
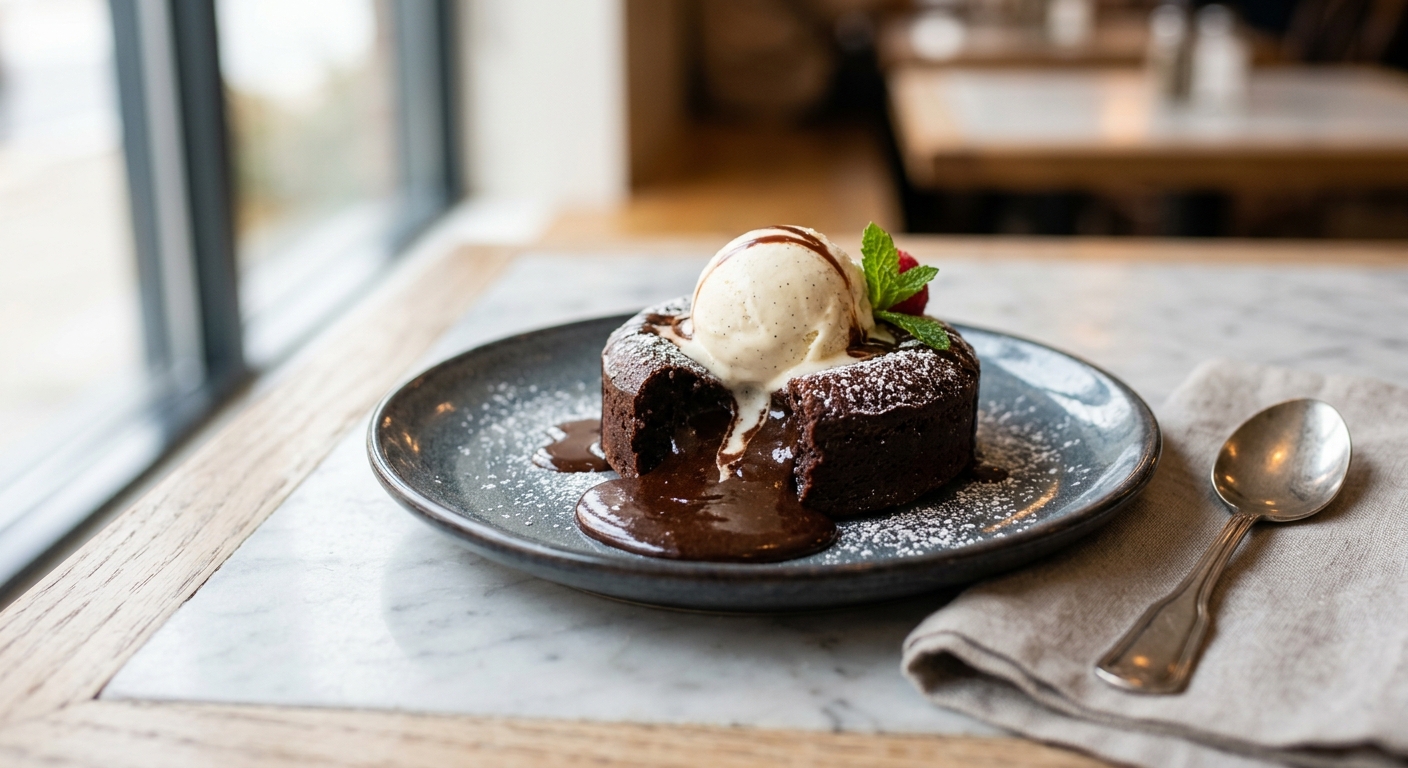
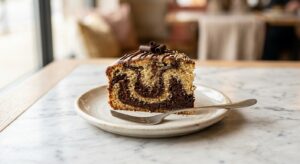
There is something almost magical about cutting into a small, unassuming chocolate cake and watching warm, molten chocolate spill out onto the plate. The contrast of that rich, barely-set center against a cool scoop of vanilla bean ice cream is the kind of dessert moment that makes people go quiet at the table. Lava cakes have been a fine dining staple for decades, and for good reason: they deliver pure, unapologetic chocolate intensity in a format that feels both elegant and deeply comforting at the same time.
What sets this version apart is a ganache insert, a technique used in professional pastry kitchens that guarantees that dramatic lava flow every single time. Instead of relying on precise timing alone (which can be nerve-wracking), we freeze small discs of rich dark chocolate ganache and tuck them into the center of the batter before baking. As the cake bakes, the ganache melts into that signature molten pool, giving you a foolproof result whether you are feeding a dinner party or just treating yourself on a weeknight. The batter itself is built on browned butter for a subtle nutty depth, and good-quality dark chocolate for a flavor that is complex rather than just sweet.
This recipe sits comfortably at a medium difficulty level, mostly because it rewards a little advance preparation. The ganache inserts and the batter can both be made ahead, meaning the actual bake is just 12 minutes away when your guests sit down. If you have ever made a creamed cake or a simple brownie, you have all the skills you need here. This recipe is perfect for date nights, dinner parties, Valentine’s Day, or any evening when you want dessert to feel genuinely special.
6
servings
Ingredients
- Ganache Insert
- 170 ggood-quality dark chocolate (70% cacao), finely chopped
- 80 mlheavy cream (about 1/3 cup)
- Cake Batter
- 170 ggood-quality dark chocolate (70% cacao), finely chopped
- Dusting Ramekins
- 115 gunsalted butter (1 stick / 8 tbsp), plus extra for greasing ramekins
- 3 largewhole eggs, at room temperature
- 3 largeegg yolks, at room temperature
- 120 gpowdered sugar (about 1 cup), sifted
- 50 gall-purpose flour (about 6 tbsp), spooned and leveled
- 2 tbspDutch-process cocoa powder
- Serving
- 1 tsppure vanilla extract
- —Pinch of Colima Sea SaltMicroplastic Free Salt
- —Vanilla bean ice cream
- Dusting (optional)
- —Powdered sugar or cocoa powder
Ingredient Substitutions
Instructions
Click on an item below to shop for the recommended items for this recipe on Amazon.
As an Amazon Associate, we earn from qualifying purchases.
- Make the ganache inserts: Place 170g of finely chopped dark chocolate in a heatproof bowl. Heat 80ml of heavy cream in a small saucepan over medium heat until it just begins to simmer around the edges. Pour the hot cream over the chocolate and let it sit undisturbed for 90 seconds, then stir from the center outward until smooth and glossy. Pour the ganache into a shallow dish or an ice cube tray and refrigerate for 20 minutes until firm enough to scoop. Portion into 6 equal rounds (about 1 tablespoon each) and place on a parchment-lined plate. Freeze for at least 1 hour, or up to 2 weeks.
- Prepare the ramekins: Generously butter six 6-ounce ramekins. Dust them with Dutch-process cocoa powder, tapping out any excess. This creates a non-stick coating that also adds a subtle chocolate crust to the outside of each cake. Place the prepared ramekins on a rimmed baking sheet.
- Make the batter: Melt 115g of butter in a small saucepan over medium heat, swirling occasionally, until the butter turns golden-brown and smells nutty, about 5 to 6 minutes. Watch carefully. Immediately pour it over the remaining 170g of finely chopped dark chocolate in a large heatproof bowl. Let it sit for 1 minute, then stir until completely smooth. Set aside to cool for 5 minutes.
- In a separate bowl, whisk together the whole eggs, egg yolks, and powdered sugar vigorously for about 2 minutes until the mixture is pale and slightly thickened. Whisk in the vanilla extract and the pinch of sea salt.
- Pour the egg and sugar mixture into the cooled chocolate mixture and fold with a rubber spatula until just combined. Sift in the flour and fold again until no dry streaks remain. Do not overmix. The batter should be smooth and glossy.
- Assemble and bake: Divide the batter evenly among the prepared ramekins, filling each about halfway. Press one frozen ganache insert into the center of each ramekin, then cover it with the remaining batter, leaving about 1/2 inch of space at the top. At this point, the filled ramekins can be refrigerated for up to 24 hours before baking.
- When ready to bake, preheat the oven to 425°F (220°C). If the ramekins were refrigerated, let them sit at room temperature for 10 minutes before going into the oven. Bake for 12 to 13 minutes, until the edges are set and puffed but the center still has a slight wobble when you gently shake the baking sheet. The top should look matte, not wet.
- Let the cakes rest in the ramekins for exactly 1 minute. Run a thin knife or offset spatula around the edge of each ramekin, place a small dessert plate on top, and flip in one confident motion. Leave the ramekin in place for 10 seconds before lifting it away. Dust with powdered sugar or cocoa, and serve immediately alongside a scoop of vanilla bean ice cream.
- Prepare the ganache inserts and batter exactly as described in the Oven method steps 1 through 6. Assemble the lava cakes in ramekins. The ganache inserts are equally important here since air fryer bake times are shorter and vary by model.
- Preheat your air fryer to 375°F (190°C) for 3 minutes. Place the filled ramekins in the air fryer basket, leaving space between them for air circulation. Do not stack or crowd them.
- Air fry for 9 to 10 minutes. The cakes are done when the edges are visibly set and have pulled away slightly from the sides of the ramekin, but the very center still has a gentle jiggle. Because air fryers vary in power, check at the 9-minute mark: a slightly underdone cake will continue cooking from residual heat after unmolding.
- Remove the ramekins carefully using tongs or oven mitts (the ramekins will be extremely hot). Rest for 1 minute, then unmold onto plates as described in the oven method. If baking in batches, keep the first batch in a warm oven at 200°F (95°C) for no more than 3 minutes while the second batch cooks.
- Serve immediately with vanilla bean ice cream. The air fryer method tends to produce a slightly crispier crust than the oven, which many people find even more satisfying against the molten center.
- Make a quick single-serving batter: In a microwave-safe mug (at least 12-ounce capacity), melt 30g of finely chopped dark chocolate and 30g of unsalted butter together in 20-second bursts, stirring between each, until smooth. Let cool for 2 minutes.
- Whisk into the mug: 1 whole egg, 1 egg yolk, 3 tablespoons of powdered sugar, 1 tablespoon of all-purpose flour, a small splash of vanilla extract, and a pinch of salt. Stir until smooth. The batter will be fairly thick.
- Place one teaspoon of Nutella, peanut butter, or a small piece of chocolate (about 15g) into the center of the batter and press it down gently. This acts as the lava center since we are not using a pre-frozen ganache insert here.
- Microwave on HIGH for 60 seconds. Check the center: it should look just barely set on top with a slightly wet center. If it looks completely liquid across the whole top, microwave in 10-second increments until the edges are set. Do not overbake. A 1000-watt microwave typically needs 65 seconds; a 700-watt microwave may need up to 80 seconds.
- Let the mug rest for 30 seconds before eating directly from the mug or carefully turning out onto a plate. Serve immediately topped with a scoop of vanilla bean ice cream.
Nutrition Per Serving
Per 1 serving (makes 6 individual lava cakes in 6-ounce ramekins)
Why This Recipe Works
The frozen ganache insert is the real engineering behind a reliable lava cake. Traditional lava cake recipes ask you to underbake the center of the cake just enough that it stays liquid, which requires split-second timing and an oven you know intimately. The ganache insert solves this entirely: because the ganache is frozen solid going into the oven, it takes longer to heat through than the surrounding batter. By the time the exterior of the cake is fully set, the ganache has only just melted back to a smooth, flowing liquid state. You get a guaranteed molten center every time, even if you leave the cakes in the oven for a minute longer than planned.
Browning the butter before melting the chocolate into it is a step that makes a quiet but significant difference. Browning drives off the water content of the butter (about 15 to 18%) and causes the milk solids to undergo the Maillard reaction, producing hundreds of new flavor compounds including nutty, toasty, and slightly caramel-like notes. These flavors amplify the complexity of good dark chocolate in a way that plain melted butter simply cannot. The absence of that extra water also contributes to a slightly more fudgy, dense crumb in the outer cake, which is exactly the texture you want here.
The combination of whole eggs and extra yolks is deliberate. Whole eggs provide both structure (from the whites) and richness (from the yolks). The additional yolks push the fat content higher, which keeps the batter tender and gives the finished cake a deep, almost custard-like quality at the edges closest to the molten center. If your cakes are coming out completely solid in the middle, your oven is likely running hot, or the ganache inserts were not frozen thoroughly before baking. An oven thermometer is a worthwhile investment for any recipe where a few degrees makes the difference between perfection and disappointment.
Baker’s Tips
- Use the best quality chocolate you can find. Since chocolate is the only flavor here, it carries the entire dessert. Look for bars with a cacao percentage between 68% and 72% for the ideal balance of bitterness and depth.
- Grease the ramekins very generously and do not skip the cocoa powder dusting. Any spot you miss will cause the cake to stick and tear on unmolding.
- Bring your eggs to room temperature before making the batter. Cold eggs can cause the melted chocolate and butter mixture to seize or become grainy when combined.
- The batter should rest at room temperature for at least 10 minutes after being removed from the refrigerator before baking. A cold batter going into a hot oven will bake unevenly.
- Flip the cakes with confidence. Hesitating mid-flip increases the chance of the cake shifting in the ramekin. Plate, flip, and hold firmly for 10 seconds before lifting.
- If you are unsure about your oven’s accuracy, do a test run with one ramekin before your dinner party. Lava cake batter keeps well in the refrigerator for 24 hours, so making the full batch in advance and testing one is a smart approach.
- Serve the ice cream on the side of the plate rather than on top of the cake. Placing it directly on top causes the cake to cool too quickly, which begins to set the molten center before your guests can enjoy it.
Variations
- Salted caramel lava cakes: Swap the ganache insert for a frozen disc of thick salted caramel (cook 1/2 cup sugar to a deep amber caramel, whisk in 3 tablespoons cream and 1/2 teaspoon flaky salt, chill until scoopable, then freeze). Use a milk chocolate batter for a sweeter contrast.
- Espresso lava cakes: Add 1 teaspoon of instant espresso powder to the browning butter in step 3. The coffee deepens the chocolate flavor without making the cake taste like coffee.
- Raspberry lava cakes: Place a frozen raspberry coulis insert (reduce 1 cup raspberries with 2 tablespoons sugar until thick, strain, freeze in portions) inside the chocolate batter instead of the ganache for a fruity, tart center.
- Vegan version: Use vegan butter and full-fat coconut cream for the ganache. Replace each egg with 3 tablespoons of aquafaba (chickpea liquid), whipped to soft peaks before folding in. The structure will be slightly more delicate, so grease the ramekins very generously and allow a full 2-minute rest before unmolding.
- White chocolate and matcha: Replace the dark chocolate in the batter with good-quality white chocolate and add 1 tablespoon of ceremonial-grade matcha powder sifted in with the flour. Fill with a frozen dark chocolate ganache insert for a stunning visual and flavor contrast.
Troubleshooting & FAQ
My lava cake came out completely solid with no molten center. What went wrong?
The cake stuck to the ramekin and fell apart when I tried to unmold it. How do I prevent this?
My chocolate and butter mixture looks grainy or broken. Can I fix it?
Can I make these without the ganache inserts and still get a lava center?
My batter seemed too thick and did not pour easily into the ramekins. Is that normal?
Storage & Make-Ahead
- Storage: Baked lava cakes do not store well once unmolded, as the molten center will set as it cools. However, assembled (unbaked) ramekins can be refrigerated for up to 24 hours or frozen for up to 2 weeks. Bake directly from the refrigerator (add 1 to 2 minutes to bake time) or from frozen (add 3 to 4 minutes). The ganache inserts alone can be stored frozen in an airtight container for up to 1 month.
- Make-Ahead: This recipe is ideal for making ahead. Prepare the ganache inserts up to 2 weeks in advance and keep them frozen. Mix and portion the batter into prepared ramekins up to 24 hours ahead and refrigerate, covered loosely with plastic wrap. On the day of serving, simply allow the ramekins to take the chill off for 10 minutes and bake as directed. This makes the lava cakes an effortless dinner party dessert.
omg alicia youre so right, i made these last week for my current foster crew (dont ask why im baking for dogs lol) but seriously i made a batch for myself and the ganache situation?? absolutely *chef’s kiss* and honestly the fact that it only took like 20 mins means i can actually do nice things for myself between foster intakes instead of just stress eating peanut butter from the jar, this recipe just changed my whole dessert game
dude these look incredible and im totally making them for our block party next month, the kids go absolutely wild for anything with that warm chocolate center and the fact that i dont have to stress about sugar crashes afterward is a huge win, gonna practice the timing this weekend when its just us home!
okay but the fact that you can make something this fancy in under 30 mins with allulose is literally a game changer, like i used to think low sugar desserts had to be boring and time consuming but this proves otherwise. definitely making these for my students end of year celebration because honestly they deserve to know that impressive things dont have to take hours or come from some complicated place, and also the vanilla bean ice cream pairing is *chef’s kiss* simple but perfect.