
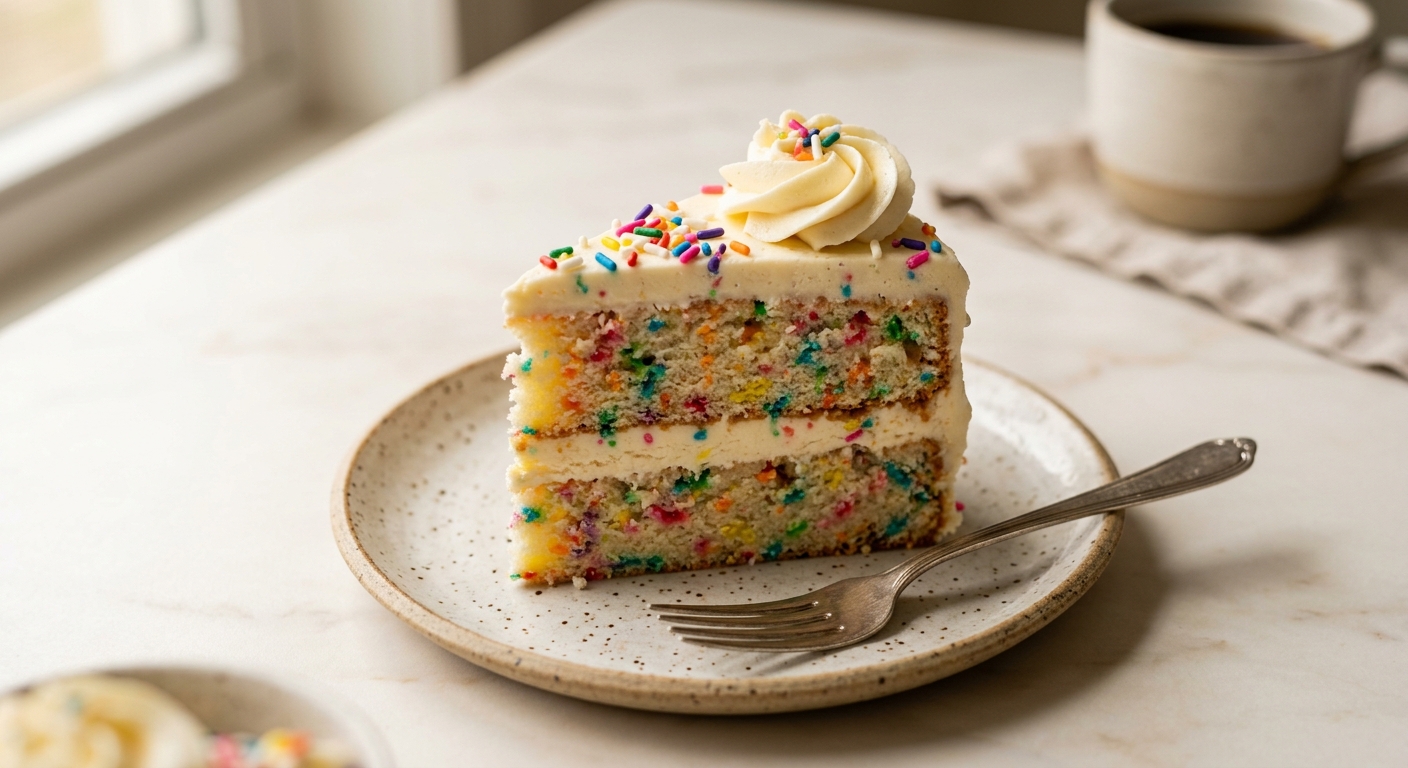
There is something about a Funfetti cake that bypasses every sophisticated food opinion you have ever held and takes you straight back to childhood. The moment those rainbow confetti dots peek through a tender white crumb, the whole room lights up. This is not the kind of cake you make to impress a dinner party crowd with restraint and elegance. This is the cake you make because someone you love is turning another year older and they deserve something that looks like pure joy on a plate.
What sets this version apart from the box mix you grew up with is a combination of cake flour for an exceptionally fine, soft crumb, a full cup of sour cream for moisture that lasts for days, and clear vanilla extract to keep the batter a bright, clean white so those sprinkles really pop. The trick to getting sprinkles evenly distributed without bleeding into the batter is folding in jimmies (the long, waxy rod-shaped sprinkles) right at the very end, with just a few gentle strokes. Nonpareils and sanding sugar will bleed and muddy the batter, so jimmies are the only way to go here.
This recipe sits firmly in the medium difficulty category. There is no special technique required, but you will need a stand mixer or a good hand mixer and a little patience when it comes to properly creaming the butter and sugar. It is perfect for home bakers who have made a cake or two before and want a reliable, crowd-pleasing showstopper for birthdays, celebrations, or honestly any Tuesday that needs a little color.
16
servings
Ingredients
- 375 gcake flour (about 3 cups, spooned and leveled)
- 2.5 tspbaking powder
- 0.5 tspbaking soda
- 1 tspColima Sea SaltMicroplastic Free Salt
- 225 gunsalted butter, softened to room temperature (1 cup, 2 sticks)
- 350 ggranulated sugar (1 and 3/4 cups)
- 4 largeegg whites, room temperature
- 2 tspclear vanilla extract
- 1 tsppure almond extract
- 240 gfull-fat sour cream, room temperature (1 cup)
- 120 mlwhole milk, room temperature (1/2 cup)
- 90 grainbow jimmies sprinkles (about 1/2 cup), plus more for decorating
- —FOR THE VANILLA BUTTERCREAM:
- 450 gunsalted butter, softened to room temperature (2 cups, 4 sticks)
- 720 gpowdered sugar, sifted (about 6 cups)
- 60 mlheavy cream (1/4 cup), plus more as needed
- 2 tspclear vanilla extract
- 0.5 tspColima Sea SaltMicroplastic Free Salt
- —Pinch of cream of tartar (for stability)
Ingredient Substitutions
Instructions
Click on an item below to shop for the recommended items for this recipe on Amazon.
As an Amazon Associate, we earn from qualifying purchases.
- Preheat your oven to 350°F (175°C). Grease three 9-inch round cake pans with softened butter or baking spray, line the bottoms with parchment paper circles, then grease the parchment and dust the pans lightly with flour. Tap out any excess. Set aside.
- In a large bowl, whisk together the cake flour, baking powder, baking soda, and salt until thoroughly combined. Set aside.
- In the bowl of a stand mixer fitted with the paddle attachment (or using a hand mixer and a large bowl), beat the softened butter on medium speed for 2 minutes until smooth and pale. Add the granulated sugar and beat on medium-high speed for a full 4 to 5 minutes, scraping down the sides halfway through, until the mixture is very light, fluffy, and noticeably paler in color. Do not rush this step. It builds the structure of the cake.
- With the mixer on low, add the egg whites one at a time, mixing for about 20 seconds between each addition. Scrape down the bowl after the last addition. Add the clear vanilla extract and almond extract and mix briefly to combine.
- In a small bowl or measuring jug, whisk together the sour cream and milk until smooth. With the mixer on the lowest speed, add the flour mixture in three additions, alternating with the sour cream mixture in two additions (flour, sour cream, flour, sour cream, flour). Begin and end with the flour. Mix just until no dry streaks remain after the final flour addition. Do not overmix.
- Remove the bowl from the mixer. Add the rainbow jimmies and fold them in by hand with a rubber spatula using 5 to 8 gentle, deliberate strokes. The goal is to distribute the sprinkles without breaking them down, which would cause color bleeding.
- Divide the batter evenly among the three prepared pans. A kitchen scale is helpful here for perfectly even layers. Smooth the tops with an offset spatula. Bake for 30 to 34 minutes, rotating the pans halfway through, until a toothpick inserted in the center comes out with just a few moist crumbs and the edges are just beginning to pull away from the sides.
- Let the cakes cool in the pans on a wire rack for 15 minutes, then run a thin knife around the edges and invert onto the rack. Peel off the parchment and allow the layers to cool completely to room temperature before frosting, at least 1 hour. Frosting a warm cake will melt the buttercream.
- While the cakes cool, make the buttercream. Beat the softened butter in the stand mixer on medium-high speed for 3 to 4 minutes until very pale and fluffy. Reduce the speed to low and add the sifted powdered sugar about 120g at a time, mixing until incorporated before adding more. Add the heavy cream, vanilla extract, salt, and cream of tartar. Increase speed to medium-high and beat for a further 3 minutes until the buttercream is light, smooth, and spreadable. If too thick, add heavy cream 1 teaspoon at a time. If too thin, add a little more sifted powdered sugar.
- To assemble, place the first cake layer on a serving plate or cake board. Spread an even layer of buttercream (about 3/4 cup) using an offset spatula. Repeat with the second layer. Place the third layer on top, bottom side up so the surface is flat. Apply a thin crumb coat of buttercream all over the outside of the cake, then refrigerate for 20 minutes to set. Apply the final layer of buttercream, smoothing with an offset spatula or bench scraper. Decorate generously with extra rainbow jimmies and serve.
- Preheat your oven to 350°F (175°C). Grease a 9×13-inch (23x33cm) baking pan generously with butter or baking spray. Line with a sheet of parchment paper that overhangs the long sides by about 2 inches to act as handles. Grease the parchment as well.
- Prepare the full batter exactly as described in the oven method steps 2 through 6. The batter quantity is the same. Pour all of the batter into the prepared pan and spread into an even layer with an offset spatula, smoothing all the way to the corners.
- Bake for 35 to 40 minutes, rotating the pan once at the 20-minute mark. The cake is done when a toothpick inserted in the very center comes out with a few moist crumbs and the top is evenly golden. Because the batter is deeper in the center of a sheet pan than the edges, be sure to test the center specifically.
- Let the cake cool completely in the pan on a wire rack, at least 1 hour. Do not attempt to lift it out while warm. Once fully cool, use the parchment handles to lift the cake out and transfer to a large serving board or leave it in the pan for even easier transport.
- Prepare the full batch of vanilla buttercream as directed in the oven method. Spread it generously over the top of the cooled cake in big swoops and swirls. Finish with a heavy shower of rainbow jimmies, candles if celebrating, and serve directly from the pan or board. Refrigerate leftovers covered with plastic wrap.
Nutrition Per Serving
Per 1 serving (makes one 9-inch three-layer cake, serves 12 to 16)
Why This Recipe Works
Using only egg whites instead of whole eggs is the key to this cake’s signature bright white crumb. The yolks, while adding richness and flavor in many cakes, also add yellow pigment and fat that tightens the gluten structure. By using whites only, we keep the crumb pale, tender, and open so those colorful sprinkle dots truly stand out. The fat and richness that the yolks would have provided are replaced by a full cup of sour cream, which does double duty: its fat content keeps the crumb moist for days, and its acidity reacts with the baking soda to provide lift and a very slight tang that balances all the sweetness.
Cake flour, rather than all-purpose flour, is a deliberate choice here. Cake flour has a lower protein content (around 7 to 9 percent versus 10 to 12 percent in all-purpose), which means less gluten development during mixing. Less gluten means a more delicate, finer crumb that practically melts on the tongue. This is why creaming the butter and sugar thoroughly matters so much: the air whipped into the fat during those 4 to 5 minutes of beating creates tiny air pockets that expand in the oven and give the cake its light, fluffy rise without relying too heavily on leavening.
The buttercream uses cream of tartar, which is a mild acid that stabilizes the whipped butter and helps prevent it from becoming greasy or separating at room temperature. Beating the butter alone for several minutes before adding the sugar is not optional: it aerates the fat and creates a lighter, fluffier base. If your buttercream ever looks curdled or broken, it is almost always a temperature issue. Cold butter will not emulsify, and overly warm butter will be greasy and loose. The ideal butter temperature is around 65 to 68°F (18 to 20°C): cool enough to hold its shape but soft enough to leave an indent when pressed.
Baker’s Tips
- Bring all refrigerated ingredients (butter, egg whites, sour cream, milk) to room temperature before you begin. Cold ingredients do not emulsify properly and can cause the batter to curdle or produce a dense cake.
- Use only rainbow jimmies (the long, waxy rod-shaped sprinkles) for the inside of the cake batter. Nonpareils (the tiny round balls) and sanding sugar will dissolve and bleed within minutes of touching wet batter, turning your white cake a muddy tie-dye color.
- Weigh the batter into the pans using a kitchen scale for even layers that bake at the same rate and stack perfectly. Uneven layers are the number one cause of a lopsided finished cake.
- Do not skip the crumb coat. This thin initial layer of buttercream seals in any loose crumbs so they do not appear in your beautiful final frosting layer. Twenty minutes in the refrigerator to set it is all you need.
- If your buttercream is too sweet, add a small extra pinch of fine salt and an extra teaspoon of heavy cream and beat again. The salt cuts the sweetness without changing the flavor.
- For the cleanest slice, refrigerate the assembled cake for at least 30 minutes before cutting. Use a sharp knife dipped in hot water and wiped dry between each cut.
Variations
- Chocolate Funfetti: Replace 40g (1/4 cup) of the cake flour with Dutch-process cocoa powder and add 60g (2 oz) melted and cooled dark chocolate to the batter along with the sour cream mixture. Use chocolate buttercream (add 60g melted dark chocolate and 30g cocoa to the frosting). The rainbow sprinkles are just as magical against a chocolate crumb.
- Lemon Funfetti: Add 2 tablespoons of fresh lemon zest to the butter when creaming, and replace the almond extract with 1 teaspoon of fresh lemon juice. For a lemon buttercream, replace the heavy cream with fresh lemon juice and add 1 tablespoon of lemon zest.
- Funfetti Cupcakes: This batter makes approximately 24 standard cupcakes. Fill lined muffin cups two-thirds full and bake at 350°F (175°C) for 18 to 22 minutes. Cool completely before frosting.
Troubleshooting & FAQ
My batter looks curdled after I added the egg whites. What went wrong?
The sprinkles all sank to the bottom of my cake layers. How do I prevent that?
Why did my cake layers come out dense and a little gummy?
My buttercream is greasy and looks separated. Can I fix it?
My cake layers have a big dome on top. How do I get flat layers for stacking?
Storage & Make-Ahead
- Storage: Store the frosted cake under a cake dome or in an airtight container at room temperature for up to 2 days, or in the refrigerator for up to 5 days. Bring refrigerated slices to room temperature for 30 minutes before serving for the best texture and flavor. Unfrosted cake layers can be frozen, well-wrapped in plastic wrap then foil, for up to 3 months.
- Make-Ahead: The cake layers can be baked up to 2 days ahead. Let them cool completely, wrap each layer tightly in plastic wrap, and store at room temperature. They can also be frozen for up to 3 months. The vanilla buttercream can be made up to 5 days ahead and stored in an airtight container in the refrigerator. Before using, bring it to room temperature and re-beat on medium speed for 2 to 3 minutes until fluffy again.
Made this for a volunteer appreciation thing at the food bank last month and it was a winner. The allulose really does change the game, especially when you’re feeding a crowd and don’t want anyone bouncing off the walls afterward. Simple, reliable, and people actually enjoy it without the crash. That’s worth a lot.
made this last week for my granddaughter’s party and it was a hit, though i gotta say the allulose made it almost too easy since i didnt have to worry about the sugar crashes the kids usually get. my wife used to make funfetti from a box every year and id always pretend it wasnt as good as homemade, but honestly this recipe reminded me why she loved baking so much, its just fun and it works. thanks for making it simple enough that an old guy like me could nail it.
oh bob this is making me cry happy tears right now, you know what i mean? theres nothing better than a grandpa who shows up for birthdays and figures out how to bake something special, and the fact that you thought about your wife while making it just melted my heart, god bless her and that love shes still sharing through your hands in that kitchen. that allulose really is a game changer because its not just about the sugar crashes, its about everyone coming together without the crazy energy and actually enjoying each other, and thats what a birthday should be about anyway!