
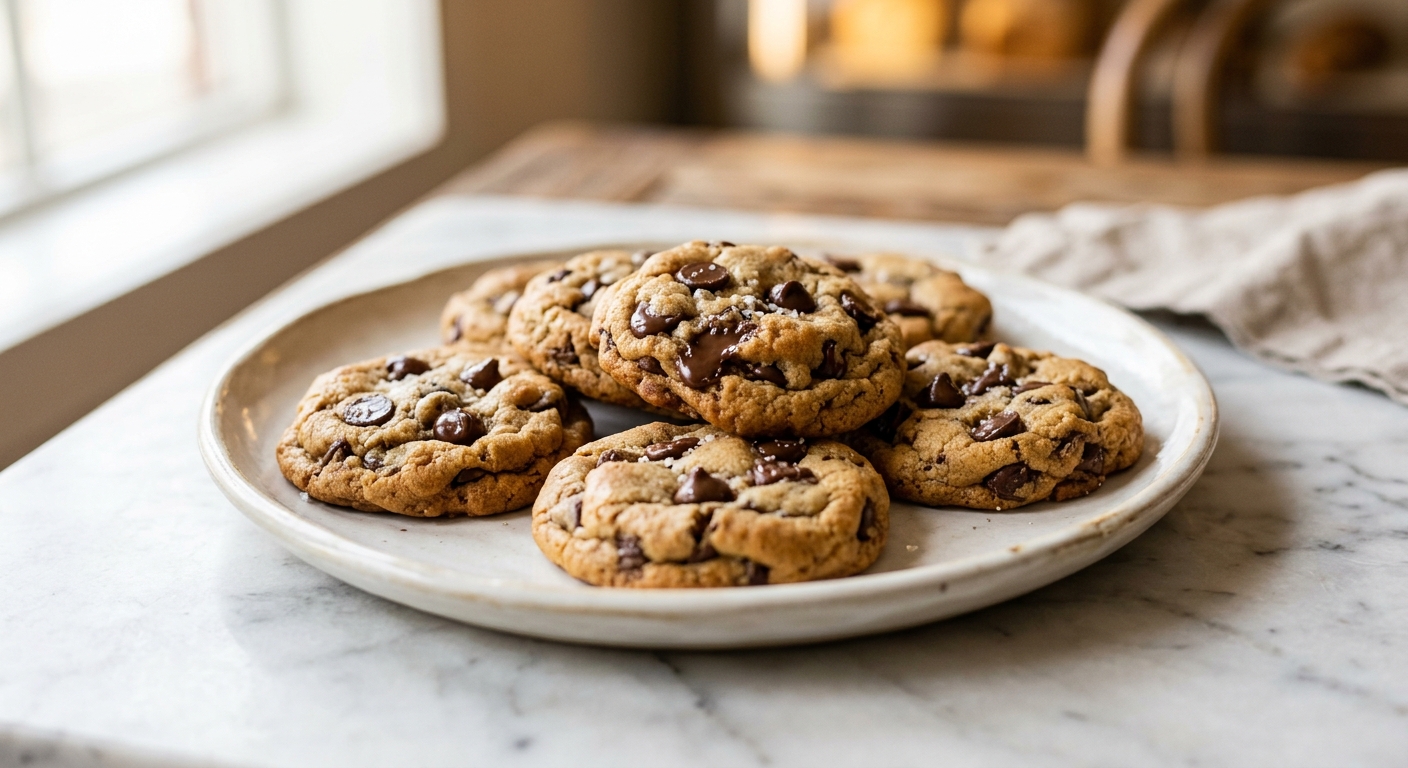
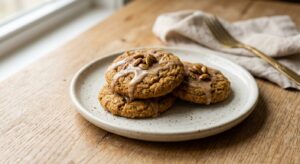
Close your eyes and picture the ideal chocolate chip cookie: crisp at the edges, pillowy and chewy in the center, with deep caramel-like warmth and pools of chocolate that stretch when you pull it apart. Now imagine that cookie asks nothing of your blood sugar. That is exactly what these allulose chocolate chip cookies deliver, and honestly, the first time you bite into one, you might do a double-take to make sure you grabbed the right batch.
What makes this recipe genuinely different from most sugar-free cookie attempts is the sweetener choice: allulose. Unlike allulose, which can crystallize and leave a gritty texture or cooling sensation, allulose behaves almost identically to table sugar in baking. It draws moisture into the cookie, promotes Maillard browning, and keeps the crumb soft and pliable even after the cookies cool completely. The result is a cookie with the authentic chewy texture that most sugar-free recipes simply cannot achieve. A touch of molasses deepens the flavor and adds that familiar brown-sugar warmth without meaningfully affecting the glycemic load.
These cookies sit firmly in the easy to medium range of difficulty. If you have ever made a standard chocolate chip cookie, you already know how to make these. They are perfect for anyone managing blood sugar who refuses to settle for sad, cakey imitations, and they are equally wonderful for sharing with friends who will never guess they are sugar-free.
20
servings
Ingredients
- 240 gall-purpose flour (about 1 3/4 cups, spooned and leveled)
- 1 tspbaking soda
- 1 tspColima Sea SaltMicroplastic Free Salt
- 170 gunsalted butter, softened to room temperature (3/4 cup or 1.5 sticks)
- 200 ggranular allulose (about 1 cup)
- 50 gpowdered allulose (about 1/4 cup, for finer texture and bind)
- 1 tspunsulfured molasses (optional but recommended for brown-sugar depth)
- 2 largeeggs, at room temperature
- 2 tsppure vanilla extract
- 200 gsugar-free dark chocolate chips (such as Lily’s or ChocZero, about 1 1/4 cups)
Ingredient Substitutions
Instructions
Click on an item below to shop for the recommended items for this recipe on Amazon.
As an Amazon Associate, we earn from qualifying purchases.
- Whisk together the flour, baking soda, and salt in a medium bowl. Set aside.
- In the bowl of a stand mixer fitted with the paddle attachment (or using a hand mixer), beat the softened butter, granular allulose, and powdered allulose on medium-high speed for 3 full minutes, until the mixture is pale, fluffy, and noticeably increased in volume. Scrape down the bowl halfway through. This extended creaming step is important: allulose does not cream quite as efficiently as sugar, so giving it extra time builds the air structure your cookies need.
- Add the molasses (if using), eggs one at a time, and vanilla extract. Beat on medium speed after each addition until fully incorporated, about 30 seconds each. Scrape down the bowl and beat for another 20 seconds until the mixture is smooth and cohesive.
- Add the flour mixture all at once and mix on low speed just until no dry streaks remain, about 20 to 30 seconds. Do not overmix. Fold in the chocolate chips by hand with a spatula.
- Cover the bowl and refrigerate the dough for at least 30 minutes, or up to 48 hours. Chilling firms the butter, reduces excess spread, and allows the flour to hydrate fully for a chewier texture. Do not skip this step.
- When ready to bake, preheat your oven to 375°F (190°C). Line two large baking sheets with parchment paper. Scoop dough into balls of about 40g each (about 1.5 tablespoons) and place them 2.5 inches apart on the prepared sheets.
- Bake one sheet at a time on the center rack for 11 to 13 minutes. The cookies are done when the edges are set and golden and the centers look slightly underdone and glossy. They will firm up considerably as they cool. Remove from the oven and immediately use a large round cookie cutter or the back of a spoon to nudge any irregular edges into a rounder shape while still hot.
- Let the cookies rest on the baking sheet for 5 minutes before transferring to a wire cooling rack. They need this time to set; moving them too early will cause them to fall apart. Cool for at least 10 minutes before eating for the best chewy texture.
- Prepare the cookie dough through Step 5 of the oven method, including the 30-minute chill.
- Cut a piece of parchment paper to fit your air fryer basket, leaving about half an inch of clearance from the sides to allow airflow. Do not use a full sheet that blocks the basket edges.
- Preheat the air fryer to 325°F (163°C) for 3 minutes. Allulose browns more quickly than sugar under direct dry heat, so a lower temperature than you might expect is important here. Baking at a higher temperature risks dark edges before the center is set.
- Scoop 3 to 4 dough balls (40g each) into the prepared basket, spacing them at least 2 inches apart. Air fryers vary in size; do not overcrowd or the cookies will bake unevenly.
- Air fry for 7 to 9 minutes, checking at 7 minutes. The cookies are done when the edges are golden and set but the centers still look slightly soft and underdone. They will continue cooking from residual heat after you remove them.
- Carefully slide the parchment with the cookies onto a flat surface and let them rest for 8 to 10 minutes before moving. Air-fryer cookies set more firmly as they cool than oven-baked ones and need this resting period to become cohesive. Repeat with remaining dough.
- Heat-treat the flour first to make it safe to eat raw: Spread the 240g of flour on a baking sheet and bake at 350°F (175°C) for 5 minutes, or microwave in a microwave-safe bowl in 30-second intervals, stirring between each, until a thermometer reads 165°F (74°C) throughout. Let it cool completely before using.
- Beat the softened butter, granular allulose, and powdered allulose together with a hand mixer or in a stand mixer for 3 minutes until light and fluffy. Add the vanilla extract and molasses (if using). Do not add eggs, as this version is not baked.
- Add 3 tablespoons of heavy cream or unsweetened almond milk to loosen the mixture slightly and add moisture that the eggs would normally provide. Mix briefly to combine.
- Add the cooled heat-treated flour and mix on low until a soft dough comes together. Fold in the sugar-free chocolate chips. The dough will be slightly softer than traditional cookie dough.
- Scoop into 20 balls (about 35g each) and place on a parchment-lined tray. Press each one gently to flatten into a disk shape, or leave as rounds. Freeze for 30 minutes until firm.
- Transfer to an airtight container with parchment between layers. Store in the freezer for up to 2 months or in the refrigerator for up to 1 week. Eat straight from the freezer for a firm, fudgy bite, or let sit at room temperature for 5 minutes for a softer texture.
Nutrition Per Serving
Per 1 serving (makes about 20 cookies (2.5 inches each))
Sweetener: allulose
Why This Recipe Works
The star ingredient here is allulose, a rare sugar found naturally in small amounts in figs and raisins. Chemically, it is a monosaccharide like fructose, but the human body does not metabolize it for energy, which means it contributes virtually no calories or glycemic impact. What makes it remarkable for baking is how closely it mirrors the functional behavior of sucrose: it dissolves readily, promotes Maillard browning (the chemical reaction responsible for golden color and complex flavor), and is hygroscopic, meaning it attracts and retains moisture from the air. That last property is exactly why these cookies stay chewy and soft for days rather than drying out or becoming gritty, which is the common fate of cookies made with allulose.
The combination of granular and powdered allulose serves two distinct purposes. The granular version creams with the butter to create air pockets and contributes to spread and structure, while the powdered form dissolves more completely into the dough and provides a finer, more cohesive texture that helps the cookies hold together after baking. Chilling the dough is non-negotiable: it solidifies the fat so the cookies spread slowly and evenly in the oven, giving the exterior time to set before the center collapses. It also allows the flour proteins to fully hydrate, contributing directly to that desirable chewy bite. Baking at a slightly higher temperature (375°F rather than 350°F) sets the edges quickly while leaving the center just underdone, which translates to a perfectly gooey result once the residual heat finishes the job on the cooling rack.
If your cookies spread too thin, the butter was likely too warm when you started, or the dough was not chilled long enough. If they come out cakey rather than chewy, the dough was overmixed after adding the flour, which develops too much gluten, or there was too much flour measured in by volume. Always weigh your flour for consistent results. If the edges are darkening too fast before the centers set, your oven may run hot: lower the temperature by 10 to 15 degrees and add a minute or two to the bake time.
Baker’s Tips
- Weigh your ingredients, especially the flour and allulose. Volume measurements for flour can vary by up to 20 percent depending on how the flour is packed, which makes a significant difference in cookie texture.
- Do not skip the 30-minute chill. Allulose-based doughs tend to spread more than sugar-based doughs because allulose has a lower melting point. Chilled dough spreads slowly and evenly, giving you thicker, chewier cookies.
- Pull the cookies out when the centers still look underdone and glossy. They will set completely as they cool on the pan. Fully set cookies in the oven will be overdone once they cool.
- Allulose browns faster than regular sugar, especially in dry-heat environments like air fryers. Watch your first batch carefully and adjust your oven temperature down by 10 to 15 degrees if you notice the edges darkening before the centers are set.
- Let the butter reach true room temperature before beating: it should yield easily when pressed but not be shiny or greasy. Cold butter will not cream properly; melted butter will make the cookies spread flat.
- Press a few extra chocolate chips onto the tops of each dough ball just before baking for a bakery-style look with visible chocolate on every cookie.
- For the chewiest result, store the cooled cookies in an airtight container with a small piece of parchment paper. They actually improve in texture on day 2 as the allulose continues to draw in ambient moisture.
Variations
- Brown butter version: Melt the butter in a saucepan over medium heat, swirling until golden and nutty-smelling, about 5 minutes. Pour into a bowl, cool until solid (refrigerate for 30 minutes), then use in place of softened butter. The cookies will have a deeper, nuttier flavor.
- Double chocolate: Replace 30g of flour with 30g of unsweetened cocoa powder and use a mix of sugar-free dark and white chocolate chips for a rich, fudgy cookie.
- Sea salt and espresso: Add 1 teaspoon of espresso powder to the dough and finish each cookie with a pinch of flaky sea salt right before baking for a sophisticated, cafe-style result.
- Gluten-free: Substitute a measure-for-measure gluten-free flour blend at the same weight (240g) and chill the dough for a full hour before baking.
Troubleshooting & FAQ
My cookies spread out completely flat. What went wrong?
Why do my cookies taste slightly bitter or have an off flavor?
My cookies are cakey and puffy instead of chewy and flat. What happened?
The edges of my cookies are very dark but the centers are still underdone. How do I fix this?
My cookies hardened and became dry the next day. How do I keep them chewy?
Storage & Make-Ahead
- Storage: Store baked cookies in an airtight container at room temperature for up to 4 days. They actually improve in chewiness on day 2. Refrigerate for up to 1 week. Freeze baked cookies in a single layer, then transfer to a zip-top bag for up to 3 months. Thaw at room temperature for 20 minutes or microwave for 15 seconds.
- Make-Ahead: The cookie dough can be made up to 48 hours ahead and refrigerated, which actually improves the flavor and texture. You can also scoop the dough into balls and freeze them unbaked on a tray, then transfer to a bag and freeze for up to 3 months. Bake straight from frozen, adding 2 to 3 minutes to the bake time.


Just baked a batch this weekend and was struck by how these reminded me of tending a garden, you know? You plant the right seeds, give them what they need, and something real grows. Allulose does that for baking, it actually works with your ingredients instead of fighting them. The fact that they stay tender for days is huge, especially for folks like Lydia mentioned, sending care packages across distance. There’s something beautiful about food that travels well and tastes like it was made with intention.
oh these sound perfect, especially for our deployed families trying to send care packages that actually hold up in the mail. ive been burned by other sugar free cookies that get weird and hard or taste off after a few days, so the fact that these stay tender is huge. gonna try this for sure and honestly i bet the allulose browning thing means less weird flavors sneaking through, which is what everyone complains about right? adding this to my rotation asap.
These sound absolutely wonderful, and I love that you’re highlighting how allulose actually browns like real sugar – that makes such a difference in both taste and texture. I’ve had really good luck with allulose in cookies too, and there’s something really satisfying about baking something that feels indulgent without the guilt. The fact that they stay chewy for days is huge, especially when you’re baking for people who appreciate the care that goes into a homemade treat. Thanks for sharing this recipe!