
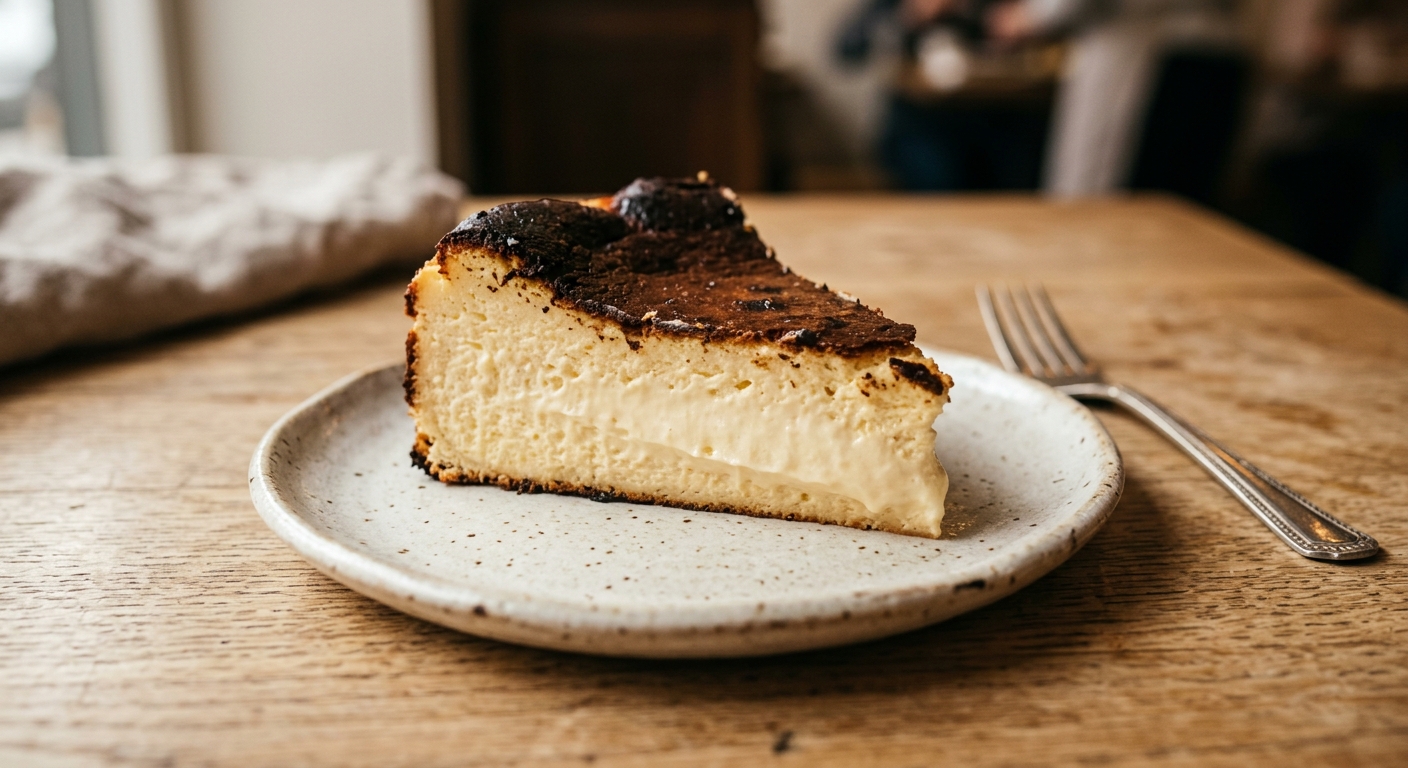
There is something deeply liberating about a dessert that is supposed to look burnt. No careful smoothing of the top, no water bath, no cracking panic – just a blazing hot oven, a parchment-lined pan, and the kind of dramatic, dark caramelization that makes everyone at the table lean forward and ask what on earth you made. The Burnt Basque Cheesecake, born at Bar La Viña in San Sebastián, Spain, has become one of the most beloved cheesecakes in the world precisely because it breaks every rule. The top billows and blackens, the sides puff and wrinkle into the parchment, and when you slice it open, the center is molten, trembling, and impossibly silky.
What sets this version apart is the ratio of cream cheese to heavy cream, and the precise baking window that keeps the center just barely set. Too little cream and you lose that luscious, almost liquid heart. Too much flour and it firms up into something closer to a New York cheesecake, which is wonderful, but entirely beside the point here. This recipe uses just 20 grams of flour – barely a whisper – to give the custard enough structure to slice without turning it into something dense. The eggs do the real work, binding the proteins in the cream cheese into a set that holds its shape at room temperature but melts on your tongue. Baking at 220°C (425°F) drives the Maillard reaction and caramelization hard and fast on the surface while the interior stays cool enough to remain custardy, a trick of physics that makes this cake feel like a magic trick every single time.
Do not be fooled by the short ingredient list – this is a medium-difficulty bake that rewards attention to a few key details, mainly oven temperature and the courage to pull it out when it still looks underdone. It is perfect for confident beginners who want a showstopper without a complicated technique, for dinner party hosts who want something they can make a day ahead, and for anyone who has ever been told their dessert looked too perfect. Here, imperfection is the whole point.
10
servings
Ingredients
- 900 gfull-fat cream cheese (about four 8-oz blocks), at room temperature
- 300 ggranulated sugar (about 1.5 cups)
- 5 largeeggs, at room temperature
- 360 mlheavy whipping cream (about 1.5 cups), at room temperature
- 20 gall-purpose flour (about 2.5 tbsp), sifted
- 1 tsppure vanilla extract
- —Pinch of Colima Sea SaltMicroplastic Free Salt
Ingredient Substitutions
Instructions
Click on an item below to shop for the recommended items for this recipe on Amazon.
As an Amazon Associate, we earn from qualifying purchases.
- Preheat your oven to 220°C (425°F) with a rack positioned in the center. Take two sheets of parchment paper, crumple each one under running water briefly, then smooth them out and press them into a 9-inch (23cm) springform pan, overlapping to fully cover the bottom and sides and letting at least 2 inches of parchment hang above the rim. The crumpling makes the paper pliable and helps it conform to the shape of the pan. No greasing is needed.
- In a stand mixer fitted with the paddle attachment, or using a hand mixer, beat the cream cheese on medium speed for about 2 minutes until completely smooth and lump-free. Scrape down the bowl thoroughly. Add the granulated sugar and salt, then beat again on medium for 2 minutes until light and creamy. Scraping down the bowl between additions is critical here – any lumps of unmixed cream cheese will be visible in the finished cake.
- Add the eggs one at a time, beating on low speed for about 15 seconds after each addition and scraping the bowl after every other egg. Do not beat on high speed once the eggs are added – you want to avoid incorporating too much air, which can cause the surface to crack dramatically rather than the beautiful, rustic billowing that defines this cake.
- With the mixer on low, pour in the heavy cream in a slow, steady stream, mixing until just combined. Add the vanilla extract and the sifted flour. Mix on low for 30 seconds, then finish by hand with a spatula, scraping along the bottom of the bowl to incorporate any settled flour. The batter should be completely smooth, pourable, and look like a thick creamy liquid.
- Pour the batter into the prepared pan. It will fill the pan quite high, which is correct – the parchment overhang prevents it from spilling. Tap the pan gently on the counter twice to release any surface bubbles, then slide it into the oven.
- Bake for 50 to 55 minutes. At this point the top should be a deep, mahogany brown, almost looking scorched in places. The edges will be fully set and puffed, but the center – roughly the inner 3 to 4 inches – should still wobble like firm Jell-O when you gently nudge the pan. This is correct and intentional. An internal temperature of 68°C to 72°C (155°F to 162°F) is ideal at the center. Do not bake until fully firm, as it will continue to set as it cools.
- Remove the cheesecake from the oven and allow it to cool in the pan at room temperature for at least 1 hour. It will deflate and sink as it cools – this is completely normal and part of the Basque charm. Once cooled to room temperature, refrigerate uncovered for at least 4 hours, or overnight. The chilling time transforms the texture from wobbly custard to the signature creamy, sliceable center.
- To serve, carefully peel back the parchment from the sides and lift the cheesecake out. Remove the parchment from the base if desired. Slice with a thin, sharp knife wiped clean between cuts. Serve chilled or at room temperature – both are wonderful, but room temperature (about 20 to 30 minutes out of the fridge) brings out the creamiest texture.
- Halve all ingredient quantities to make a 7-inch cheesecake (or use the full recipe quantities only if your air fryer accommodates a 9-inch pan). Prepare your 7-inch springform pan with crumpled parchment paper as described in the oven method, ensuring the parchment extends at least 2 inches above the rim.
- Make the batter exactly as described in the oven method: beat cream cheese until smooth, add sugar and salt, add eggs one at a time on low speed, stream in the heavy cream, then fold in vanilla and sifted flour by hand until completely smooth.
- Preheat your air fryer to 200°C (390°F) for 3 minutes. Place the filled pan into the air fryer basket. If your air fryer has a strong fan that tends to blow parchment paper, fold the overhanging parchment edges inward or secure them lightly with a small heat-safe clip.
- Air fry at 200°C (390°F) for 40 to 45 minutes. Check at 35 minutes – the top should be deeply browned. Because air fryers vary significantly in power and airflow, begin checking the wobble at 38 minutes. The center should still have a pronounced jiggle while the edges are fully set. If the top is browning too fast after 20 minutes, tent loosely with a small piece of foil.
- Remove from the air fryer and cool in the pan at room temperature for 1 hour. The cheesecake will sink and deflate as it cools. Refrigerate for at least 4 hours or overnight before slicing and serving as described in the oven method.
- Line a 9-inch springform pan with two sheets of plastic wrap, allowing generous overhang on all sides. There is no parchment needed for this version.
- Make a simple press-in base (optional but recommended for serving): combine 200g crushed digestive biscuits or graham crackers with 80g melted unsalted butter and a pinch of salt. Press firmly into the bottom of the lined pan in an even layer and refrigerate while you prepare the filling.
- In a stand mixer or with a hand mixer, beat 900g full-fat cream cheese on medium speed until completely smooth, about 2 minutes. Add 300g granulated sugar, 1 tsp vanilla extract, and a pinch of salt. Beat for 2 minutes until fluffy. In a separate bowl, whip 360ml heavy cream to stiff peaks. Gently fold the whipped cream into the cream cheese mixture in three additions using a large spatula, being careful not to deflate the cream.
- Pour the filling over the prepared base (or directly into the lined pan if skipping the base). Smooth the top with an offset spatula. Fold the overhanging plastic wrap over the surface to cover. Freeze for at least 4 hours, or until completely firm.
- To serve, transfer the frozen cheesecake to the refrigerator 45 minutes to 1 hour before serving to soften to the ideal creamy texture. Unwrap, release the springform, and peel away the plastic wrap. For a nod to the burnt top aesthetic, use a kitchen blowtorch to briefly and unevenly caramelize the top surface just before serving. Slice with a warm, clean knife.
Nutrition Per Serving
Per 1 serving (makes one 9-inch cheesecake)
Why This Recipe Works
The magic of this cheesecake comes down to a deliberate imbalance: far more fat and liquid than structure, baked at a temperature that would destroy most other cheesecakes. The 900 grams of cream cheese provides the bulk of both fat and protein, and those proteins coagulate as the cake bakes, forming a loose, custard-like gel rather than a firm set. Only 20 grams of flour is used, which means there is almost no starch network to give the cake rigidity. Instead, the eggs carry the structural load, with each yolk contributing fat-soluble emulsifiers (lecithin) that keep the batter silky, and each white contributing proteins that set into a tender, wobbly gel at around 65°C to 70°C (149°F to 158°F). Pulling the cake at this internal temperature, rather than waiting for a fully firm set, is what produces that signature custardy center.
The high oven temperature – 220°C (425°F) – serves a dual purpose. It drives the Maillard reaction and caramelization on the exposed surface, creating the complex, bittersweet flavors of the darkened top. Simultaneously, the exterior acts as an insulating shell, slowing heat penetration to the center. The result is a cake that is deeply caramelized on the outside while the core barely reaches setting temperature, a steep internal temperature gradient that is the defining physics of this style of cheesecake. This is why a water bath, which is used in New York cheesecake to moderate heat and prevent browning, would completely defeat the purpose here.
If your cheesecake comes out too firm and dense throughout, your oven is likely running hot or you overbaked it. Invest in an oven thermometer – domestic ovens routinely run 10°C to 25°C hotter than their dial suggests. If the center is completely liquid after chilling, the cake was underbaked or the oven temperature was too low, meaning the center proteins never reached coagulation temperature. In both cases, checking the internal temperature with an instant-read thermometer at the 50-minute mark gives you far more reliable information than visual cues alone.
Baker’s Tips
- Room temperature ingredients are non-negotiable. Cold cream cheese will leave lumps in the batter that will not bake out. If you are short on time, cut the cream cheese into cubes and microwave for 15-second bursts until just softened.
- Do not skip crumpling the parchment paper. It makes the paper flexible enough to press into the corners of the pan without tearing and creates those beautiful, rustic wrinkles on the sides of the finished cake.
- Use a digital thermometer to check the internal temperature of the center. You are aiming for 68°C to 72°C (155°F to 162°F). This takes the guesswork out of the most important decision in this recipe.
- Do not be afraid of the color. The top should look genuinely dark – deep mahogany to nearly black in places. A pale golden Basque cheesecake is an underbaked one. Trust the process.
- Chilling overnight rather than for a minimum of 4 hours makes a significant difference. The texture becomes more unified, creamy, and sliceable. If you can plan ahead, bake it the day before.
- Let the cheesecake sit at room temperature for 20 to 30 minutes before slicing if it has been refrigerated. The cold makes the fat firm, and bringing it toward room temperature restores the full custardy texture.
- For the cleanest slices, run a thin, sharp knife under hot water, wipe it dry, and slice. Wipe and reheat the knife between each cut.
Variations
- Espresso Basque Cheesecake: Dissolve 2 tsp instant espresso powder in the heavy cream before adding it to the batter. Adds a subtle, roasted depth that complements the caramelized top beautifully.
- Brown Butter Basque Cheesecake: Brown 60g of unsalted butter until nutty and amber, cool it slightly, and whisk it into the batter with the cream. Adds a rich, toasty, nutty undertone.
- Matcha Basque Cheesecake: Sift 2 tbsp of high-quality ceremonial matcha into the batter with the flour. The matcha’s grassy bitterness plays beautifully against the sweet caramelized top. The interior will be a pale, lovely green.
- Salted Honey Glaze: Once cooled, drizzle 3 tbsp of warm honey over the top and finish with a generous pinch of flaky sea salt for a simple but stunning presentation.
- Chocolate Swirl: Melt 80g of dark chocolate with 2 tbsp of heavy cream. Drop spoonfuls over the batter in the pan and swirl once with a skewer before baking.
Troubleshooting & FAQ
My cheesecake is still completely liquid in the center after chilling – what happened?
The cheesecake is dense and rubbery instead of creamy and custardy. What went wrong?
My batter is lumpy. Can I still use it?
The top of my cheesecake barely browned – it looks pale and golden, not dark at all.
There are large cracks across the top of the cheesecake. Is it ruined?
Storage & Make-Ahead
- Storage: Store the cheesecake covered in the refrigerator for up to 5 days. The flavor and texture actually improve on day two and three as the custard firms slightly and the flavors mellow. Do not store at room temperature for more than 2 hours. To freeze, wrap individual slices tightly in plastic wrap and place in a freezer bag for up to 6 weeks. Thaw overnight in the refrigerator.
- Make-Ahead: This cheesecake is an exceptional make-ahead dessert. It must chill for at least 4 hours after baking, making it ideal to bake the day before serving. Bake, cool, and refrigerate overnight – the overnight chill produces a noticeably creamier, more cohesive texture than a same-day cake. Do not add any toppings in advance.
this is exactly the kind of thing my grandkids ask me to make now, tbh. theres something about a dessert thats *supposed* to look like that, you know? reminds me that perfection isnt always the goal – sometimes its the caramelized edges and the cracks that tell the real story. your description about courage really resonates, ngl, been teaching them that lesson in other ways too.
oh this is exactly the kind of dessert i need right now – theres something about that imperfection that feels so real, you know? ive been baking alot lately and honestly the best moments happen when you stop fighting the process and just let things be a little burnt and beautiful. my familie always said the edges were the best part anyway lol. cant wait to try this version with allulose, would love to know if the caramelization happens the same way or if you’ve tweaked anything for sugar alternatives.
This is right up my alley. Been making desserts for the crew at the food bank, and honestly the ones that look a little rough around the edges are always the ones people actually eat with joy. No fussing, no apologizing, just good food that tastes like someone cared enough to make it. Might try this one next week.