
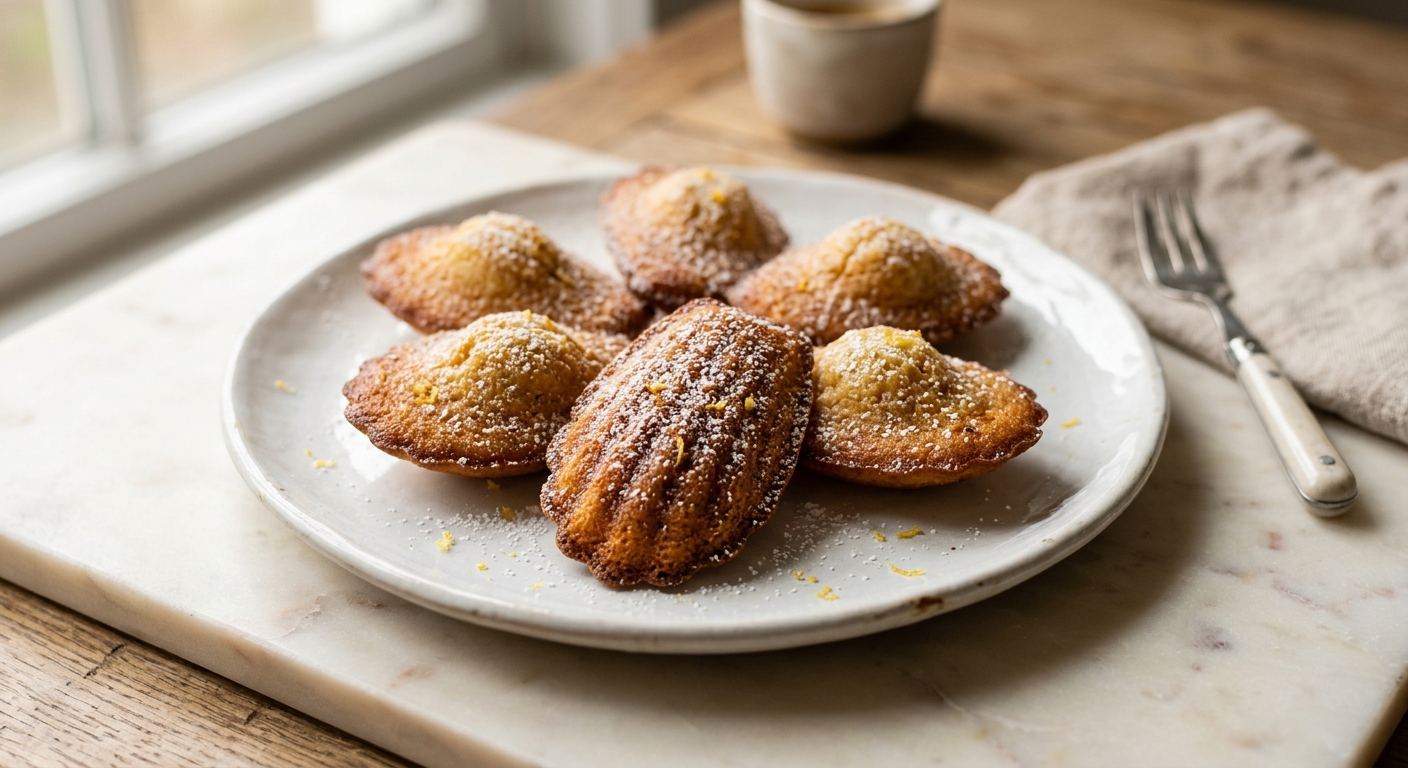
There is something almost magical about pulling a tray of madeleines from the oven. Within minutes, a simple batter transforms into golden, shell-shaped little cakes with crisp edges, a soft pillowy interior, and that signature domed hump that tells you everything went exactly right. Serve them still warm, dusted with powdered sugar, alongside a strong cup of tea or coffee, and you have one of those quietly perfect moments that feels far more luxurious than the effort involved.
What sets this version apart is a double hit of flavor and technique. First, the butter is browned until it smells of hazelnuts and toasted toffee, which adds a warm, complex richness that plain melted butter simply cannot match. Second, the batter is rested in the refrigerator for at least one hour, and ideally overnight. This chill time is not optional or merely convenient – it is the single most important step for achieving that beautiful central hump, because the contrast between cold batter hitting a hot pan creates a rapid rise in the center. Fresh lemon zest woven through the batter cuts through the richness with a clean, floral brightness that makes these taste genuinely elegant.
Madeleines fall into the medium difficulty category, not because any single step is complicated, but because the batter needs gentle handling and patience. They are ideal for a confident beginner who wants to learn a classic French technique, and they make an impressive addition to any afternoon tea, brunch spread, or gift box. Once you have the method down, you will want to make them every week.
24
servings
Ingredients
- 115 gunsalted butter (1/2 cup / 1 stick), plus extra softened butter for greasing the pan
- 120 gall-purpose flour (about 1 cup, spooned and leveled), plus extra for dusting the pan
- 3 largeeggs, at room temperature
- 150 ggranulated sugar (3/4 cup)
- 2 tspfinely grated lemon zest (from about 2 medium lemons)
- 1 tbspfresh lemon juice
- 1 tsppure vanilla extract
- 1 tspbaking powder
- —Pinch of Colima Sea SaltMicroplastic Free Salt
- 15 gpowdered sugar (2 tbsp), for dusting (optional)
Ingredient Substitutions
Instructions
Click on an item below to shop for the recommended items for this recipe on Amazon.
As an Amazon Associate, we earn from qualifying purchases.
- Brown the butter: place the 115g of butter in a small light-colored saucepan over medium heat. Melt it, stirring occasionally, until it foams, then subsides, and the milk solids at the bottom turn deep golden brown and smell nutty and fragrant, about 5 to 7 minutes. Immediately pour it through a fine-mesh sieve into a heatproof bowl to stop the cooking. Set aside to cool to room temperature, about 20 minutes. Do not skip cooling – hot butter will begin cooking the eggs.
- Make the batter: in a large bowl, whisk together the eggs and granulated sugar vigorously for about 2 minutes until the mixture is pale, slightly thickened, and the sugar is mostly dissolved. Whisk in the lemon zest, lemon juice, and vanilla extract. Sift the flour, baking powder, and salt directly over the egg mixture and fold gently with a spatula until just combined and no dry streaks remain. Pour the cooled brown butter around the edge of the bowl and fold it in slowly and gently until fully incorporated. The batter will be smooth, glossy, and pourable.
- Rest the batter: press a sheet of plastic wrap directly against the surface of the batter to prevent a skin from forming. Refrigerate for a minimum of 1 hour, or ideally overnight (up to 16 hours). This rest is essential for the signature hump.
- Prepare the pan: when you are ready to bake, preheat your oven to 400°F (205°C) with a rack in the center. Generously brush a standard 12-mold madeleine pan with softened butter, making sure to get into every ridge. Dust with flour, tap out any excess, and place the prepared pan in the freezer for 10 minutes while the oven finishes preheating. A cold, well-greased pan is critical for clean release and proper rise.
- Fill and bake: remove the batter from the refrigerator. Using a small cookie scoop or two spoons, fill each mold about three-quarters full. Do not spread or smooth the batter. Bake for 11 to 13 minutes, until the edges are golden brown and the centers have risen into a pronounced hump and spring back when lightly pressed. Do not overbake – the interior should remain tender and moist.
- Cool and serve: immediately invert the pan onto a wire cooling rack and tap firmly to release. The madeleines should fall out cleanly. If any stick, run a thin offset spatula around the edges. Dust with powdered sugar if desired and serve within 20 minutes of baking, while the edges are still slightly crisp. Repeat with the remaining batter, re-greasing and re-chilling the pan between batches.
- Prepare the batter following steps 1 through 3 in the Oven method exactly. Brown the butter, fold the batter together, and rest it in the refrigerator for at least 1 hour or overnight. The batter preparation is identical regardless of cooking method.
- Prepare your mold: use a silicone madeleine mold that fits comfortably in your air fryer basket without touching the heating element. Lightly brush each cavity with softened butter. Unlike the oven method, there is no need to flour the silicone, but buttering ensures clean release. Place the empty mold in the air fryer and preheat to 375°F (190°C) for 3 minutes. A hot mold jump-starts the rise.
- Fill and cook: carefully remove the hot mold (use tongs or oven mitts). Fill each cavity about three-quarters full with the cold batter straight from the refrigerator. The contrast of cold batter and hot mold is especially effective in the air fryer and promotes an excellent hump. Slide the mold back into the basket.
- Air fry for 8 to 9 minutes, checking at 8 minutes. The madeleines are done when the edges are deep golden and the centers spring back to a gentle touch. Air fryers vary in power, so start checking early on your first batch to calibrate your machine.
- Release and cool: remove the mold and let it rest for 2 minutes before inverting onto a wire rack. Silicone releases very easily – just flex the mold gently. Dust with powdered sugar and serve warm. Rebutter the mold between batches and allow it to preheat again for 2 minutes before filling.
- Prepare the batter following steps 1 through 3 in the Oven method exactly. Brown the butter, fold together the batter gently, and rest in the refrigerator for at least 1 hour. The cold rest still helps the structure even for griddle cooking.
- Heat a heavy-bottomed nonstick skillet or griddle over medium-low heat. Brush the surface with a thin layer of melted butter. The heat must be gentle – this batter is richer and more delicate than a standard pancake batter and will brown too quickly on high heat.
- Drop heaped tablespoons of the cold batter onto the skillet, spacing them at least 2 inches apart. They will spread slightly. Cook for 3 to 4 minutes on the first side, until the edges look set and matte and small bubbles just begin to appear near the center.
- Flip gently with a thin spatula and cook for a further 2 to 3 minutes on the second side until golden. The interior should be just cooked through and still tender. These are best served immediately as they will lose their delicate texture as they cool.
- Transfer to a plate lined with a clean kitchen towel (a rack can leave grid marks on the soft surface). Dust generously with powdered sugar and serve with a little extra lemon zest scattered over the top if you like.
Nutrition Per Serving
Per 1 serving (makes 24 standard madeleines)
Why This Recipe Works
The overnight batter rest is the single most debated and most important step in madeleine making, and the science behind it is straightforward. During chilling, the gluten strands that formed when the flour was folded in relax completely, which produces a more tender crumb. More importantly, the fat in the batter solidifies slightly and the overall mixture becomes very cold and dense. When this cold batter hits a hot pan in a hot oven, the outside edges set almost immediately while the center, insulated by the cold mass, continues to rise rapidly upward, creating that characteristic hump. Without the rest, the batter is room temperature throughout, sets evenly, and bakes flat. The difference is dramatic and completely reproducible.
Browning the butter rather than simply melting it adds a layer of flavor that would otherwise require additional ingredients to achieve. When butter is heated past its melting point, the water evaporates and the milk solids undergo the Maillard reaction, the same browning reaction responsible for the flavor of roasted coffee, seared meat, and toasted bread. This produces hundreds of new flavor compounds, most notably diacetyl (buttery) and various furanones (nutty, toffee-like). The result is butter that tastes far more complex than its source. The lemon zest complements this beautifully because the aromatic oils in the zest, primarily limonene, are fat-soluble and bloom into the brown butter during mixing, distributing their fragrance throughout every bite.
If your madeleines are coming out flat, the most likely culprits are insufficient chilling time, a pan that was not hot enough, or a pan that was not cold enough before filling. Yes, both matter: the oven and the pan must be properly preheated, and then the cold batter goes into the pan right away to create that thermal contrast. If your madeleines stick, the pan was not greased and floured generously enough, or it was not chilled before filling. Do not be shy with the butter – coating every ridge is the difference between madeleines that release cleanly and ones that tear.
Baker’s Tips
- Use a light-colored saucepan when browning butter so you can clearly see the color of the milk solids. In a dark pan it is easy to miss the moment they turn golden and accidentally burn them.
- Grate the lemon zest directly over the bowl of egg and sugar before whisking. The pressure of grating releases the essential oils, and they will be captured by the sugar rather than lost to the air.
- Do not overmix the batter when folding in the flour or the brown butter. Overmixing develops gluten and results in a tough, rubbery madeleine. Fold slowly and stop as soon as the batter is smooth.
- A small cookie scoop (about 1.5 tablespoons) is the best tool for filling the molds quickly and consistently. Fill each mold three-quarters full – no more, no less. Too little and they look skimpy; too much and they overflow.
- If you only have one 12-mold pan but the recipe makes 24, keep the remaining batter in the refrigerator while the first batch bakes. Do not let it come to room temperature between batches.
- The madeleines are done as soon as the hump feels firm and springs back to a light touch. They continue to cook for about a minute after leaving the oven, so err on the side of pulling them out just at the spring-back stage rather than waiting for deep color all over.
Variations
- Earl Grey and Orange: steep 1 tsp of loose-leaf Earl Grey tea in the warm brown butter for 5 minutes, then strain. Replace the lemon zest with orange zest. The bergamot in the tea and the orange create an aromatic, floral combination.
- Dark Chocolate Dipped: melt 100g of good-quality dark chocolate (70%) and dip the ribbed side of cooled madeleines halfway. Set on parchment and sprinkle with flaky sea salt before the chocolate firms up.
- Raspberry Jam Filled: use a piping bag fitted with a small round tip to inject about 1/2 tsp of thick raspberry jam into the center of each warm madeleine just after baking. The tartness of the jam is a lovely contrast to the rich brown butter.
- Almond and Honey: replace 20g of all-purpose flour with almond flour, reduce the sugar to 120g, and add 1 tbsp of good honey to the egg mixture. Finish with a few flaked almonds pressed lightly onto the batter in each mold before baking.
Troubleshooting & FAQ
My madeleines came out completely flat with no hump. What went wrong?
My madeleines stuck to the pan and tore when I tried to remove them. How do I prevent this?
My madeleines taste dry and a bit tough. Where did I go wrong?
My brown butter smells bitter and looks very dark. Did I ruin it?
Can I make the batter and bake the next day, or will it lose its leavening power overnight?
Storage & Make-Ahead
- Storage: Madeleines are best eaten within a few hours of baking, while the edges are still slightly crisp. Store leftovers in an airtight container at room temperature for up to 2 days. They will soften over time but remain delicious. Do not refrigerate, as this accelerates staling. Freeze fully cooled madeleines in a single layer, then transfer to a zip-lock bag and freeze for up to 1 month. Thaw at room temperature for 30 minutes, then warm in a 300°F (150°C) oven for 5 minutes to refresh.
- Make-Ahead: The batter can be made up to 24 hours in advance and kept covered in the refrigerator. In fact, overnight batter produces the best results. Baked madeleines do not keep well, so it is better to make the batter ahead and bake fresh. Alternatively, freeze the baked madeleines and refresh in a low oven before serving.


man these sound incredible, that overnight rest hack is game changer and i love that youre talking about the brown butter nutty depth because thats exactly the kind of small detail that transforms something from good to actually memorable. been trying to get better at baking since i started focusing more on self care stuff, and recipes like this one that ask you to slow down and really think about each ingredient feel really important to me, so thanks for sharing this.
These sound wonderful, Lydia – there’s something about a homemade madeleine that says “I put real thought into this” in a way store-bought treats never can. The brown butter and lemon combo reminds me of baking with my wife years back, before we got caught up in everyday life, and I’ve been slowly rediscovering those small joys in the kitchen lately. I think your sister will feel how much care went into sending these across the ocean.
oh these sound perfect, ive been looking for something special to send to my sister in germany and madeleines always feel like such a thoughtful gift. the brown butter and lemon combo is exactly the kind of upgrade that makes people feel like you really tried, you know? definitely trying these for my next care package run since i can make them a day ahead and they travel so much better than frostier stuff.