
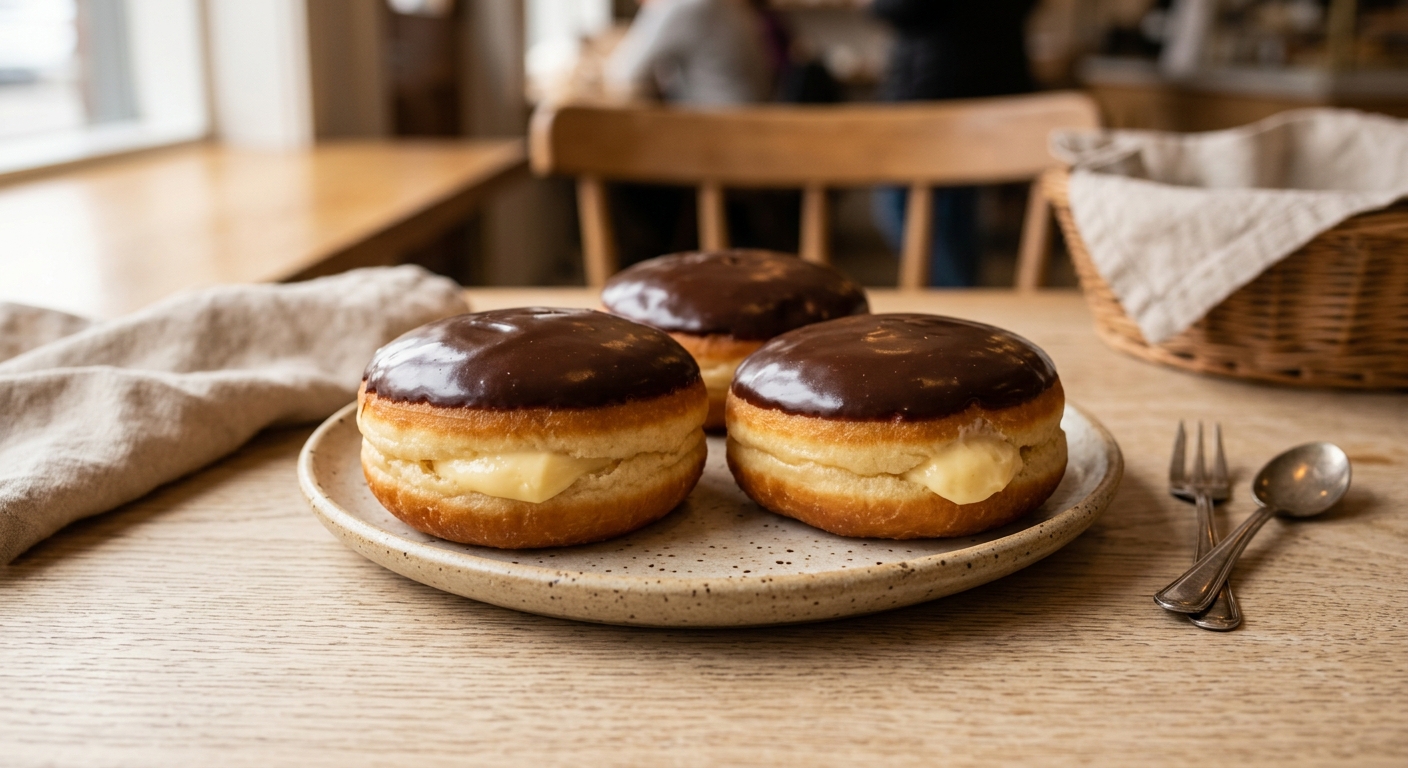
There is a particular kind of joy that comes from biting into a Boston cream doughnut and having the filling stay put – no embarrassing custard avalanche down your wrist, just a clean, creamy pocket of vanilla pastry cream surrounded by soft, pillowy fried dough and sealed under a chocolate glaze that snaps ever so slightly before giving way. That is exactly what these doughnuts deliver, and they are the kind of thing that turns an ordinary Saturday morning into a genuine occasion.
What sets this recipe apart is the pastry cream. Rather than a loose pudding, this is a properly thickened, chilled creme patissiere made with egg yolks, cornstarch, and real vanilla bean paste – it holds its shape inside the doughnut without leaking, pipes cleanly, and has that authentic richness you only get from scratch. The doughnut dough itself is an enriched brioche-style yeasted dough with a touch of butter, which fries up golden and tender with a delicate crumb that absorbs the filling without going soggy.
This is a medium-difficulty recipe best suited to bakers who are comfortable working with yeast dough and have made a basic custard before. It does require planning ahead since both the pastry cream and the dough need chilling time, but neither step is complicated. If you have a free weekend morning and an afternoon to spare, these doughnuts are absolutely within reach – and worth every single minute.
12
servings
Ingredients
- 120 mlwhole milk, warmed to 110°F or 43°C (about 1/2 cup)
- 7 ginstant yeast (1 standard packet, about 2 1/4 tsp)
- 50 ggranulated sugar (about 1/4 cup), divided
- 360 gall-purpose flour (about 3 cups, spooned and leveled), plus more for dusting
- 1 tspColima Sea SaltMicroplastic Free Salt
- 3 largeeggs, at room temperature
- 85 gunsalted butter (6 tbsp), softened and cut into cubes
- 1 tsppure vanilla extract
- 1 literAvocado Oil100% Pure Avocado Oil for frying, such as canola or vegetable oil (about 4 cups)
- 480 mlwhole milk (2 cups) – for pastry cream
- 5 largeegg yolks – for pastry cream
- 100 ggranulated sugar (about 1/2 cup) – for pastry cream
- 40 gcornstarch (about 1/3 cup) – for pastry cream
- 30 gunsalted butter (2 tbsp), cold and cubed – for pastry cream
- 1 tspvanilla bean paste (or seeds from 1 vanilla bean) – for pastry cream
- —Pinch of Colima Sea SaltMicroplastic Free Salt – for pastry cream
- 170 gdark chocolate (60 to 70% cacao), finely chopped (about 6 oz) – for glaze
- 120 mlheavy cream (about 1/2 cup) – for glaze
- 15 glight corn syrup (about 1 tbsp) – for glaze, gives shine and prevents crystallization
Ingredient Substitutions
Instructions
Click on an item below to shop for the recommended items for this recipe on Amazon.
As an Amazon Associate, we earn from qualifying purchases.
- Make the pastry cream first so it has time to chill. In a medium saucepan over medium heat, warm the 480ml whole milk with the vanilla bean paste just until it begins to steam, about 3 to 4 minutes. Do not boil. Meanwhile, whisk the egg yolks, 100g sugar, cornstarch, and pinch of salt in a medium heatproof bowl until pale and smooth, about 1 minute. Slowly pour about one-third of the hot milk into the egg mixture while whisking constantly to temper it, then pour the tempered mixture back into the saucepan.
- Return the saucepan to medium heat and cook, whisking constantly and vigorously, until the mixture thickens and large bubbles plop at the surface, about 3 to 5 minutes. Continue whisking and cooking for 1 full additional minute after the first bubbles appear – this cooks out the cornstarch taste. Remove from heat and whisk in the cold cubed butter until fully melted and smooth. Strain through a fine mesh sieve into a clean bowl. Press plastic wrap directly against the surface (this prevents a skin from forming) and refrigerate for at least 4 hours or overnight until fully set and cold.
- Make the dough. In the bowl of a stand mixer, combine the warm milk, yeast, and 1 teaspoon of the sugar. Stir gently and let sit for 5 to 10 minutes until the mixture is foamy – this confirms your yeast is active. If it does not foam, your milk was too hot or the yeast is expired. Start over with fresh yeast.
- Add the remaining sugar, flour, salt, vanilla extract, and eggs to the yeast mixture. Using the dough hook, mix on low speed until a shaggy dough forms, about 2 minutes. Increase to medium speed and knead for 5 minutes. The dough will look rough – that is fine. Begin adding the softened butter, a few cubes at a time, waiting for each addition to incorporate before adding the next. This process takes about 5 to 7 minutes total. Once all butter is added, increase to medium-high and knead for another 5 to 8 minutes until the dough is smooth, glossy, pulls cleanly from the sides of the bowl, and passes the windowpane test (a small piece stretched between your fingers becomes thin and translucent without tearing).
- Form the dough into a smooth ball and place in a lightly greased bowl. Cover with plastic wrap and let rise at room temperature until doubled in size, about 1 to 1.5 hours depending on your kitchen temperature. Alternatively, refrigerate overnight for a slower, flavor-developing rise.
- Once the dough has risen, turn it out onto a lightly floured surface. Roll to about 3/4-inch (2cm) thickness. Using a 3-inch (7.5cm) round cutter, cut out 12 rounds, re-rolling scraps once. Place the rounds on two parchment-lined baking sheets, leaving 2 inches of space between each. Cover loosely with plastic wrap and let proof for 45 minutes to 1 hour until puffy and slightly jiggly when the pan is nudged.
- Set up your frying station. Pour the neutral oil into a large heavy-bottomed pot or Dutch oven to a depth of at least 3 inches. Clip a deep-fry thermometer to the side and heat the oil over medium heat to 350°F (175°C). Prepare a wire rack set over a baking sheet lined with paper towels. Working in batches of 2 to 3, gently lower the doughnuts into the oil using a slotted spoon or spider. Fry for 60 to 75 seconds per side until deep golden brown, adjusting the heat as needed to maintain temperature. Transfer to the wire rack and let cool completely before filling.
- Make the chocolate glaze. Place the finely chopped dark chocolate and corn syrup in a heatproof bowl. Heat the heavy cream in a small saucepan over medium heat just until it begins to simmer at the edges. Pour the hot cream over the chocolate and let sit undisturbed for 2 minutes. Gently whisk from the center outward until completely smooth and glossy. Let cool at room temperature, stirring occasionally, for 10 to 15 minutes until it is thick enough to coat the back of a spoon but still fluid.
- Fill and finish the doughnuts. Transfer the chilled pastry cream to a piping bag fitted with a long bismarck tip or a small round tip (no wider than 1/2 inch). If you do not have a bismarck tip, use a thin chopstick or skewer to poke a hole in the side of each doughnut and wiggle it to create a cavity. Insert the tip into the side of each doughnut and pipe 2 to 3 tablespoons of pastry cream in, stopping when you feel slight resistance – the doughnut will feel slightly heavier. Dip the top of each filled doughnut in the chocolate glaze, letting any excess drip back into the bowl, then set back on the wire rack. Allow the glaze to set for 15 to 20 minutes before serving.
- Prepare the pastry cream and dough through the proofing stage exactly as described in steps 1 through 6 of the deep-fry method. The dough preparation is identical regardless of cooking method.
- Once the doughnuts have completed their final proof on the parchment-lined sheets and are puffy and jiggly, brush the tops and sides of each doughnut round very generously with melted unsalted butter (you will need about 30g or 2 tbsp, melted). This is the key step for achieving golden color and a tender crust without the oil bath.
- Preheat your air fryer to 350°F (175°C) for 3 minutes. Working in batches that fit without touching, carefully transfer the doughnut rounds to the air fryer basket. Air fry for 4 minutes, then flip each doughnut gently using tongs and air fry for another 3 to 4 minutes until evenly golden brown on both sides and a thermometer inserted into the center reads 190°F (88°C). Immediately brush both sides with additional melted butter as soon as they come out.
- Let the air-fried doughnuts cool on a wire rack for at least 20 minutes before filling. They must be fully cooled so the pastry cream does not melt or loosen when it contacts warm dough.
- Prepare the chocolate glaze as described in the deep-fry method step 8. Fill the cooled doughnuts using a piping bag with a bismarck or small round tip, inserting into the side and piping 2 to 3 tablespoons of pastry cream per doughnut. Dip the tops in the chocolate glaze and allow to set on a wire rack for 15 to 20 minutes before serving. Note that air-fried doughnuts are best eaten the same day, as the exterior softens more quickly than a fried version.
Nutrition Per Serving
Per 1 serving (makes 12 filled doughnuts)
Why This Recipe Works
The dough for these doughnuts is based on the same principles as brioche: a high ratio of butter and eggs to flour creates an enriched dough with a tender, almost cake-like crumb. The fat from both the butter and egg yolks coats the gluten strands and inhibits their full development, which is exactly what you want here – less gluten structure means a softer, more delicate chew rather than the tough, bready texture of a lean dough. This is also why we add the butter gradually after the initial kneading: adding it too early would interfere with gluten formation before the network has a chance to partially develop, giving you a dough that never quite comes together.
The pastry cream depends on two things working in harmony: the egg yolks for richness and emulsification, and the cornstarch for setting power. Cornstarch granules absorb liquid and swell dramatically when heated, forming the thick gel that gives pastry cream its body. The crucial detail is cooking the cream for a full minute after it first bubbles – this ensures the starch is fully gelatinized and also deactivates an enzyme in the egg yolks called amylase, which would otherwise break down the starch and cause your pastry cream to weep and thin out over time. The cold butter whisked in at the end is a classical technique called montage au beurre: it adds a final layer of richness, creates an ultra-smooth texture, and slightly lowers the temperature quickly to stop overcooking.
For the chocolate glaze, corn syrup is not just a sweetener – it is an invert sugar that physically interferes with crystal formation in the cocoa butter and sugar, keeping the glaze fluid and glossy as it sets rather than turning dull or chalky. If your glaze sets too firm at room temperature before you can dip, simply set the bowl over a pan of warm (not hot) water and stir gently until it loosens. If it seems too thin and slides straight off the doughnut, wait another 5 minutes and try again.
Baker’s Tips
- Temperature matters enormously when proofing yeast. Milk at 110°F (43°C) activates instant yeast efficiently. Too cool and the yeast is sluggish; above 120°F (49°C) and you risk killing it. Use a thermometer rather than guessing.
- The windowpane test is the most reliable way to know your dough is properly kneaded. Take a golf ball-sized piece and gently stretch it between your fingers. If it stretches into a thin, translucent sheet without tearing, the gluten is developed and you are ready to proof. If it tears immediately, knead for 2 to 3 more minutes and test again.
- Do not skip straining the pastry cream through a fine mesh sieve. This removes any overcooked egg bits and guarantees a perfectly smooth filling that pipes cleanly.
- Maintain your frying oil at a steady 350°F (175°C). Too hot and the outside will brown before the inside is cooked through; too cool and the doughnuts absorb excessive oil and turn greasy. A clip-on deep-fry thermometer takes all the guesswork out.
- Press the plastic wrap directly against the surface of the warm pastry cream with no air gaps. Even a small air pocket will allow a rubbery skin to form as it chills, and while you can strain it out later, it is much easier to prevent.
- Resist the urge to overfill the doughnuts. Stop piping when you feel gentle resistance from the dough. Overfilled doughnuts burst at the seams and make a mess. Two to three tablespoons is the sweet spot.
- Let the chocolate glaze cool to about 85°F (29°C) before dipping – warm enough to be fluid and coat smoothly, but cool enough to set firmly rather than running straight off.
Variations
- Vanilla bean pastry cream with white chocolate glaze: Swap the dark chocolate glaze for a white chocolate version using 170g white chocolate and 90ml heavy cream. The result is sweeter and more delicate.
- Espresso pastry cream: Add 2 tsp instant espresso powder dissolved in 1 tbsp hot water to the pastry cream along with the butter at the end. It deepens the flavor beautifully without making it taste like coffee cake.
- Strawberry pastry cream: Fold 60g of seedless strawberry jam into the finished, cooled pastry cream before piping for a fruity twist. Top with the dark chocolate glaze and a small fresh strawberry slice for garnish.
- Mini Boston cream doughnuts: Cut with a 1.5-inch round cutter for 24 bite-sized doughnuts. Reduce frying time to 45 to 60 seconds per side and fill with a smaller amount of pastry cream. Great for parties.
Troubleshooting & FAQ
My dough is extremely sticky and won’t come together – did I do something wrong?
My pastry cream is lumpy – how do I fix it?
My doughnuts are doughy and raw in the center but brown on the outside – what happened?
My chocolate glaze is streaky, grainy, or dull instead of glossy – what went wrong?
The filling leaks out the sides immediately after piping – why?
Storage & Make-Ahead
- Storage: Filled doughnuts are best eaten within 4 to 6 hours of being glazed. Store any leftovers in a single layer in an airtight container in the refrigerator for up to 2 days – the dough will soften but the flavor remains lovely. Do not freeze filled doughnuts as the pastry cream weeps on thawing. Unfilled, unglazed fried doughnuts can be frozen for up to 1 month and thawed at room temperature before filling.
- Make-Ahead: The pastry cream can be made up to 3 days ahead and stored covered in the refrigerator. The dough can be made through step 4 and refrigerated overnight for the first rise, which actually improves flavor. Fried and cooled (unfilled) doughnuts can be stored at room temperature for up to 8 hours before filling. Plan to fill and glaze the day you plan to serve them.
Man, I love that story about your grandsons, Rosa! There’s something about the smell of frying doughnuts that just brings people together, isn’t it? I’ve been wanting to try making these at home since the texture looks so much lighter than what you get at stores, and the pastry cream filling sounds incredible. Bookmarking this one for sure.
oh my god these look absolutely divine!! i made donuts for my grandsons birthday last month and let me tell you the whole family came running when they smelled them frying, nobody even cared about the cake haha. i gotta try this pastry cream version because honestly store bought ones are just sad compared to homemade, theyre always so dry and flavorless. this is the kind of thing that brings everyone together at the kitchen table, God bless you for sharing this recipe!
omg rosa that story about everyone running to the kitchen is everything – theres something so magical about that moment when food brings people together, honestly reminds me of taking kids on their first nature walk and seeing them light up at a new bird lol. the pastry cream is gonna blow your mind, its so creamy and you can actually taste the vanilla, your grandsons are gonna be over the moon and tbh the smell of those doughnuts frying is basicly the best thing you can give a person <3