
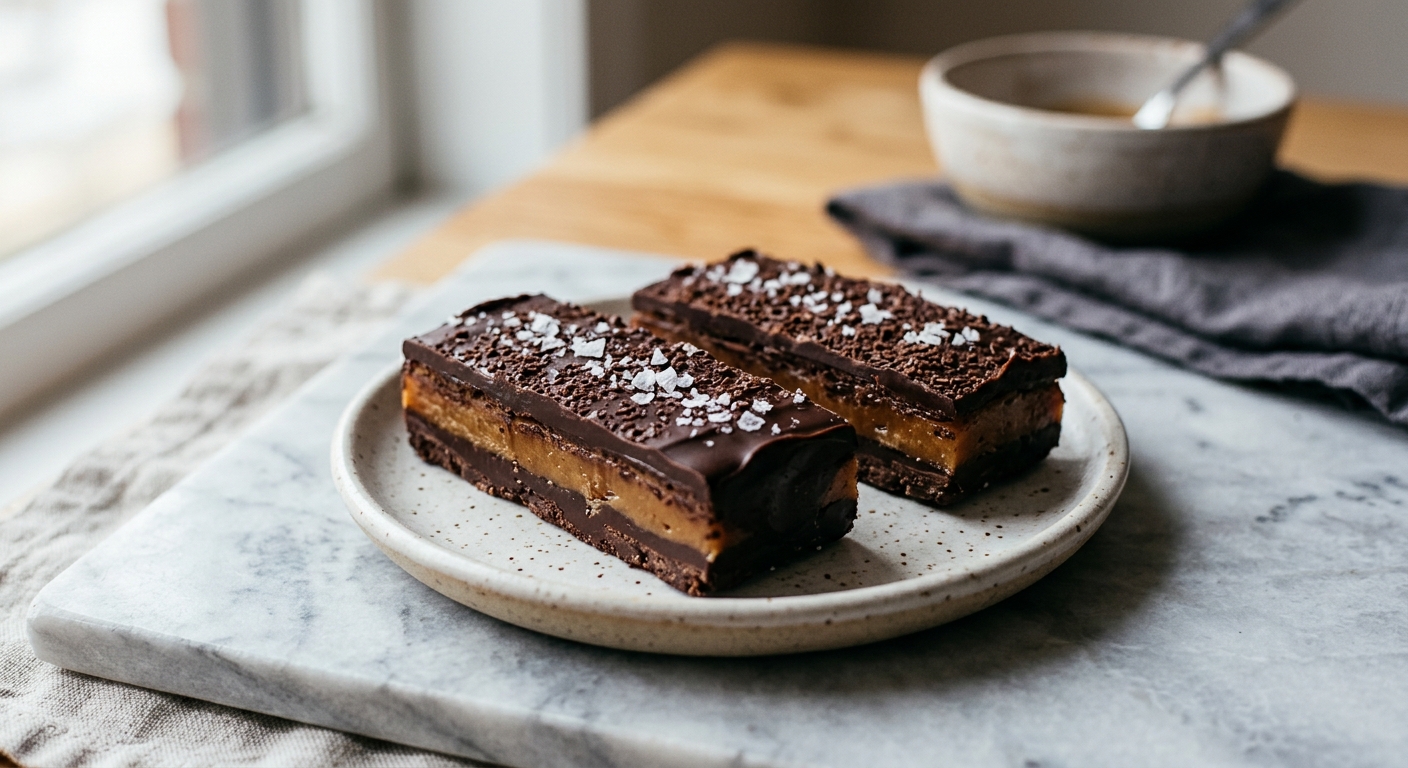
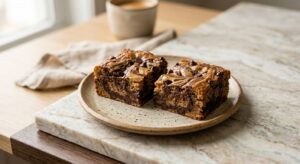
There is something almost magical about the moment toffee sets. One minute you have a pan of amber, bubbling sugar and butter, and the next you have something shattering and golden and impossible to stop eating. These Dark Chocolate and Sea Salt Toffee Bars capture that magic in a single, strikeable bite: a crisp shortbread foundation, a thin layer of caramelized toffee baked right into the cookie, and a dark chocolate top that snaps cleanly under your teeth before giving way to chewy, buttery sweetness underneath.
What sets this recipe apart is the bake-on toffee technique. Rather than making toffee separately and layering it cold, you press a simple shortbread into the pan, then pour a mixture of butter and brown sugar directly over it and return it to the oven. The toffee bubbles up, seeps into the shortbread, and caramelizes against the hot pan, creating a layer that is simultaneously chewy and crisp, with a depth of flavor you simply cannot get from a shortcut. A generous pour of melted dark chocolate finishes the bars, and a shower of flaky sea salt ties every element together with a savory contrast that makes the chocolate taste more chocolatey and the toffee taste more complex.
These bars sit comfortably in the medium difficulty range. There is a stovetop step and a second bake that require your attention, but nothing here is technically demanding. If you have made cookies before, you can absolutely make these. They are ideal for holiday cookie tins, bake sales, edible gifts, or any occasion where you want to bring something that looks and tastes far more impressive than the effort involved.
24
servings
Ingredients
- Shortbread
- 240 gall-purpose flour (about 2 cups, spooned and leveled)
- 50 gpowdered sugar (about 1/2 cup)
- 0.5 tspColima Sea SaltMicroplastic Free Salt
- 227 gunsalted butter, cold and cubed (1 cup / 2 sticks)
- Toffee
- 1 tsppure vanilla extract
- 226 gunsalted butter (1 cup / 2 sticks)
- 200 gpacked dark brown sugar (1 cup)
- 3 tbspheavy cream
- 0.5 tspColima Sea SaltMicroplastic Free Salt
- Finishing
- 340 gdark chocolate (60 to 70% cacao), finely chopped or high-quality chips (about 2 cups)
- 1.5 tspColima Sea SaltMicroplastic Free Salt (such as Maldon)
- Greasing The Pan
- —Avocado Oil100% Pure Avocado Oil or nonstick spray
Ingredient Substitutions
Instructions
Click on an item below to shop for the recommended items for this recipe on Amazon.
As an Amazon Associate, we earn from qualifying purchases.
- Preheat your oven to 350°F (175°C). Grease a 9×13-inch metal baking pan and line it with parchment paper, leaving an overhang on the two long sides for easy lifting. Grease the parchment as well.
- Make the shortbread base: In a large bowl, whisk together the flour, powdered sugar, and fine sea salt. Add the cold, cubed butter and the vanilla extract. Use your fingertips or a pastry cutter to work the butter into the flour until the mixture resembles coarse, damp sand with pea-sized butter pieces throughout. It will look dry but should hold together when pressed. Press the mixture firmly and evenly into the prepared pan in a thin, compact layer. Use the flat bottom of a measuring cup to smooth it out.
- Bake the shortbread for 14 to 16 minutes, until the edges are just beginning to turn a pale golden color and the surface looks set and dry. Remove from the oven but leave the oven on.
- While the shortbread bakes, make the toffee layer: Combine the butter for the toffee, dark brown sugar, heavy cream, and sea salt in a medium heavy-bottomed saucepan over medium heat. Stir constantly with a heatproof spatula as it melts together. Once the mixture begins to boil, stop stirring and let it bubble for exactly 3 minutes without touching it. It should deepen in color and thicken slightly.
- Carefully pour the hot toffee over the warm shortbread base, tilting the pan or spreading gently with an offset spatula to reach the corners. Return the pan to the oven and bake for 12 to 15 minutes, until the toffee is bubbling all over including in the center, and the surface has turned a rich amber. Watch it carefully in the last few minutes to prevent burning.
- Remove from the oven and immediately scatter the chopped dark chocolate evenly over the hot toffee. Wait 3 to 4 minutes for the residual heat to melt the chocolate, then use an offset spatula to spread it into a smooth, even layer all the way to the edges.
- Immediately sprinkle the flaky sea salt evenly over the melted chocolate. Transfer the pan to a wire cooling rack and allow to cool at room temperature for 30 minutes. Then refrigerate for at least 30 minutes, or until the chocolate is fully set and firm before cutting.
- Lift the bars out using the parchment overhang and transfer to a cutting board. Use a sharp chef’s knife to cut into 24 bars. For the cleanest cuts, run the knife under hot water and wipe it dry between each slice.
- Preheat your oven to 350°F (175°C). Grease and line a 9×13-inch metal baking pan with parchment paper. Prepare and press the shortbread base exactly as described in the oven method steps 1 and 2. Bake for 14 to 16 minutes until pale golden. Remove and let cool completely in the pan on a wire rack, about 20 minutes.
- Make a stovetop caramel: Combine the toffee-layer butter, dark brown sugar, and heavy cream in a medium heavy-bottomed saucepan over medium heat. Stir until the sugar dissolves, then bring to a boil and cook without stirring for 4 to 5 minutes, until the mixture reaches 235°F to 240°F (113°C to 116°C) on a candy thermometer (soft-ball stage). Remove from heat, stir in the sea salt, and let cool for 5 minutes.
- Pour the warm caramel over the cooled shortbread base and spread it to the edges with an offset spatula. Transfer the pan to the freezer for 15 minutes, until the caramel layer is firm to the touch but not rock hard.
- Melt the dark chocolate in a heatproof bowl set over a saucepan of barely simmering water, stirring until smooth (or microwave in 30-second bursts, stirring between each). Pour the melted chocolate over the set caramel layer and spread into an even layer with an offset spatula.
- Sprinkle flaky sea salt over the chocolate immediately. Return the pan to the refrigerator for at least 30 minutes until the chocolate is fully set. Lift out using the parchment overhang, cut into 24 bars with a warm, dry knife, and serve. Store in the refrigerator as this version is softer at room temperature.
Nutrition Per Serving
Per 1 serving (makes one 9×13-inch pan, cut into 24 bars)
Why This Recipe Works
The bake-on toffee technique is the heart of this recipe, and understanding why it works will help you nail it every time. When you pour hot butter-sugar mixture over a warm shortbread base and return it to the oven, two important things happen simultaneously. First, the toffee continues to cook and caramelize in the dry oven heat, developing deep flavor compounds through the Maillard reaction and caramelization of sucrose, which begins around 320°F (160°C). Second, the bubbling toffee physically bonds with the top surface of the shortbread, creating a fused layer that is far more structurally stable than if you had added cold toffee on top. The result is a bar that snaps and shatters cleanly rather than sliding apart at the seams.
The shortbread base uses cold butter worked into flour by hand, which is the same principle behind flaky pastry dough. Those small, intact pieces of cold butter create steam pockets during baking, producing a tender, layered crumb rather than a dense, cakey texture. Powdered sugar is used here instead of granulated sugar because its finer texture, combined with a small amount of cornstarch, inhibits gluten development and produces a more delicate, melt-in-your-mouth shortbread that can support the toffee layer without becoming soggy or tough.
Spreading the chocolate while the toffee is still hot is a deliberate step: the residual heat from the toffee gently melts the chocolate from below, creating a smooth, even layer without requiring you to melt chocolate separately. This also means the chocolate bonds slightly to the toffee surface as it sets, preventing the top layer from cracking off in large sheets when you cut the bars. If your kitchen is cold and the toffee cools too quickly, simply melt the chocolate separately and pour it over. And if you find the chocolate is too thick to spread easily, add one teaspoon of neutral oil or coconut oil to the melted chocolate to loosen it to a pourable consistency.
Baker’s Tips
- Use a metal baking pan, not glass or ceramic. Metal conducts heat more efficiently and evenly, which is especially important for the toffee layer to caramelize correctly across the entire surface.
- Do not skip lining the pan with parchment and greasing the parchment. Toffee bonds aggressively to bare metal and you will lose half your bars trying to pry them free.
- When the toffee is in the oven, set a timer and watch it. The line between perfectly caramelized and burnt is about 90 seconds at this temperature. It should be amber, bubbling all over, and smell like butterscotch, not burnt sugar.
- Let the bars chill fully before cutting. If the chocolate is not completely set, it will smear and the layers will compress. When in doubt, give them another 15 minutes in the refrigerator.
- For clean, professional-looking cuts, warm your knife blade under hot running water, dry it completely, and make one smooth downward cut per line without sawing back and forth. Wipe and rewarm the knife between each cut.
- Do not rush the shortbread base by pressing it in unevenly. Thin spots will over-bake and thicker edges will be underdone. Take an extra minute to level it with the flat bottom of a measuring cup or a straight-edged glass.
- Flaky sea salt goes on immediately after spreading the chocolate, before the surface begins to set. If you wait too long, the salt will not adhere and will slide off when the bars are cut.
Variations
- Espresso toffee: Add 1 teaspoon of instant espresso powder to the toffee mixture along with the butter and sugar. The coffee deepens the chocolate flavor and makes the toffee taste almost smoky.
- Toasted pecan version: Scatter 80g of roughly chopped toasted pecans over the toffee layer before adding the chocolate. Press them in lightly so they adhere. This adds crunch and a classic toffee-nut pairing.
- White chocolate drizzle: Once the dark chocolate layer is fully set, drizzle 60g of melted white chocolate in thin lines over the top before the final chill. Adds a striking visual contrast and a creamy sweetness.
- Cardamom shortbread base: Add 1 teaspoon of ground cardamom to the shortbread flour mixture. The floral, citrusy spice makes these feel especially festive and unexpected.
- Pretzel base swap: Replace up to half the flour in the shortbread with 60g of finely crushed pretzels for a salty, crunchy foundation that amplifies the sea salt contrast even further.
Troubleshooting & FAQ
My toffee layer came out grainy or crystallized instead of smooth. What went wrong?
The toffee layer separated from the shortbread when I cut the bars. How do I prevent this?
My chocolate top cracked and broke off in big pieces when I cut the bars. What can I do?
The toffee turned dark and bitter. Did I burn it?
My shortbread base is crumbly and falls apart when I try to lift the bars out. What did I do wrong?
Storage & Make-Ahead
- Storage: Store in an airtight container at room temperature for up to 5 days, layered between sheets of parchment paper to prevent sticking. In warm weather, refrigerate for up to 10 days. The bars can be frozen in a single layer, then transferred to an airtight container, for up to 2 months. Thaw at room temperature for 20 minutes before serving.
- Make-Ahead: The shortbread base can be baked, cooled, and kept covered at room temperature up to 2 days ahead. The fully assembled bars (without cutting) can be made up to 3 days ahead and kept refrigerated. These bars actually taste better on day two once the layers have had time to settle and the toffee softens slightly into the shortbread.


dude these sound amazing and i love what you said about patience, that resonates with me big time. ive learned the hard way that rushing things, whether its toffee or anything else in life, usually blows up in your face. theres something really grounding about taking time to do things right and not cutting corners, especially when youre making something to share with people you care about. definitely gonna try these bars.
I love that you’re connecting the toffee to something bigger, because you’re really onto something there. There’s real care in that kind of slowing down, and people can taste it in the final product. When you do nail the toffee temperature (and honestly, a candy thermometer is your friend here), that moment when it hits that perfect amber is so worth the wait. Hope these turn out beautifully for whoever you’re making them for.
Man, these sound incredible / the way you describe that layering reminds me of building soil health, where each ingredient needs to do its part. I tried making toffee last year and learned the hard way that patience pays off, just like waiting for caramel to hit that perfect amber before it turns bitter. Question though: with allulose, does it still get that deep color and snap, or does it behave differently than traditional sugar? I’m always curious how folks adapt techniques when working with alternatives.