
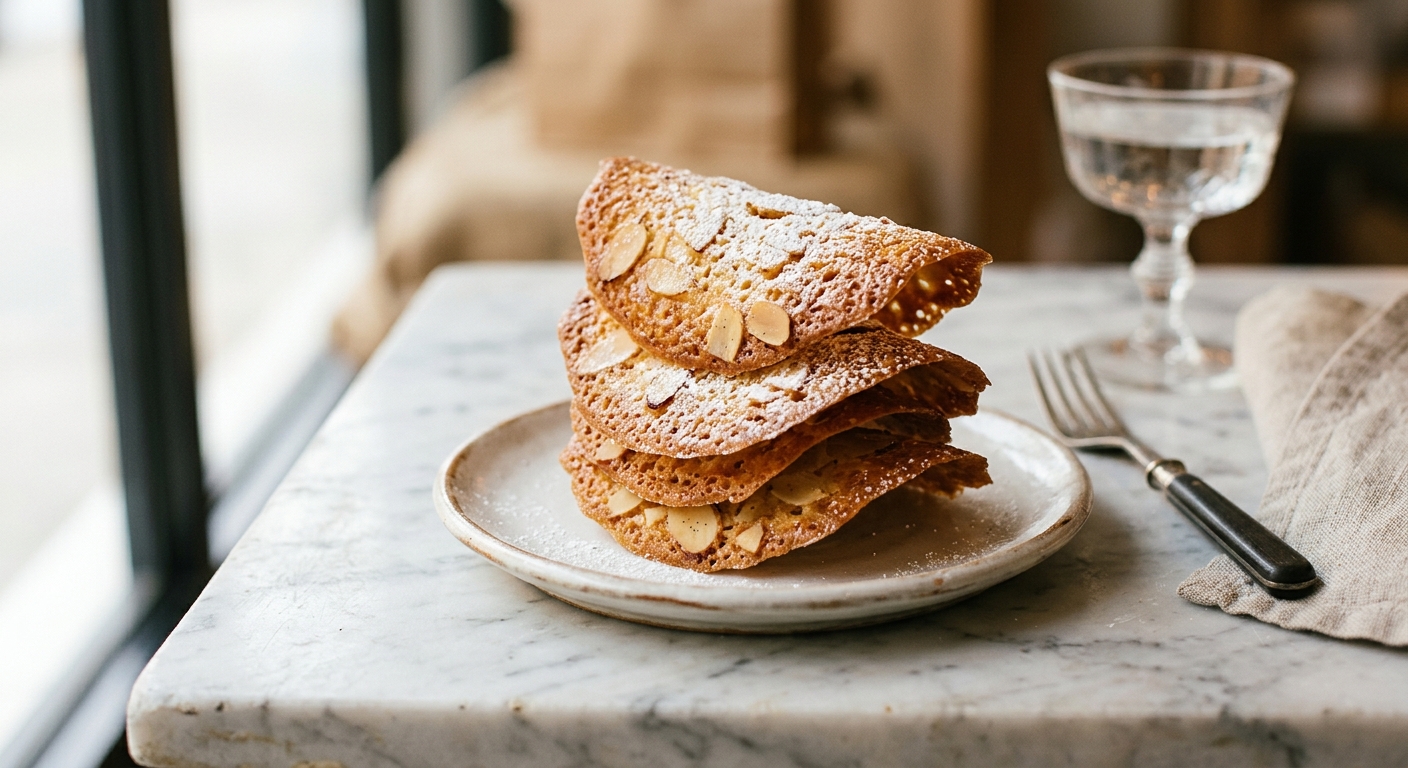
There is something almost magical about pulling a tuile off a baking sheet. One moment it is a pale, lacy wafer glistening with butter and studded with sliced almonds; thirty seconds later it is a warm, pliable disc you can coax into a delicate curl or a crisp little cone. The kitchen smells of toasted almonds and caramel, and the whole thing feels far more like an act of confectionery artistry than a simple cookie recipe. Tuiles have graced the dessert plates of French patisseries for centuries, and once you make them yourself, you will understand exactly why they have endured.
What sets this version apart is the batter itself. By using a combination of browned butter and egg whites, we get an extraordinary depth of nutty flavour alongside the clean, crisp snap that defines a proper tuile. A whisper of vanilla and a pinch of sea salt keep things balanced, while a brief rest in the refrigerator allows the batter to firm up so it spreads into perfectly round, even circles rather than ragged puddles. The sliced almonds are pressed flat into the batter rather than stirred through, ensuring every tuile has an even, beautiful mosaic of nuts from edge to edge.
Tuiles sit firmly in the medium difficulty category. The baking itself is fast and the ingredient list is short, but the shaping window is narrow and your full attention is required once the pan comes out of the oven. This recipe is perfect for confident beginner bakers ready to level up their skills, and for anyone who wants a showstopping accompaniment to a scoop of ice cream, a pot of mousse, or a plated dinner-party dessert. Work in small batches, stay close to the oven, and you will be rewarded generously.
24
servings
Ingredients
- 60 gunsalted butter (about 4 tbsp)
- 100 gpowdered (icing) sugar, sifted (about 3/4 cup plus 1 tbsp)
- 2 large egg whites, at room temperature (about 60g total)
- 0.5 tsppure vanilla extract
- 30 gall-purpose flour (about 3 tbsp plus 1 tsp)
- 100 gsliced (flaked) almonds (about 1 cup)
- —Pinch of Colima Sea SaltMicroplastic Free Salt
Ingredient Substitutions
Instructions
Click on an item below to shop for the recommended items for this recipe on Amazon.
As an Amazon Associate, we earn from qualifying purchases.
- Make the brown butter: melt the butter in a small light-coloured saucepan over medium heat, swirling occasionally, until the milk solids turn golden and it smells nutty, about 4 to 5 minutes. Immediately pour into a medium mixing bowl and let cool for 5 minutes.
- Whisk the sifted powdered sugar into the warm brown butter until smooth. Add the egg whites, vanilla extract, and pinch of salt, whisking until fully combined and no streaks remain. Sift in the flour and fold gently with a spatula until just incorporated. Do not over-mix. Cover the bowl and refrigerate the batter for at least 30 minutes, and up to 24 hours. This firms the fat and helps the tuiles hold their round shape.
- Preheat your oven to 350°F (175°C). Line two large baking sheets with silicone baking mats (preferred) or lightly greased parchment paper. Have a rolling pin, a clean wine bottle, or a curved bowl ready nearby for shaping.
- Drop level teaspoons of batter onto the prepared baking sheets, spacing them at least 3 inches apart. You should fit 6 tuiles per standard sheet. Using the back of a wet spoon or a small offset spatula dipped in water, spread each mound into a thin circle about 3 inches (7.5 cm) in diameter. Scatter sliced almonds evenly over each circle, pressing them gently so they are flat and touching the batter, not piled up.
- Bake one sheet at a time on the middle rack for 7 to 9 minutes, until the edges are deep golden brown and the centres are golden. The colour difference between underdone and perfect is subtle but important: pale tuiles will not crisp up, and you want a uniform golden-amber tone across most of the surface.
- Remove from the oven and wait exactly 20 to 30 seconds. Working very quickly with a thin offset spatula, lift each tuile and drape it almond-side up over a rolling pin or wine bottle to form a curved shape. If they harden before you can shape them, return the sheet to the oven for 30 to 60 seconds to soften. Once shaped, let cool completely on the rolling pin, about 2 to 3 minutes, before transferring to an airtight container.
- Continue with remaining batter, allowing the baking sheet to cool completely between batches. Hot sheets cause the batter to spread too quickly and the tuiles will be too thin and uneven.
- Prepare the brown butter batter and chill as directed in the oven method (steps 1 and 2). The batter is identical regardless of cooking method.
- Cut a piece of parchment paper to fit the base of your air fryer basket, then use scissors to snip several small slits around the edges to allow air to circulate. Lightly grease the parchment with a very thin layer of butter or neutral cooking spray.
- Drop 2 to 3 level teaspoons of batter onto the parchment, spacing them at least 2.5 inches apart. Spread each into a thin 3-inch circle using the back of a wet spoon. Press sliced almonds evenly over each circle in a single flat layer.
- Air fry at 325°F (160°C) for 5 to 6 minutes. Check at 5 minutes: the edges should be deep golden and the centres amber. Because air fryers vary significantly, your first batch is a calibration batch. Note the exact time that works for your machine.
- Open the basket, wait 15 to 20 seconds (the shaping window is slightly shorter here due to the intense heat), then quickly lift each tuile with a thin spatula and drape over a rolling pin to curl. Work fast. Let cool completely before storing. Allow the basket and parchment to cool fully before the next batch.
- Prepare the brown butter batter and chill as directed in the oven method. Do not skip the chill time, as the batter must be cold and firm to spread correctly.
- Place a silicone baking mat on a microwave-safe plate (this is important: parchment alone can stick and burn at high heat spots in a microwave). Drop one level teaspoon of chilled batter onto the centre of the mat. Spread into a thin 3-inch circle with the back of a wet spoon. Press 5 to 7 sliced almonds flat onto the surface.
- Microwave on HIGH (full power) for 60 seconds. Check: the tuile should be puffed, golden at the edges, and beginning to dry in the centre. If it looks pale and wet, continue in 10-second bursts up to 90 seconds total. Watch carefully as it can go from golden to burnt in seconds, and every microwave is different.
- Remove the plate and let the tuile sit for 10 seconds (it will firm slightly on the mat), then quickly peel it off and drape over a rolling pin to curl. Work fast: the shaping window here is about 15 to 20 seconds. Let cool completely. The mat must cool fully before you make the next tuile.
Nutrition Per Serving
Per 1 serving (makes about 24 tuiles)
Why This Recipe Works
The crisp, glassy texture of a tuile is the result of a specific balance of sugar, fat, protein, and just enough flour to hold things together. Icing sugar dissolves completely into the butter and egg whites, creating a smooth, fluid batter with no undissolved sugar crystals to interrupt the structure. As the tuile bakes, the sugar melts and caramelises, the egg white proteins set in a thin network, and the butter spreads the mixture into a lacy, almost transparent wafer. The very small amount of flour provides just enough starch to give the tuile structural integrity without making it thick or biscuit-like. This is a cookie that is almost entirely sugar and fat, which is precisely why it behaves so differently from a classic dough.
Browning the butter before mixing the batter adds a layer of complexity that plain melted butter simply cannot match. When butter is browned, the milk solids undergo the Maillard reaction, producing hundreds of new flavour compounds with nutty, toffee-like, and slightly savoury qualities. These compounds amplify the flavour of the toasted almonds and the caramelised sugar, creating a depth of taste that is entirely disproportionate to the modest ingredient list. It is one of the easiest ways to dramatically improve a baked good.
Chilling the batter before baking is not optional. The fat in the batter needs to be cold and solid so that when it hits the hot oven, it melts gradually and the tuile spreads in a controlled, even circle. Room-temperature batter will spread too fast, producing thin, ragged, irregular shapes. The chilling step also allows the flour to fully hydrate, which contributes to a smoother, more uniform spread. If your tuiles are coming out misshapen or too thin at the edges, chill the batter for longer before the next batch.
Baker’s Tips
- Use a silicone baking mat rather than parchment paper if you have one. Tuiles release far more cleanly from silicone, and the flexible mat makes it easier to peel them off quickly during shaping.
- Spread the batter as thin and even as possible. The thinner the tuile, the more delicate and crisp it will be. Thick patches will stay chewy in the centre even when the edges are browned.
- Bake only one sheet at a time so you can give your full attention to the shaping. Trying to shape two batches at once is how tuiles become frisbees.
- Have everything you need for shaping ready before the timer goes off: your rolling pin positioned on the counter, your offset spatula in hand. You have roughly 20 to 30 seconds from oven to curl.
- If a tuile hardens before you can shape it, simply return it to the oven for 30 to 60 seconds to soften. This works every time and is much less stressful than trying to force a brittle tuile.
- Cool your baking sheet completely between batches. A warm sheet causes the cold batter to melt too quickly before the egg whites have a chance to set, resulting in flat, greasy tuiles.
- Wet your spoon or offset spatula with a little cold water before spreading each tuile. This prevents the batter from sticking to the tool and gives you a much smoother, more even circle.
Variations
- Orange almond tuiles: add 1 tsp finely grated orange zest to the batter along with the vanilla. The citrus cuts beautifully through the richness of the brown butter.
- Sesame tuiles: replace the sliced almonds with a mix of black and white sesame seeds for a striking, nutty alternative with an Asian-inspired flavour profile.
- Chocolate-dipped tuiles: once fully cooled and set, dip one end of each tuile into melted dark chocolate and place on parchment to set. An elegant addition for dinner-party dessert plates.
- Tuile cones: while still warm and pliable, roll each tuile around a metal cream horn mould or roll it by hand into a tight cone shape. Hold for 30 seconds until set, then remove. Fill with whipped cream or pastry cream just before serving.
- Lemon and pistachio tuiles: substitute sliced pistachios for the almonds and add 1 tsp lemon zest to the batter. The colour contrast is stunning.
Troubleshooting & FAQ
My tuiles are soft and bendy instead of crisp. What went wrong?
My tuiles are spreading into irregular, ragged shapes rather than neat circles. How do I fix this?
The tuiles are sticking to the parchment paper and tearing when I try to lift them. Help.
My tuiles are hardening before I can shape them. The shaping window feels impossibly short.
There are dark, oily spots on my tuiles and they taste slightly burnt. What happened?
Storage & Make-Ahead
- Storage: Store completely cooled tuiles in a single layer in an airtight tin or container at room temperature for up to 5 days. Humidity is the enemy of tuiles: even a slightly damp environment will cause them to soften and lose their snap. Do not refrigerate (condensation will make them limp). You can place a small food-safe silica gel packet or a piece of dry bread in the container to absorb moisture.
- Make-Ahead: The batter can be made up to 24 hours in advance and stored covered in the refrigerator. Shaped, baked tuiles do not freeze well as they become soft and fragile when thawed. For the best results, bake the tuiles the day you plan to serve them.
oh vince, you’re so right about that. i’ve found the same thing happens with these tuiles – theres something about being fully present with them, watching the edges turn golden, moving quickly but not rushed. reminds me of sitting with patients actually, that same quality of attention. your grandmother sounds like she understood something really profound about what baking teaches us. tbh the allulose version sets up beautifully if you work quickly, less forgiving than sugar but so worth it for the clean sweetness it brings to something this delicate.
Miriam, what you said about presence and attention really struck me, both in the kitchen and with people. I’ve been growing food for our neighborhood for two decades now, and I’ve learned that whether it’s tending seedlings or shaping warm cookies, the best results come from showing up fully, moment to moment. Your point about allulose being less forgiving is exactly like working with soil and seeds, some seasons are more particular than others, but that’s where the real learning happens. I’m definitely going to try these with allulose next time I bake.
These sound absolutely lovely, and I’m really drawn to the idea of making something that requires presence and timing, the way you describe them needing to be shaped while warm. My grandmother always said the best baking teaches you patience in the most delicious way, and I feel like these tuiles are that lesson in cookie form. Can’t wait to try them out.