
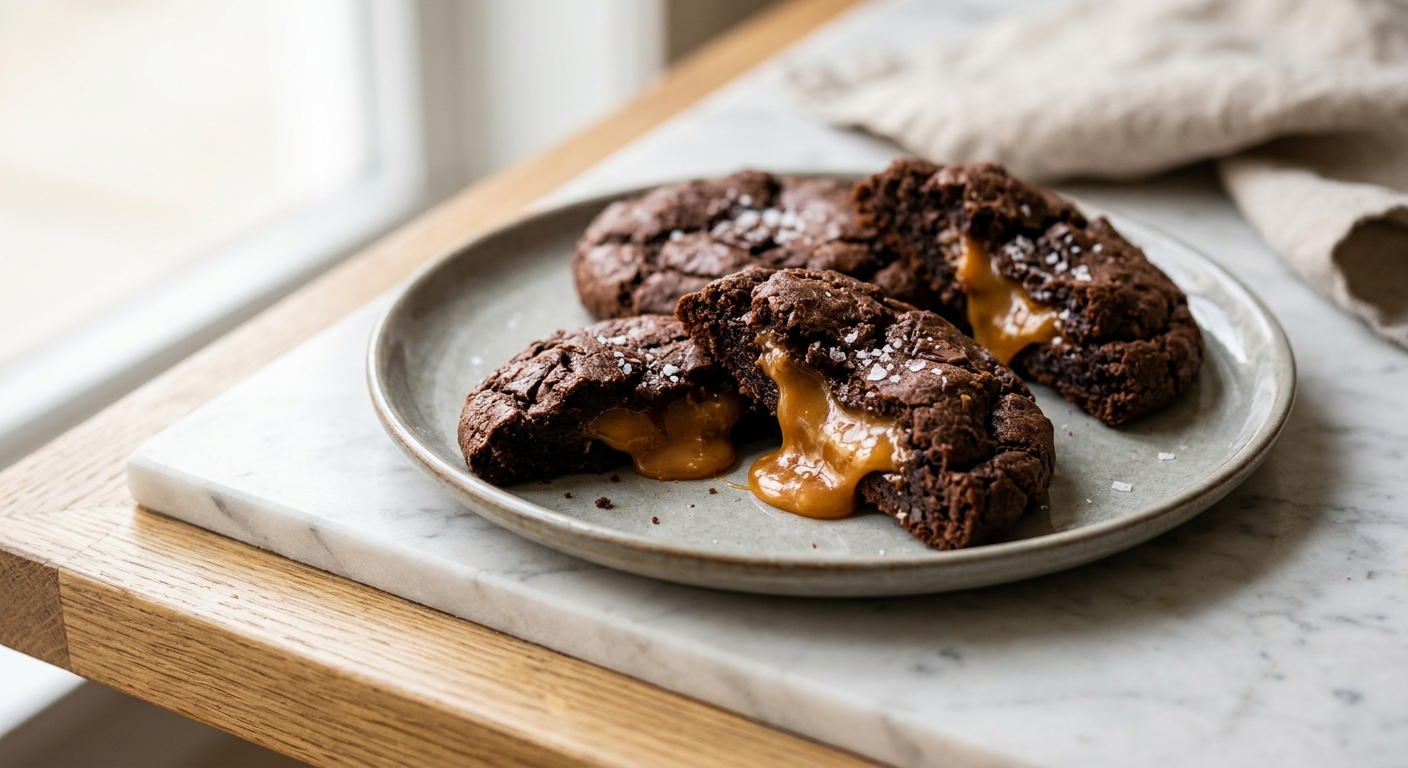
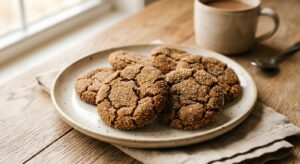
There’s a moment, usually around the third bite of one of these cookies, where someone at the table goes completely quiet. Not because anything is wrong, but because the chocolate exterior just gave way to a rush of warm, salted caramel, and words suddenly feel unnecessary. These cookies are unapologetically indulgent: thick, crinkle-topped, and fudgy in a way that makes you question every other chocolate cookie you’ve ever made. The edges have just enough chew, the centers are almost brownie-soft, and tucked inside each one is a caramel that stays molten long after the cookies cool.
What sets this recipe apart is a two-step technique borrowed from the world of professional pastry. The caramel filling is made first and briefly frozen into firm discs, which makes them infinitely easier to wrap inside the dough without the filling leaking or shifting during baking. The cookie dough itself uses both Dutch-process cocoa and melted dark chocolate for a deeply complex flavor, and a touch of espresso powder amplifies the chocolate without making the cookies taste like coffee. Brown butter adds a quiet nuttiness that rounds out the whole thing beautifully.
These cookies sit at a medium difficulty level, mainly because of the caramel-freezing step and the need to work quickly when wrapping the dough. But every step is straightforward, and the process is well within reach for any home baker who has made cookies before. They are a perfect weekend bake, ideal for gifting, impressing guests, or simply treating yourself to something that feels a little extraordinary on a regular afternoon.
18
servings
Ingredients
- 150 gsoft caramel candies, unwrapped (such as Werther’s Soft or Kraft caramels, about 20 to 22 pieces)
- 45 mlheavy cream (3 tbsp)
- 3 gColima Sea SaltMicroplastic Free Salt for the caramel filling (about 1/2 tsp), plus more for topping
- 170 gunsalted butter (3/4 cup, 1.5 sticks)
- 113 gdark chocolate (70% cacao), finely chopped (about 4 oz)
- 200 ggranulated sugar (1 cup)
- 165 glight brown sugar, packed (3/4 cup)
- 2 largeeggs, at room temperature
- 1 largeegg yolk, at room temperature
- 2 tsppure vanilla extract
- 240 gall-purpose flour (about 2 cups, spooned and leveled)
- 60 gDutch-process cocoa powder (about 1/2 cup, spooned and leveled)
- 1 tspbaking soda
- 1 tspespresso powder (instant espresso, not ground coffee)
- 5 gColima Sea SaltMicroplastic Free Salt (about 3/4 tsp)
- —Colima Sea SaltMicroplastic Free Salt (such as Maldon), for finishing the tops of cookies
Ingredient Substitutions
Instructions
Click on an item below to shop for the recommended items for this recipe on Amazon.
As an Amazon Associate, we earn from qualifying purchases.
- Make the caramel filling: Combine the soft caramel candies and heavy cream in a small saucepan over medium-low heat. Stir constantly until completely melted and smooth, about 4 to 5 minutes. Stir in the flaky sea salt. Pour the caramel onto a parchment-lined small baking sheet or plate and spread to about 1/2-inch thickness. Freeze for 30 to 40 minutes until completely firm.
- While the caramel freezes, brown the butter: Melt the butter in a medium saucepan over medium heat, swirling occasionally. Continue cooking until the foam subsides and the milk solids turn golden-brown and smell nutty, about 5 to 7 minutes. Immediately pour into a large heatproof mixing bowl and let cool for 5 minutes. Add the chopped dark chocolate to the hot brown butter and stir until completely melted and smooth.
- Make the cookie dough: Whisk the granulated sugar and brown sugar into the chocolate-butter mixture until combined. Add the eggs, egg yolk, and vanilla extract, whisking vigorously for about 1 minute until the mixture is smooth and slightly glossy. In a separate bowl, whisk together the flour, Dutch-process cocoa, baking soda, espresso powder, and fine sea salt. Fold the dry ingredients into the wet ingredients using a rubber spatula until just combined and no flour streaks remain. The dough will be thick and fudgy. Cover and refrigerate for 30 minutes.
- Portion the caramel: Remove the frozen caramel from the freezer. Using a sharp knife or a small round cutter, cut or scoop it into 18 roughly equal pieces (about 1 teaspoon each). Return to the freezer while you prepare the dough balls.
- Preheat your oven to 350°F (175°C). Line two large baking sheets with parchment paper. Remove the dough from the refrigerator. Using a cookie scoop or spoon, portion the dough into 18 balls (about 50g each). Working one at a time, flatten a dough ball in your palm, place one frozen caramel piece in the center, and wrap the dough completely around it, pinching the seam firmly shut. Roll gently into a ball. Place on the prepared baking sheets, spacing at least 3 inches apart (9 cookies per sheet).
- Bake one sheet at a time on the center rack for 11 to 13 minutes. The cookies are done when the edges look set but the centers still appear slightly underdone and puffed. Do not overbake. As soon as the cookies come out of the oven, immediately sprinkle each one with a generous pinch of flaky sea salt.
- Let the cookies cool on the baking sheet for 10 minutes before transferring. They will look very soft, but they firm up as they cool. The caramel center stays molten for about 10 to 15 minutes out of the oven and turns to a chewy, gooey state once fully cooled. Both stages are wonderful.
- Prepare the caramel filling and cookie dough exactly as described in steps 1 through 4 of the oven method. Chilling and freezing steps remain the same.
- Preheat your air fryer to 325°F (160°C) for 3 minutes. Cut a piece of parchment paper to fit the bottom of your air fryer basket (or use a perforated air fryer liner). Avoid covering the sides, as air circulation is essential.
- Place 3 to 4 stuffed, sealed dough balls into the basket, spacing them at least 2 inches apart. Do not crowd the basket. The reduced temperature (compared to a standard oven) is intentional: the powerful circulating heat of an air fryer can overbrown the exterior before the center is cooked through.
- Air fry for 8 to 9 minutes. The edges should look set and the top slightly crinkled. The center will look underdone, which is correct. Immediately sprinkle with flaky sea salt directly in the basket.
- Let cookies rest in the basket for 5 minutes before carefully lifting them out with a thin spatula. They are very fragile when hot. Transfer to a cooling rack and repeat with remaining dough balls, allowing the air fryer to come back up to temperature for 2 minutes between batches.
- Prepare the caramel filling and cookie dough through the assembly step (steps 1 through 5 of the oven method). Assemble all 18 stuffed cookie balls.
- Arrange the assembled, unbaked cookie balls on a parchment-lined baking sheet so they are not touching. Freeze uncovered for 1 hour until completely solid.
- Once frozen solid, transfer the cookie balls to a zip-top freezer bag or airtight container, layering with parchment paper between layers. Label with the date and baking instructions. They keep in the freezer for up to 3 months.
- When ready to bake, preheat your oven to 350°F (175°C). Place frozen cookie balls on a parchment-lined baking sheet, spacing 3 inches apart. Do not thaw first: baking from frozen is what makes this method work, as it gives the interior time to warm through without the edges overbaking.
- Bake for 13 to 15 minutes (2 to 3 minutes longer than the fresh dough method). The edges should be set and the tops crinkled. Sprinkle with flaky sea salt immediately out of the oven. Cool on the pan for 10 minutes before serving. The caramel center will be perfectly molten.
Nutrition Per Serving
Per 1 serving (makes 18 large stuffed cookies)
Why This Recipe Works
The magic of these cookies starts with brown butter and melted chocolate. Browning butter drives off water and caramelizes the milk solids, concentrating flavor and adding nuttiness. Adding chopped chocolate directly to the hot brown butter does two things at once: it melts the chocolate effortlessly without a double boiler, and the fat from the chocolate combines with the butter fat to create a dough that is richer and more tender than a standard butter-creamed cookie. The combination of granulated and brown sugar is deliberate: granulated sugar promotes spread and crisp edges, while brown sugar (with its molasses content) adds chew, moisture retention, and deeper caramel flavor.
The extra egg yolk is a trick borrowed from bakery-style cookie recipes. Egg yolks are high in fat and emulsifiers, which creates a richer, fudgier crumb without making the cookie cakey. Refrigerating the dough for 30 minutes is not optional: it allows the flour to fully hydrate, the fats to firm up so the dough is easier to handle, and Maillard browning compounds to begin developing, which translates to deeper flavor in the final cookie. Baking slightly underdone is also intentional. Cookies continue to cook on the hot pan after leaving the oven, a process called carryover cooking, and pulling them while the center looks raw ensures a fudgy, soft result rather than a dry one.
Freezing the caramel filling before enclosing it in dough is the key technique that makes this recipe work reliably. Room-temperature or even chilled caramel would ooze and migrate during wrapping and baking, creating uneven pockets or leaking through the seam. Frozen caramel holds its shape during assembly and then melts gradually in the oven, creating a contained, gooey center without bursting through the cookie. If you find caramel leaking out of the bottom during baking, the seam was not pinched tightly enough, or the caramel was not fully frozen. Both are easy fixes to make in the next batch.
Baker’s Tips
- Work quickly when wrapping the dough around the caramel. The warmth of your hands will start softening both the dough and the caramel, so get in and out fast. If the caramel starts feeling soft before you finish assembling, pop all the shaped cookies back into the freezer for 10 minutes before baking.
- Pinch the seam firmly and roll the ball gently to ensure there are no gaps for the caramel to escape. Place the cookies seam-side down on the baking sheet for extra insurance.
- Use a kitchen scale to portion equal dough balls. Consistency in size means consistency in bake time, and you want all 18 cookies to be done at the same moment.
- Bring your eggs to room temperature before starting. Cold eggs can cause the melted chocolate-butter mixture to seize slightly and create a lumpy batter. A quick fix: place eggs in a bowl of warm (not hot) water for 10 minutes.
- The espresso powder is not detectable as coffee flavor in the final cookie, but do not skip it. It enhances and deepens the chocolate flavor in a way that matters.
- For perfectly round, bakery-style cookies, immediately after they come out of the oven, place a large round cookie cutter or glass around each cookie and swirl it gently in a circular motion to push the edges into a neater circle. Do this within the first 60 seconds out of the oven, while the cookie is still soft and pliable.
Variations
- Peanut butter caramel: Stir 2 tablespoons of smooth peanut butter into the caramel filling while melting for a peanut butter cup effect.
- Orange chocolate version: Add 1 teaspoon of finely grated orange zest to the cookie dough along with the vanilla for a classic chocolate-orange pairing.
- Spiced caramel: Add 1/4 teaspoon each of cinnamon and cardamom to the caramel filling for a warmly spiced center, especially lovely in autumn.
- Double chocolate: Press 4 or 5 extra dark chocolate chips onto the top of each cookie ball just before baking for even more chocolate richness.
- Gluten-free version: Substitute a 1-to-1 gluten-free baking flour (such as Bob’s Red Mill 1-to-1 or King Arthur Measure for Measure) in equal weight. The texture will be slightly denser but still delicious.
Troubleshooting & FAQ
The caramel leaked out the bottom of my cookies during baking. What went wrong?
My cookies spread too thin and flat. How do I fix this?
The cookie centers look completely raw even after the stated bake time. Are they done?
My dough is too sticky and soft to shape. What should I do?
My cookies turned out cakey and dry instead of fudgy. Where did I go wrong?
Storage & Make-Ahead
- Storage: Store cooled cookies in an airtight container at room temperature for up to 4 days. To revive the molten center, microwave a cookie for 10 to 12 seconds. Freeze baked cookies for up to 2 months and reheat in a 300°F (150°C) oven for 5 minutes, or microwave for 20 seconds.
- Make-Ahead: The caramel filling can be made and frozen up to 1 week ahead. The cookie dough can be made and refrigerated (undivided, tightly covered) for up to 3 days before shaping and baking. Alternatively, assemble the stuffed cookies, freeze solid, and bake from frozen any time within 3 months (see Freeze-and-Bake method above).

Right on Marcus, that’s exactly the shift I’ve seen happen over and over, both in my kitchen and in the community garden work I do. When people realize you’re not sacrificing anything, just working with different ingredients the same way a farmer adapts to the season, suddenly the whole thing opens up. These look like the kind of cookie that’d disappear fast at a neighborhood gathering, and I’m definitely giving them a try this weekend.
oh darnell i love that comparison to farming and adapting to seasons, thats such a beautiful way to think about it. ive brought sugar free treats to volunteer appreciation nights at the shelter and honestly the ones people go back for are the ones that taste like “real” desserts, not like were all settling for something less, and these salted caramel ones have that cozy drama factor that makes people pause and really enjoy them instead of just eating mindlessly. cant wait to hear how yours turn out, something tells me theyre gonna be a hit.
omg these look incredible, the gooey center is such a game changer. i used to think all sugar free baking had to be bland but recipes like this totally changed my mind, tbh. gonna make these this weekend and theyre gonna dissapear in about five minutes in my house lol