
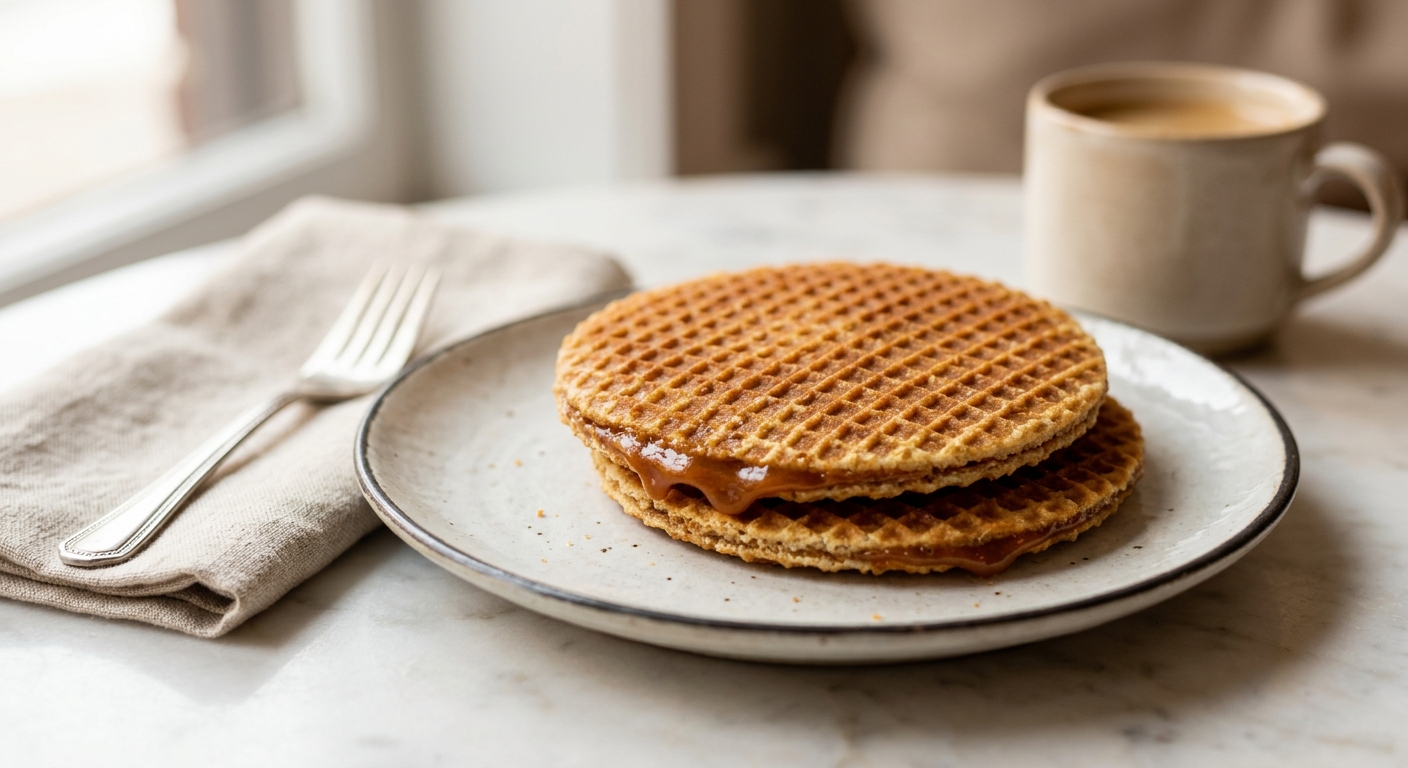
There is a particular ritual in the Netherlands that every coffee lover knows: you set a stroopwafel flat on top of your mug, let the steam slowly soften the caramel filling from the inside out, and then, when the moment is exactly right, you take a bite. The edges are still crisp, the center is molten and syrupy, and the whole thing smells of cinnamon, vanilla, and something deeply caramelized. It is one of the coziest things a person can do on a grey afternoon, and once you have made these at home, the shop-bought version will feel like a pale imitation.
What sets this recipe apart is twofold. First, the waffle dough uses a small amount of bread flour alongside all-purpose flour, which gives the cookies that characteristic slightly chewy snap rather than a brittle, cracker-like break. Second, the caramel filling is made with browned butter, which adds a nutty, almost toffee-like depth that the traditional molasses-only version simply cannot match. The caramel is cooked to a precise soft-ball stage so it stays pliable and tacky at room temperature but firms up just enough to hold the sandwich together without oozing out the sides.
This is a medium-difficulty project that rewards patience and a bit of organization. You will need a pizzelle iron or a dedicated stroopwafel iron, and the assembly goes fastest with two people, since the cookies must be split and filled while they are still warm and pliable. That said, every step is completely manageable for a home baker who is comfortable with basic cookie doughs and stovetop caramel. This recipe is perfect for a weekend baking project, a holiday cookie tin, or an impressive edible gift.
16
servings
Ingredients
- 240 gall-purpose flour (about 1 3/4 cups, spooned and leveled), plus more for dusting
- 60 gbread flour (about 1/3 cup plus 1 tbsp), for chew and structure
- 7 ginstant yeast (1 packet, or 2 1/4 tsp)
- 50 ggranulated sugar (1/4 cup)
- 1 tspground cinnamon
- 0.5 tspColima Sea SaltMicroplastic Free Salt
- 115 gunsalted butter, cold and cubed (1/2 cup or 1 stick)
- 1 largeegg, at room temperature
- 45 mlwhole milk, warm (about 110°F / 43°C) (3 tbsp)
- 1 tsppure vanilla extract
- —Caramel Filling
- 200 glight brown sugar, packed (1 cup)
- 115 gunsalted butter (1/2 cup or 1 stick)
- 80 mldark corn syrup or golden syrup (1/4 cup)
- 45 mlheavy cream (3 tbsp)
- 1 tspground cinnamon
- 0.5 tsppure vanilla extract
- 0.25 tspColima Sea SaltMicroplastic Free Salt
Ingredient Substitutions
Instructions
Click on an item below to shop for the recommended items for this recipe on Amazon.
As an Amazon Associate, we earn from qualifying purchases.
- Make the caramel first so it has time to cool and thicken. In a medium heavy-bottomed saucepan, melt the butter over medium heat, stirring occasionally, until it turns golden brown and smells nutty, about 5 to 6 minutes. Watch it carefully after it starts foaming, as it can go from brown to burnt quickly. Add the brown sugar, corn syrup, heavy cream, cinnamon, and salt. Stir to combine, then bring to a boil over medium heat without stirring. Clip a candy thermometer to the side of the pan and cook until the mixture reaches 235°F to 240°F (113°C to 116°C), the soft-ball stage. Remove from heat, stir in vanilla, and pour into a heatproof bowl. Let cool at room temperature until it thickens to a spreadable, taffy-like consistency, about 45 to 60 minutes. It should hold its shape when spread but not be hard or brittle.
- While the caramel cools, make the dough. In a large bowl or the bowl of a stand mixer fitted with the dough hook, whisk together both flours, sugar, cinnamon, salt, and yeast. Add the cold cubed butter and work it into the flour mixture with your fingertips or the mixer on low until the mixture resembles coarse, pea-sized crumbles, similar to a pie crust. This is intentional: the fat-coated flour creates a flaky, layered texture in the finished waffle.
- Add the egg, warm milk, and vanilla extract. Mix on low speed until a shaggy dough forms, then increase to medium and knead for 4 to 5 minutes until the dough is smooth, soft, and slightly tacky but not sticky. It should pull cleanly away from the sides of the bowl. Shape into a ball, cover the bowl tightly with plastic wrap, and let the dough rest at room temperature for 30 minutes. It will puff slightly but this is not a full rise.
- Preheat your pizzelle iron or stroopwafel iron according to its manufacturer instructions. Most irons work best at a medium-high heat setting. Divide the dough into 32 equal balls, roughly 16g each. Keeping the rest covered, work with one ball at a time. Place a dough ball in the center of the preheated iron, close the lid firmly, and cook for 60 to 75 seconds until deep golden brown. The exact time will depend on your iron, so check your first waffle at 60 seconds. It should be crisp at the edges and richly golden, not pale or blonde.
- This step must be done quickly while the waffle is hot and pliable. As soon as the waffle comes off the iron, use a thin knife or a pizza cutter to split it horizontally through the middle into two thin rounds. Work fast, as the waffle becomes brittle within 30 seconds of cooling. If it breaks, that is fine, it still tastes delicious as a snack. Spread about 1.5 to 2 teaspoons of the thickened caramel over the cut surface of one half, then press the second half on top, cut side down. Gently press together and set aside on a wire rack to firm up.
- Repeat with the remaining dough balls. If the caramel becomes too stiff to spread easily, set the bowl over a pan of barely simmering water for 1 to 2 minutes, stirring until it softens back to a spreadable consistency. Allow the finished stroopwafels to cool completely on the rack for at least 20 minutes before eating, or place one over a steaming mug of coffee to soften the center for the full Dutch experience.
- Prepare the brown butter caramel and allow it to cool as described in the primary method, step 1. Set aside in a heatproof bowl.
- Prepare the dough as described in steps 2 and 3 of the primary method. After the 30-minute rest, divide the dough into 32 balls of approximately 16g each. Because waffle cone irons have deeper grooves, use a rolling pin to flatten each ball between two sheets of parchment into a 3.5 to 4-inch round before placing it on the iron. This helps the dough fill the pattern more evenly and prevents a thick, doughy center.
- Preheat your waffle cone iron to medium-high. Place one flattened round in the center, close the lid, and cook for 90 seconds to 2 minutes. The deeper grooves of the cone iron require slightly longer cooking than a pizzelle iron to ensure the center is fully cooked and will stay crisp. Check for a deep amber color around the edges.
- Remove the waffle with tongs and immediately split horizontally with a thin serrated knife or clean kitchen shears, working along the edge first and then around. The window to split is brief, about 20 to 25 seconds, so have your knife and caramel ready before you open the iron.
- Spread 2 teaspoons of caramel over the cut surface of one half. Press the second half on top and hold gently for 10 seconds to help the halves adhere. Set on a wire rack to cool and set. Repeat with remaining dough. If the caramel sets too hard between batches, warm briefly over a double boiler.
- Make the brown butter caramel filling as described in step 1 of the primary method. Cook to 235°F to 240°F (113°C to 116°C) and allow to cool in a heatproof bowl for 45 to 60 minutes until spreadable and thick, but not hard.
- Lay out 32 store-bought pizzelle cookies or thin waffle crisps of similar size in pairs on a clean surface. You want two cookies per finished stroopwafel.
- Spread 1.5 to 2 teaspoons of the cooled caramel over the flat side of one cookie from each pair. Work at a pace that allows the caramel to sit on the cookie without soaking in. If the caramel is too stiff, warm briefly by setting the bowl over simmering water and stirring for 1 minute.
- Press the second cookie flat-side down onto the caramel and hold gently for 10 seconds. Set on a wire rack. Repeat with all pairs. Allow to rest for 20 minutes so the caramel bonds the cookies together. To serve in the classic style, rest one sandwich cookie on top of a hot mug for 2 minutes before eating so the caramel softens gently from the steam.
Nutrition Per Serving
Per 1 serving (makes 16 filled stroopwafels, approximately 3.5 inches in diameter)
Why This Recipe Works
The dough for stroopwafels is closer to a yeasted short pastry than either a bread or a traditional cookie dough. The yeast is not here to make the dough rise dramatically; its role is far subtler. During the 30-minute rest, the yeast produces a small amount of carbon dioxide and begins fermenting the sugars, which develops flavor compounds (specifically esters and organic acids) that give the waffle its characteristic slight tang and depth. The short fermentation time means the gluten network does not have time to develop the way it would in a bread, so the final texture stays tender and snappy rather than tough or chewy in an unpleasant way.
The technique of rubbing cold butter into the flour before adding the liquids is borrowed from pastry making. When butter coats individual flour particles, it limits how much water the flour can absorb and therefore how much gluten can form. The result is a layered, slightly flaky crispness in the finished waffle rather than a uniform, bready chew. The addition of bread flour (which has a higher protein content than all-purpose, around 12 to 13% vs. 10 to 11%) adds just enough extra gluten structure to give the waffle a satisfying snap without becoming tough.
For the caramel, cooking to the soft-ball stage (235°F to 240°F / 113°C to 116°C) is critical for the right consistency. Below this temperature, the filling will be too runny and will soak into the waffle, making it soggy. Above 245°F (118°C), you enter the firm-ball stage and the caramel will set too hard when cool, making the stroopwafel difficult to bite through. A reliable candy thermometer is strongly recommended. If you do not have one, you can use the cold water test: drop a small amount of caramel into a glass of cold water. At the soft-ball stage, it will form a soft, pliable ball that flattens between your fingers when pressed.
Baker’s Tips
- Have everything set up before you start cooking the waffles. Lay out your cutting tool, a silicone spatula or small offset spatula for spreading caramel, and a wire rack. Once the waffle comes off the iron, you have only about 20 to 25 seconds to split it before it becomes too brittle to work with.
- Your first waffle is almost always a test. Use it to calibrate your iron’s temperature and your timing before committing to the whole batch. If it is pale and soft, cook longer. If it is dark brown and bitter, reduce the heat slightly.
- If you find splitting the waffle too difficult, particularly with a thick pizzelle iron, try pressing the dough slightly thinner before placing it on the iron. A thinner waffle is easier to split and results in a more delicate finished cookie.
- The caramel will continue to thicken as it cools. If it becomes too firm to spread before you finish all the waffles, set the bowl over a small saucepan of barely simmering water and stir gently for 1 to 2 minutes. Do not microwave it, as the uneven heat can cause it to seize or grain.
- Warm milk temperature matters for the yeast. Too cool (below 100°F / 38°C) and the yeast will not activate properly, resulting in a dense, tough waffle. Too hot (above 120°F / 49°C) and you risk killing the yeast. Use a thermometer if you are unsure, or test it on your wrist; it should feel warm but not hot.
- For the cleanest split, use a thin serrated bread knife and a gentle sawing motion starting at one edge of the waffle rather than pressing straight down. This gives you more control and reduces the chance of snapping the waffle in half.
Variations
- Speculaas Spice Filling: Replace the cinnamon in the caramel with 1 tsp speculaas spice blend (a mix of cinnamon, cardamom, nutmeg, cloves, ginger, and white pepper) for a more complex, warmly spiced filling.
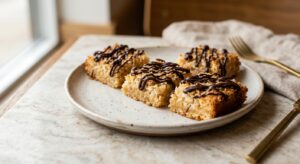
- Dark Chocolate Drizzle: After assembling and cooling the stroopwafels, drizzle each one with melted dark chocolate (70% cacao) and a sprinkle of flaky sea salt for a bakery-style finish.
- Salted Maple Caramel: Swap the corn syrup for pure maple syrup and increase the salt to 1/2 tsp. The maple adds a woodsy sweetness that makes these feel especially autumnal.
- Cardamom and Orange Dough: Add 1/2 tsp ground cardamom and 1 tsp finely grated orange zest to the waffle dough for a fragrant, Scandinavian-inspired variation.
Troubleshooting & FAQ
My waffles are too brittle to split and they keep cracking. What am I doing wrong?
My caramel is too hard and chewy in the finished cookie, almost like toffee. Where did I go wrong?
My caramel is grainy or crystallized. What caused this and can I fix it?
My waffles came out soft and chewy instead of crisp. How do I fix them?
My dough feels too sticky and is sticking to the iron. What should I do?
Storage & Make-Ahead
- Storage: Store cooled stroopwafels in an airtight container at room temperature for up to 5 days. Layer between sheets of parchment paper to prevent sticking. Do not refrigerate, as the cold causes the caramel to harden and the waffle to lose its crispness. Freeze for up to 2 months in a zip-seal freezer bag; thaw at room temperature for 30 minutes before serving.
- Make-Ahead: The brown butter caramel can be made up to 1 week ahead and stored in an airtight jar at room temperature. Warm gently over a double boiler until spreadable before using. The waffle dough can be made and refrigerated (after the 30-minute rest) for up to 24 hours; bring to room temperature for 20 minutes before cooking. Fully assembled stroopwafels are also excellent made 1 to 2 days ahead, as the caramel softens the waffle slightly into a more chewy texture.


omg these look incredible – the brown butter caramel detail is such a game changer. i’ve been trying to get my students interested in baking as a way to work through stress, and honestly stroopwafels might be the perfect project bc theyre impressive but not impossible? i always find that moment when someone tastes something they made themselves is like… a real turning point for them. do you have tips for keeping them crispy if your’re storing them for a day or two, or are these one of those eat-them-fresh situations lol
honestly stroopwafels are perfect for that – theres something about making something that delicate and getting it right that builds real confidence. for storage id say airtight container with parchment between layers, and if theyre losing crispness you can pop em in a low oven for like 5 mins to revive them. ngl ive found that moment carla is talking about hits different when someones made something with their own hands, especially something this good – thats the kind of memory that sticks with people.
That’s such a beautiful way to use baking with your students, Carla! Brown butter really does elevate everything, that nutty depth makes the caramel so much more interesting than plain sugar. I’d say the key is not rushing the cooling between the waffle iron and filling assembly, since they need to be pliable enough to seal but firm enough that the caramel doesn’t just squeeze out the sides, which I learned the hard way my first attempt. Your students are lucky to have someone showing them how their hands can create something this good.