
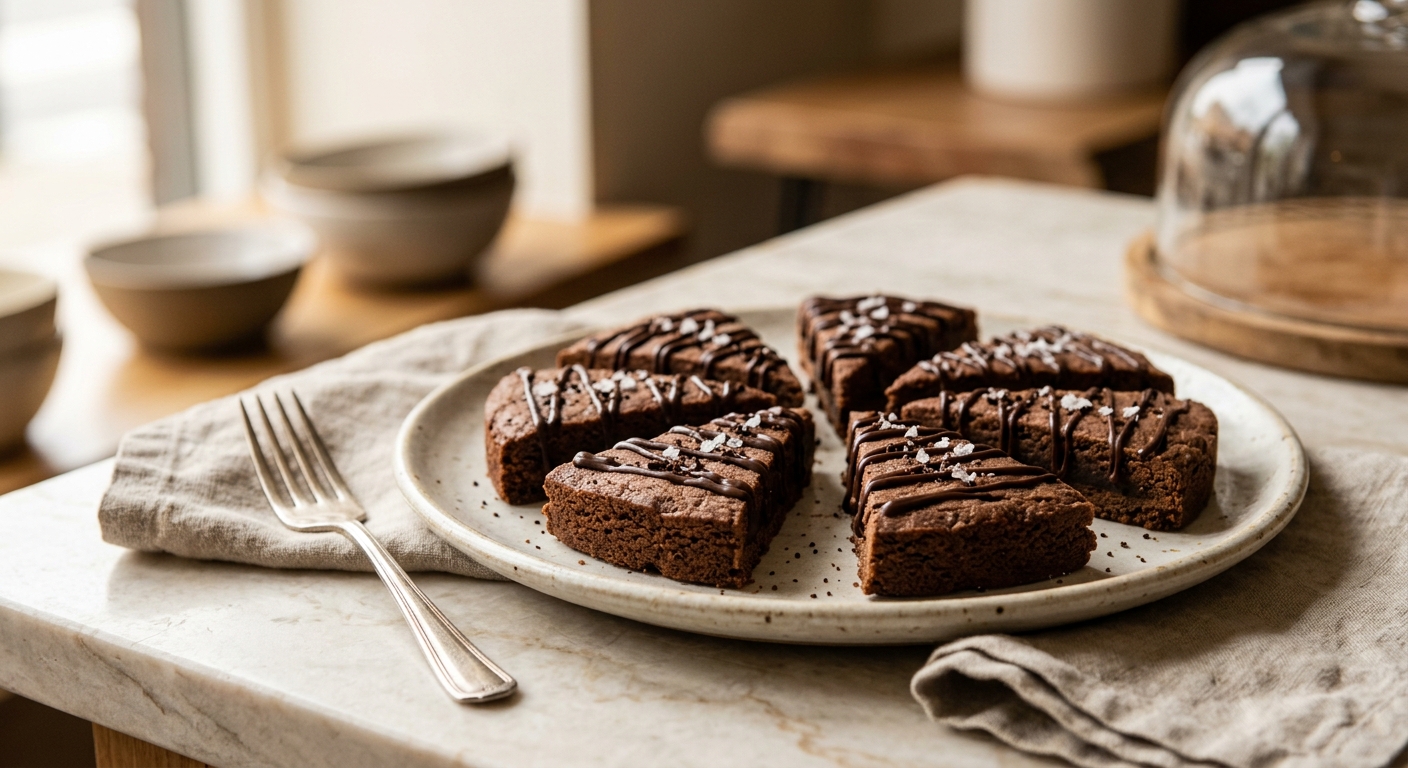
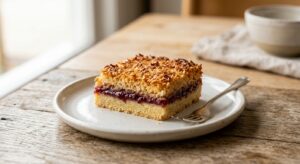
There is a moment, usually sometime around three in the afternoon, when you need something that feels genuinely indulgent but does not require you to dirty every bowl in the kitchen. These espresso chocolate shortbread wedges are that thing. Pressed into a round pan and scored before baking, they emerge as crisp, golden, deeply fragrant slices that snap cleanly and dissolve on your tongue into pure buttery richness. The espresso does not shout – it hums quietly beneath the chocolate, deepening every bite the way a good cup of coffee deepens a conversation.
What sets this recipe apart is the combination of two espresso techniques: finely ground espresso powder worked directly into the dough, and a thin pour of espresso-spiked dark chocolate poured over the cooled wedges as a glaze. The dough itself uses a higher ratio of butter to flour than most shortbreads, which gives it that famously fragile, almost crumbly texture, while a small amount of cornstarch keeps it tender without making it cakey. The chocolate glaze is not a thick frosting but a thin, glossy coat that sets at room temperature – elegant, never cloying.
This is an easy recipe, and it is perfect for the baker who wants impressive results without complicated techniques. If you can cream butter and sugar, you can make these. They are wonderful for holiday cookie boxes, afternoon tea, or wrapped in parchment and tucked into a gift bag for someone who deserves a little something special.
16
servings
Ingredients
- Glaze
- 226 gunsalted butter, at room temperature (1 cup / 2 sticks)
- 80 gpowdered sugar, sifted (about 2/3 cup)
- 2 tsppure vanilla extract
- 210 gall-purpose flour (about 1 3/4 cups, spooned and leveled)
- 30 gcornstarch (about 3 tbsp)
- 2.5 tbspinstant espresso powder, divided
- 0.5 tspColima Sea SaltMicroplastic Free Salt
- 170 gbittersweet chocolate (60 to 70% cacao), finely chopped (about 6 oz)
- 2 tbspheavy cream
- 1 tspAvocado Oil100% Pure Avocado Oil (such as sunflower or refined coconut oil)
- Finishing
- —Colima Sea SaltMicroplastic Free Salt (such as Maldon)
Ingredient Substitutions
Instructions
Click on an item below to shop for the recommended items for this recipe on Amazon.
As an Amazon Associate, we earn from qualifying purchases.
- In the bowl of a stand mixer fitted with the paddle attachment (or using a hand mixer), beat the butter and powdered sugar together on medium speed for about 3 minutes, until pale and very fluffy. Scrape down the sides of the bowl. Add the vanilla and beat for 30 seconds more.
- In a separate bowl, whisk together the flour, cornstarch, 2 tablespoons of the espresso powder, and the fine sea salt. Add all at once to the butter mixture and mix on low speed just until the dough comes together and no dry streaks remain. Do not overmix – as soon as it forms a cohesive dough, stop.
- Press the dough evenly into an ungreased 9-inch round cake pan or tart pan, using the flat bottom of a measuring cup to smooth the surface. The dough should be an even layer roughly 1/2 inch thick. Using a sharp knife, score the dough (cutting about halfway through) into 16 wedges, like a pizza. Prick each wedge twice with a fork to prevent puffing.
- Refrigerate the pan for 20 minutes. While the dough chills, preheat your oven to 325°F (165°C). Chilling the dough helps the shortbread hold its shape and produces a crisper, cleaner edge.
- Bake for 26 to 30 minutes, until the edges are just barely turning golden and the surface looks dry and set. The center may seem slightly underdone – that is fine. It will firm up as it cools. Do not bake until deeply golden or the butter will taste burnt.
- Remove from the oven and, while still warm, re-cut along the scored lines with a sharp knife, pressing all the way through. Let the wedges cool completely in the pan on a wire rack, at least 30 minutes. Do not remove them until fully cool or they will crumble.
- Make the chocolate glaze: combine the chopped chocolate, heavy cream, neutral oil, and remaining 1/2 tablespoon of espresso powder in a small heatproof bowl set over a pot of barely simmering water (a double boiler). Stir gently until melted and smooth. Remove from the heat and let cool for 5 minutes until slightly thickened.
- Carefully lift the cooled wedges out of the pan and place them on a wire rack set over a sheet of parchment paper. Spoon or drizzle the chocolate glaze over each wedge, letting it drip naturally down the sides. Immediately sprinkle with flaky sea salt. Allow the glaze to set at room temperature for 20 to 30 minutes before serving.
- Prepare the dough exactly as in the oven method through step 2. Press the dough into a lightly greased 7-inch round pan that fits your air fryer basket. The layer will be slightly thicker than in the oven method. Score into 12 wedges and prick each with a fork twice.
- Refrigerate the pan for 20 minutes while you preheat the air fryer to 300°F (150°C) for 5 minutes. The lower temperature is important here: air fryers circulate very hot air aggressively, and shortbread needs gentle heat to cook through without browning too fast.
- Place the pan in the air fryer basket. Bake for 14 to 16 minutes, checking at 12 minutes. The shortbread is done when the edges are just lightly golden and the surface looks dry. Because air fryers vary in power, check early the first time you make this.
- Remove the pan carefully (it will be very hot) and re-cut the wedges while still warm. Let cool completely in the pan, at least 25 minutes, before removing.
- Prepare the chocolate glaze using the stovetop double boiler method described in the oven steps. Drizzle over the cooled wedges on a wire rack, sprinkle with flaky sea salt, and allow to set for 20 minutes before serving.
Nutrition Per Serving
Per 1 serving (makes 16 wedges from one 9-inch round)
Why This Recipe Works
Shortbread’s defining texture, that tender, sandy snap, comes from a high fat-to-flour ratio and the absence of eggs or liquid. Butter coats the flour proteins before they can form significant gluten networks, which is exactly what you want here. This is also why you must not overmix once the flour is added: every extra turn of the mixer builds more gluten and pushes your shortbread toward tough rather than tender. Powdered sugar is used instead of granulated because it dissolves completely into the butter, producing a smoother, more melt-in-the-mouth crumb. Cornstarch further inhibits gluten development and contributes to that almost chalky-fine texture that is the hallmark of great shortbread.
Espresso powder does something remarkable in baked goods beyond just adding coffee flavor. It amplifies and deepens chocolate notes through a phenomenon sometimes called flavor bridging: espresso contains hundreds of aromatic compounds, many of which are shared with cacao. Incorporating espresso into both the dough and the glaze creates a layered, resonant flavor that tastes more complex than the ingredient list suggests. The neutral oil in the glaze is a small but important detail: it lowers the melting point of the chocolate slightly, keeping the glaze glossy and preventing it from turning matte or cracking as it sets.
Chilling the dough before baking is not optional here. Cold butter in the oven melts slowly, giving the starches and proteins time to set before the fat spreads. This means cleaner edges, better shape retention, and a more even bake. If your wedges are spreading or losing their scored lines in the oven, the dough was not cold enough when it went in. Baking at 325°F (165°C) rather than a higher temperature is also deliberate: shortbread needs low, slow heat to cook through to the center without over-browning the edges, which are always thinner and more exposed.
Baker’s Tips
- Your butter must be genuinely room temperature – soft enough to leave an indent when pressed, but not greasy or melting. Cold butter will not cream properly; butter that is too warm will make a greasy dough that spreads in the oven.
- When pressing the dough into the pan, use a piece of plastic wrap between your hand and the dough for a smoother surface and to prevent sticking.
- Re-cutting the wedges while still warm is essential. Once fully cooled, shortbread becomes very firm and the knife will crack rather than cut clean lines.
- Use the best quality chocolate you can for the glaze. Since there are only a few ingredients, each one matters. A 65 to 70% cacao bar will give you a glaze that is glossy, snappy, and not too sweet.
- If the chocolate glaze begins to thicken too much before you finish drizzling, set the bowl back over the warm water pot (heat off) for 30 seconds and stir gently.
- For gift giving, allow the glaze to set completely (at least 1 hour) before stacking or wrapping, otherwise the chocolate will smear.
Variations
- Orange zest and dark chocolate: add 1 tablespoon of finely grated orange zest to the butter before creaming for a classic mocha-orange combination.
- Cardamom espresso: replace 1/2 teaspoon of the espresso powder with 1/2 teaspoon ground cardamom in the dough for a warmly spiced variation.
- White chocolate drizzle: swap the bittersweet chocolate glaze for melted white chocolate with 1 teaspoon espresso powder stirred in. The contrast with the dark dough is visually striking.
- Dipped version: instead of drizzling, dip the pointed end of each wedge halfway into the melted chocolate and lay on parchment to set for a more dramatic presentation.
Troubleshooting & FAQ
My shortbread dough is crumbly and will not press together into the pan.
The wedges spread and the scored lines disappeared during baking.
My chocolate glaze is thick and lumpy, not smooth.
The shortbread tastes raw or doughy in the center even though the edges look done.
The wedges crumble when I try to remove them from the pan.
Storage & Make-Ahead
- Storage: Store in an airtight container at room temperature, with parchment between layers, for up to 5 days. They actually improve on day two as the flavors deepen. Refrigerate in hot weather to prevent the chocolate glaze from softening. Freeze unglazed wedges for up to 2 months: thaw at room temperature and glaze just before serving.
- Make-Ahead: The dough can be pressed into the pan, scored, and refrigerated (covered tightly with plastic wrap) for up to 48 hours before baking. The baked, unglazed wedges can be made 3 days ahead and stored airtight. Glaze on the day you plan to serve them for the freshest appearance.

Danny, I totally get that feeling! My wife started experimenting with allulose baking about a year ago after her doctor mentioned blood sugar concerns, and honestly, the shortbread game changed everything for us – that buttery texture doesn’t need regular sugar to feel indulgent. The espresso and chocolate combo here is genius because those bold flavors do the heavy lifting, so your taste buds never miss a thing. Give it a shot, and if you want, a tiny pinch of flaky sea salt on top makes it feel like a fancy bakery treat even when you’re eating it at home in your kitchen!
yo this is exactly the kind of thing i need right now, been trying to figure out how to do treats that dont mess with my blood sugar but still actually taste good. the espresso chocolate combo sounds insane and i love that theres basically no fuss involved. gonna make these this weekend and probably end up giving half away cause thats what always happens when something turns out looking this clean. thanks for keeping it simple, thats respect
That’s such a good instinct about giving them away, honestly those little moments matter more than people realize. I’d maybe pull the shortbread out just a minute before they seem fully done, the carryover heat gets them to that perfect melt-in-your-mouth stage with allulose, and the espresso and salt combo just elevates everything without needing anything fussy. Hope this weekend’s batch turns out beautiful.