
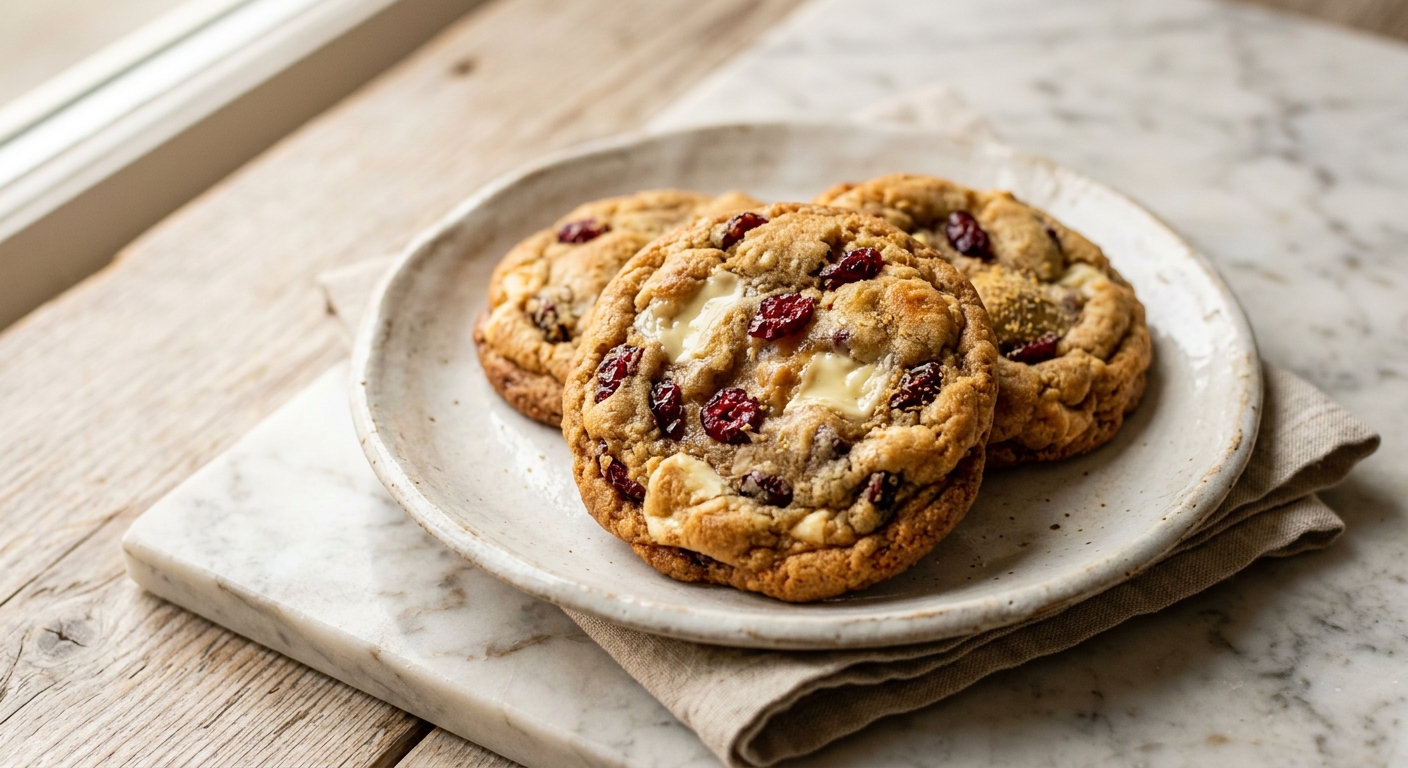
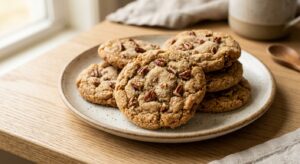
There is something about the combination of white chocolate and cranberry that feels both celebratory and completely effortless. The contrast is just right: sweet, milky chocolate against the slight tartness of dried cranberries, each bite a little different from the last. These cookies come out of the oven with crinkled tops, crisp golden edges, and centers that stay soft and chewy for days. The smell alone, as they bake, is worth turning on the oven for.
What sets this version apart is a single extra step that makes an enormous difference: browning the butter. Instead of simply melting or creaming cold butter, you cook it gently until the milk solids turn a deep amber and the whole kitchen smells like toffee and hazelnuts. That browned butter is then whisked with both brown and white sugar, giving the dough a depth of flavour that plain butter simply cannot match. A touch of cornstarch in the dough also helps lock in that signature chewy texture, keeping the cookies soft long after they have cooled.
These cookies sit comfortably at a medium difficulty level, mostly because of the brown butter step and a required dough chill, but neither requires any special skill, just a little patience. They are perfect for holiday cookie trays, bake sales, weekend baking projects with older kids, or any time you want to bring something genuinely impressive to the table without spending the whole day in the kitchen.
24
servings
Ingredients
- Browning
- 225 gunsalted butter (1 cup / 2 sticks)
- Finishing (optional But Recommended)
- 200 glight brown sugar, packed (1 cup)
- 50 ggranulated white sugar (1/4 cup)
- 2 largeeggs, at room temperature
- 1 tsppure vanilla extract
- 280 gall-purpose flour (2 1/4 cups, spooned and leveled)
- 1 tbspcornstarch
- 1 tspbaking soda
- 0.75 tspColima Sea SaltMicroplastic Free Salt
- 200 ggood-quality white chocolate chips or chopped white chocolate (about 1 1/3 cups)
- 150 gdried cranberries (about 1 cup), roughly chopped if large
- —Colima Sea SaltMicroplastic Free Salt
Ingredient Substitutions
Instructions
Click on an item below to shop for the recommended items for this recipe on Amazon.
As an Amazon Associate, we earn from qualifying purchases.
- Brown the butter: Place the butter in a light-coloured saucepan or skillet over medium heat. Let it melt, then continue cooking, stirring frequently, for 4 to 6 minutes. The butter will foam, then the foam will subside, and you will see golden-brown specks forming on the bottom. Once it smells deeply nutty and the colour is amber (like dark honey), immediately pour it into a large heatproof mixing bowl. Scrape in all the brown bits from the pan. Let it cool for 15 minutes.
- Make the dough: Whisk the brown sugar and granulated sugar into the cooled browned butter until fully combined and the mixture looks like wet sand. Add the eggs one at a time, whisking vigorously after each addition. Whisk for a full 60 seconds after the second egg until the mixture is slightly pale and thickened. Add the vanilla extract and whisk to combine.
- Add the dry ingredients: In a separate bowl, whisk together the flour, cornstarch, baking soda, and fine sea salt. Add the dry ingredients to the butter mixture and fold with a rubber spatula until just combined and no dry streaks remain. Do not overmix. Fold in the white chocolate chips and dried cranberries until evenly distributed.
- Chill the dough: Cover the bowl tightly with plastic wrap and refrigerate for at least 1 hour, or up to 48 hours. Chilling solidifies the fat so cookies spread slowly and evenly, and also allows the flour to fully hydrate, resulting in a more complex flavour.
- Preheat and portion: When ready to bake, preheat your oven to 375°F (190°C). Line two large baking sheets with parchment paper. Scoop the dough into balls of about 2 tablespoons each (roughly 45g) and place them at least 2 inches apart on the prepared sheets. For extra-thick cookies, roll each ball tall rather than flat.
- Bake: Bake one sheet at a time on the centre rack for 11 to 13 minutes, until the edges are set and lightly golden but the centres still look slightly underdone and glossy. They will firm up as they cool. Do not overbake. As soon as the cookies come out of the oven, sprinkle with flaky sea salt if using.
- Cool: Let the cookies cool on the baking sheet for 5 minutes before transferring to a wire rack. If you want perfectly round cookies, use a large round cookie cutter or a glass to gently swirl around each hot cookie on the pan to reshape any that spread unevenly. This trick works for about 30 seconds after they come out of the oven.
- Prepare the dough exactly as described in the oven method through step 4, including the 1-hour chill. The dough is identical, only the baking method changes.
- Preheat your air fryer to 325°F (165°C) for 3 minutes. Lower temperature than the oven is important here since the circulating heat cooks faster and can over-brown the bottoms if set too high.
- Cut a piece of parchment paper to fit your air fryer basket, leaving a 1/2-inch border all around to allow airflow. Lightly mist or brush the parchment with cooking spray. Place 2 to 4 dough balls (depending on your basket size) spaced at least 2 inches apart. Do not crowd them.
- Air fry for 7 to 9 minutes. The cookies should look slightly underdone in the centre when you pull them out. They will continue to set on the hot parchment. Check at 7 minutes: if the edges are golden and set, they are ready.
- Carefully lift the parchment out of the basket (the cookies will be very soft) and slide onto a cooling rack. Let rest for 5 minutes before eating. Sprinkle with flaky salt immediately after they come out. Repeat with remaining dough.
- Prepare the full dough as described in the oven method steps 1 through 3. Do not chill the dough in a bowl.
- Divide the dough into two equal portions. Place each portion on a large sheet of plastic wrap or parchment paper. Shape each into a log about 2 inches (5 cm) in diameter, rolling it tightly in the wrap and twisting the ends to seal. Try to make the log as uniform in diameter as possible so all slices bake evenly.
- Freeze the logs for at least 4 hours, or up to 3 months. Once solid, the logs can be stored in a zip-top freezer bag for easy access. Label them with the date and baking instructions.
- When ready to bake, preheat the oven to 375°F (190°C) and line a baking sheet with parchment. Remove a log from the freezer and let it rest at room temperature for 5 minutes to prevent cracking when sliced. Using a sharp serrated knife, slice cookies 3/4 inch (2 cm) thick. Place on the prepared sheet at least 2 inches apart.
- Bake from frozen for 13 to 15 minutes, until edges are golden and set. The centres will look soft. Sprinkle with flaky salt if desired, rest on the pan for 5 minutes, then transfer to a wire rack. Because the dough is cold, these cookies will be slightly thicker and puffier than scooped cookies.
Nutrition Per Serving
Per 1 serving (makes about 24 cookies (3 inches each))
Why This Recipe Works
Brown butter is the most important technique in this recipe, and it works for a specific reason. When butter is cooked past the melting point, the water evaporates and the milk proteins undergo a Maillard reaction with the natural sugars, creating hundreds of new flavour compounds, including diacetyl (a buttery, caramel note) and various nutty, toasty aromatics. The result is a fat that tastes dramatically more complex than plain melted butter, and because cookies are a relatively simple canvas, that flavour upgrade is genuinely noticeable in every bite.
The combination of both brown and white sugar is intentional and not interchangeable. Brown sugar contains molasses, which is hygroscopic (it absorbs and holds onto moisture from the air), which is why cookies made with more brown sugar stay chewier for longer. It also contributes to spread and that characteristic soft, almost fudgy centre. The small amount of granulated sugar, on the other hand, encourages crisper edges and a slight lift. Using both gives you the best of each. The cornstarch plays a supporting role here too: it dilutes the gluten-forming proteins in the flour slightly, resulting in a more tender, soft bite rather than a tough or cakey one.
Chilling the dough is not optional for this recipe, even if it feels like an annoying extra step. The browned butter is liquid when first mixed, meaning an unchilled dough would spread into thin puddles in the oven. Chilling re-solidifies the fat so it melts gradually during baking, giving the cookies time to set their structure before they spread too far. As a bonus, resting the dough also allows the flour to fully hydrate and the flavours to meld, which is why dough chilled for 24 to 48 hours will produce a noticeably more flavourful cookie than dough baked immediately after an hour.
Baker’s Tips
- Use a kitchen scale to weigh the dough balls for consistent cookies that all bake at the same rate. Aim for about 45g per cookie.
- Do not skip scraping every brown bit from the pan into the bowl when you brown the butter. Those dark specks are concentrated flavour.
- If your dough feels very soft or greasy after mixing, the butter may not have cooled enough before you added the eggs. Refrigerate the dough for 30 minutes before chilling normally.
- For bakery-style thick cookies, press a few extra white chocolate chips and cranberries onto the tops of the dough balls just before baking.
- Bake one test cookie first. Every oven runs differently. If your first cookie spreads too much, chill the remaining dough for another 30 minutes. If it barely spreads and is too cakey, let the remaining dough sit at room temperature for 10 minutes before baking.
- The ‘underdone’ test: the centre of the cookie should look glossy and slightly raw when you pull it from the oven. This is correct. Residual heat from the pan will finish cooking the centre as it cools. Overbaked cookies will be dry by the time they are fully cool.
Variations
- Lemon zest and white chocolate: Add the finely grated zest of 1 large lemon to the dough along with the vanilla. The citrus lifts the sweetness of the white chocolate beautifully.
- Orange and cranberry: Substitute 1 tsp orange extract for the vanilla and add 1 tbsp fresh orange zest. A classic holiday flavour combination.
- Macadamia nut addition: Fold in 100g (3/4 cup) of roughly chopped roasted macadamia nuts along with the chocolate and cranberries for a buttery crunch.
- Dark chocolate swap: Replace the white chocolate with dark chocolate chips (60 to 70% cacao) for a more bittersweet, less sweet cookie that balances the tart cranberries differently.
Troubleshooting & FAQ
My cookies spread out completely flat. What went wrong?
My cookies came out dry and crumbly instead of chewy. How do I fix this?
The butter burnt while I was browning it. Can I still use it?
Why are some of my cookies much larger or smaller than others?
My white chocolate chips turned brown or grainy in the oven. What happened?
Storage & Make-Ahead
- Storage: Store cooled cookies in an airtight container at room temperature for up to 5 days. To keep them extra soft, tuck a slice of white bread into the container; it will keep the cookies moist as they absorb the moisture. Baked cookies freeze well for up to 2 months; thaw at room temperature for 30 minutes. Raw dough balls can be frozen on a sheet pan, then transferred to a bag, and baked directly from frozen (add 2 minutes to the bake time).
- Make-Ahead: The dough can be made up to 48 hours ahead and kept covered in the fridge; longer chilling actually improves the flavour. Shaped dough balls can be frozen for up to 3 months and baked from frozen. Dough logs (for the slice-and-bake method) keep in the freezer for up to 3 months.
oh these sound perfect for the kids at school who need a little something special – i love that theres actual nutrition in there with the cranberries and youre keeping the sugar down. ive made so many treats over the years and the brown butter detail is what gets people every time, it just elevates everything. definitely trying this one and honestly the fact that theyre chewy is huge, so many homemade cookies turn out cake-like and kids always prefer the soft ones. thanks for creating recipes that taste indulgent but arent going to send them bouncing off the walls.
these sound absolutely amazing and im totally making them for my mentees – theres something so special about showing up with homemade treats that dont leave you feeling guilty, you know? the brown butter + cranberry combo is genius and honestly my kids are gonna lose their minds over these. love that theyre lower sugar too, makes it feel like a real win all around.
oh my god yolanda and sandra you two are speaking my language, when i bring cookies to family gatherings or to share with the kids in the neighborhood i want them to taste like love not like i’m feeding them chemicals, and this brown butter and cranberry situation sounds like exactly what i’ve been looking for because honestly my grandbaby has been asking for cookies but i worry about all that sugar you know? i’m gonna make these and watch everyones faces light up, there’s nothing like seeing people enjoy something you made with your own hands and knowing its actually good for them too, god bless you for sharing recipes that let us do both.