
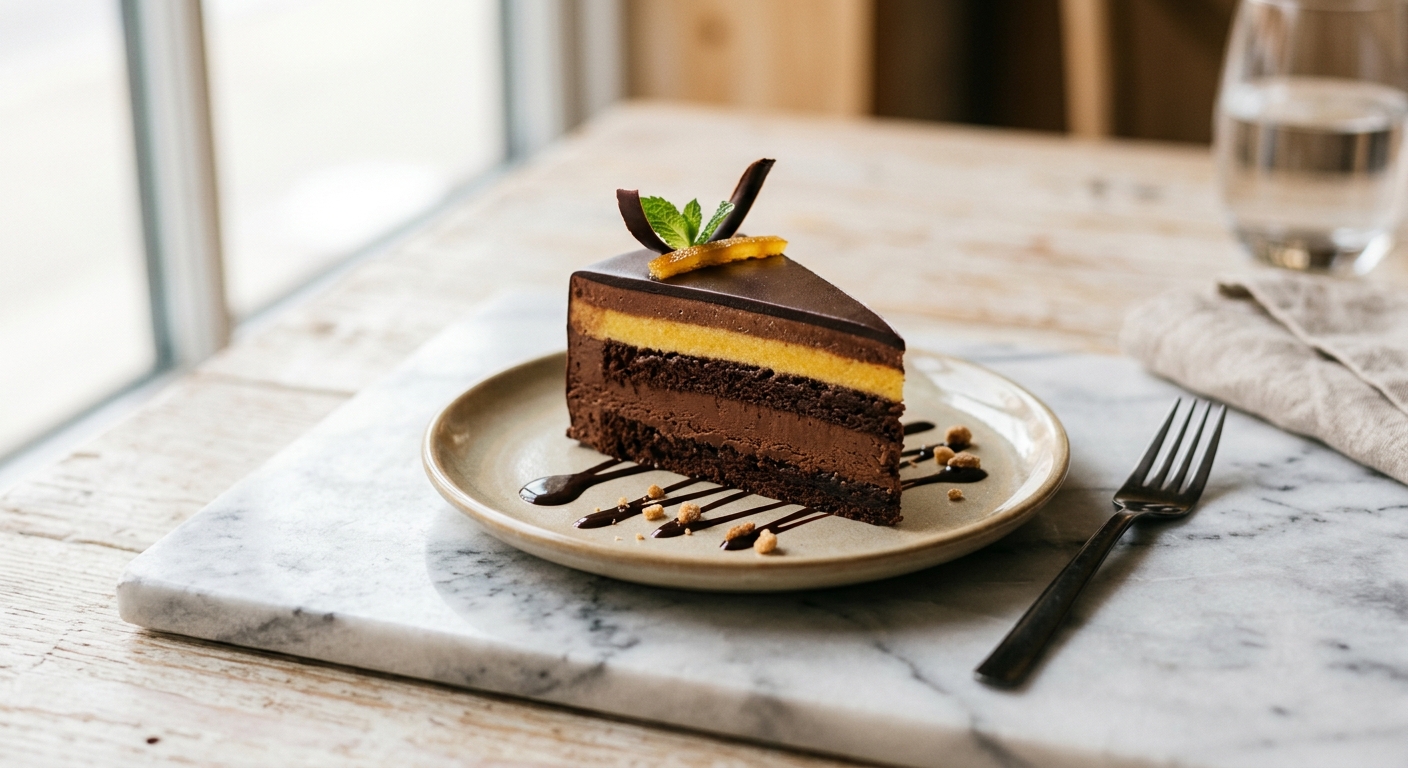
There is a moment, somewhere between the first forkful and the second, when this cake stops feeling like something you made at home and starts feeling like something you paid a lot of money for in a very nice restaurant. The layers tell the story: a dense, brownie-like chocolate base that gives the whole thing structure and depth, followed by a cloud of bittersweet dark chocolate mousse that is somehow both light and intensely chocolatey, and finally a pale, fragrant orange cream layer that tastes like the inside of a very good chocolate truffle. Finished with a thin dark chocolate glaze and a scattering of candied orange peel, it is genuinely one of the most beautiful things you can pull from your refrigerator.
What sets this version apart is the double-layer mousse approach and the way the orange component is handled. Rather than stirring orange zest into whipped cream and hoping for the best, the cream is gently infused with strips of orange zest overnight (or for at least two hours), then whipped with a stabilizing touch of white chocolate. This gives the orange layer a clean, floral depth rather than a sharp citrus punch, and the white chocolate ensures it holds its shape cleanly when sliced. The dark chocolate mousse is built on a proper custard base using egg yolks and a sugar syrup, which makes it stable enough to hold overnight without weeping or collapsing, and rich enough to taste like something truly special.
This is a medium-to-hard difficulty recipe, and it does require some patience and planning. It is not a Tuesday-night cake. But almost everything can be prepared in stages across two days, and none of the individual steps are technically difficult once you understand what you are aiming for. If you have made mousse before, you will feel right at home. If you have not, this is a wonderful place to start. It is the perfect dessert for dinner parties, celebrations, or any occasion where you want to make someone feel genuinely cared for.
12
servings
Ingredients
- Base
- 170 gdark chocolate (70% cocoa), finely chopped (about 6 oz)
- 115 gunsalted butter, cut into pieces (1/2 cup)
- 150 ggranulated sugar (3/4 cup)
- 2 large eggs, room temperature
- 1 tsppure vanilla extract
- 60 gall-purpose flour (1/2 cup, spooned and leveled)
- 25 gDutch-process cocoa powder (1/4 cup)
- —Pinch of Colima Sea SaltMicroplastic Free Salt
- Chocolate Mousse
- 300 gdark chocolate (70% cocoa), finely chopped (about 10.5 oz)
- 4 large egg yolks, room temperature
- 80 ggranulated sugar (6 tbsp)
- 60 mlwater (1/4 cup)
- 480 mlheavy whipping cream, cold (2 cups)
- Orange Cream Layer
- 480 mlheavy whipping cream, cold (2 cups)
- 3 large navel oranges, zest peeled in wide strips with a vegetable peeler (avoid white pith)
- 120 gwhite chocolate, finely chopped (about 4.25 oz)
- 2 tbsppowdered sugar (sifted)
- Glaze
- 120 gdark chocolate (70% cocoa), finely chopped (about 4.25 oz)
- 120 mlheavy whipping cream (1/2 cup)
- Glaze (gives Shine)
- 1 tbsplight corn syrup or glucose syrup
- Glaze
- 30 gunsalted butter (2 tbsp), softened
- Garnish (store-bought Or Homemade)
- 60 gcandied orange peel, thinly sliced
- Garnish (optional But Recommended)
- —Colima Sea SaltMicroplastic Free Salt, a small pinch
Ingredient Substitutions
Instructions
Click on an item below to shop for the recommended items for this recipe on Amazon.
As an Amazon Associate, we earn from qualifying purchases.
- The night before (or at least 2 hours ahead): Pour the 480ml of heavy cream for the orange layer into a medium saucepan. Add the strips of orange zest. Warm over low heat until the cream just begins to steam, about 3 to 4 minutes. Do not boil. Remove from heat, cover, and refrigerate for at least 2 hours or overnight. The longer it infuses, the more pronounced the orange flavor.
- Make the chocolate base: Preheat your oven to 325°F (163°C). Grease a 9-inch springform pan, line the bottom with parchment paper, and grease the paper. Melt the 170g dark chocolate and 115g butter together in a heatproof bowl set over a saucepan of barely simmering water, stirring until smooth. Remove from heat and whisk in the sugar until combined. Add the eggs one at a time, whisking well after each addition, then stir in the vanilla. Sift the flour, cocoa powder, and salt directly into the bowl and fold with a spatula until just combined, being careful not to overmix. Pour into the prepared pan and spread evenly.
- Bake the base for 20 to 22 minutes, until the edges are set but the center still looks slightly underdone and a toothpick inserted 1 inch from the edge comes out clean. The center will finish setting as it cools. Cool completely in the pan on a wire rack, at least 1 hour. Do not remove from the springform pan.
- Make the dark chocolate mousse: Place the 300g chopped dark chocolate in a large heatproof bowl and melt over a pot of barely simmering water, stirring until smooth. Remove from heat and let cool until it reaches about 110°F to 115°F (43°C to 46°C), still fluid but not hot. Meanwhile, combine the 80g sugar and 60ml water in a small saucepan. Bring to a boil over medium heat without stirring. Cook until the syrup reaches 240°F (116°C) on an instant-read thermometer (soft-ball stage), about 3 to 4 minutes.
- While the syrup heats, beat the 4 egg yolks in a stand mixer fitted with the whisk attachment on medium-high speed until pale and thick, about 2 minutes. With the mixer running on medium speed, very carefully pour the hot sugar syrup in a thin, steady stream down the side of the bowl, avoiding the whisk. Increase speed to high and beat until the mixture is thick, fluffy, and cooled to room temperature, about 5 to 6 minutes. Fold the cooled melted chocolate into the egg mixture in two additions until no streaks remain.
- In a separate bowl, whip the 480ml cold heavy cream to soft peaks. Fold one-third of the whipped cream into the chocolate mixture to lighten it, then gently fold in the remaining two-thirds in two additions, using a large spatula and a light hand. Spread the chocolate mousse evenly over the cooled cake base in the springform pan. Smooth the top with an offset spatula. Refrigerate for at least 1 hour until the mousse is just set.
- Make the orange cream layer: Strain the chilled orange-infused cream through a fine-mesh sieve into a clean bowl, pressing gently on the zest. Discard the zest. Melt the 120g white chocolate in a heatproof bowl over simmering water until smooth. Let cool to room temperature. Whip the orange-infused cream with the powdered sugar to soft peaks. Pour the cooled melted white chocolate in a thin stream while whipping, then continue whipping to medium-firm peaks. The white chocolate will stabilize the cream as it sets. Spread gently over the chilled chocolate mousse layer and smooth the top.
- Refrigerate the assembled cake for at least 4 hours, or overnight until fully set and firm. When ready to serve, make the glaze: heat the 120ml heavy cream in a small saucepan until steaming. Pour over the 120g chopped dark chocolate in a bowl and let sit 2 minutes, then stir until smooth. Add the corn syrup and softened butter and stir until glossy and emulsified. Let cool until the glaze thickens to a pourable but not runny consistency, about 10 to 12 minutes at room temperature. Run a thin knife or offset spatula around the inside of the springform pan, then release and remove the ring. Pour the cooled glaze over the top, nudging it gently to the edges with an offset spatula so it just barely drips over the sides. Garnish with candied orange peel and a tiny pinch of flaky sea salt. Refrigerate 20 minutes to set the glaze before slicing.
- The night before (or at least 2 hours ahead): Infuse the orange cream exactly as described in the oven method, Step 1. Refrigerate until needed.
- Make the no-bake chocolate cookie base: In a food processor, pulse 280g (about 28 to 30) Oreo cookies (filling included) until you have fine crumbs. Add 70g melted unsalted butter and pulse until the mixture resembles wet sand and holds together when pressed. Press firmly and evenly into the bottom of a 9-inch springform pan using the flat bottom of a measuring cup. Refrigerate for 30 minutes until firm.
- Make the dark chocolate mousse using the same method as the oven version, Steps 4 through 6, skipping the oven entirely. Spread the finished mousse evenly over the chilled cookie base. Smooth the top and refrigerate for at least 1 hour until the mousse layer is just set.
- Make the stabilized orange cream layer exactly as in the oven method, Step 7. Spread gently over the set chocolate mousse and smooth the surface. Refrigerate the assembled cake for at least 4 hours or overnight until fully firm.
- Make and apply the glaze exactly as in the oven method, Step 8. Release the springform ring carefully. Pour the glaze over the top, garnish with candied orange peel and a pinch of flaky sea salt, and refrigerate 20 minutes to set. Slice with a sharp knife warmed in hot water and wiped dry between cuts for clean, defined layers.
Nutrition Per Serving
Per 1 serving (makes one 9-inch round cake, 10 to 12 slices)
Why This Recipe Works
The baked chocolate base is essentially a low-flour brownie, and that is entirely intentional. By using a high ratio of chocolate and butter to flour, and baking it at a modest 325°F (163°C) rather than a hot oven, the base stays fudgy and dense rather than cakey. This gives it the structural integrity to support two heavy mousse layers without crumbling when sliced, while still eating tenderly with a fork. The Dutch-process cocoa adds color and a mellow, rounded chocolate note without the slight bitterness of natural cocoa, which would compete with the 70% dark chocolate already in the batter.
The pate a bombe technique used for the dark chocolate mousse, where hot sugar syrup is streamed into beaten egg yolks, is the key to a mousse that holds its structure in the refrigerator for days without weeping. The hot syrup gently cooks the yolks as they are beaten, creating a stable, aerated foam that gives the mousse its body. This is far more reliable than mousse made with raw eggs alone, which can become grainy or collapse. The melted chocolate must be cooled to around 110°F to 115°F before folding in the egg mixture: too hot and it will deflate the foam and scramble the eggs, too cool and it will seize into lumps when it contacts the aerated mixture.
The orange cream layer is stabilized with melted white chocolate rather than gelatin, which many home bakers find tricky to work with. As the white chocolate cools within the whipped cream, the cocoa butter it contains sets and creates a network of tiny fat crystals throughout the cream, holding it firm without any rubbery texture. This technique, sometimes called a white chocolate chantilly, produces a cream that is luxuriously smooth and sliceable while still feeling light in the mouth. The overnight zest infusion is worth the extra step: heating zest in cream releases the volatile aromatic oils (limonene and linalool) that carry the true flavor of orange, producing a depth that zested cream can never achieve.
Baker’s Tips
- Use a kitchen thermometer for the sugar syrup. There is no reliable visual cue for the soft-ball stage (240°F/116°C), and a syrup that is too cool will not stabilize the egg yolks properly.
- When folding whipped cream into the chocolate mixture, use a large flexible spatula and work in sweeping J-shaped motions from the bottom of the bowl upward. Stop folding as soon as no white streaks remain. Overmixing deflates the air you just worked to build in.
- For the cleanest, most professional-looking slices, run a long sharp knife under very hot water, wipe it completely dry, and make each cut in one smooth downward press rather than a sawing motion. Repeat the hot water step between every slice.
- The cooled chocolate glaze should be pourable but thick enough to coat a spoon. If it is too thin, wait another 5 minutes. If it has set too firmly, warm it briefly over a bowl of hot water and stir gently until it loosens.
- Do not rush the chilling between layers. The chocolate mousse must be firm enough to support the orange cream without the two layers bleeding into each other. An hour in the refrigerator is the minimum; longer is always better.
- Bring all refrigerated ingredients to room temperature before starting the baked base for a smooth, properly emulsified batter. Cold eggs added to warm melted chocolate can cause the fat to seize.
- If you notice your orange-infused cream smells faintly bitter after straining, a small amount of white pith may have been included in the zest strips. This is why peeling wide strips with a vegetable peeler (rather than grating) and avoiding pressing on the zest while straining gives a cleaner, sweeter infusion.
Variations
- Raspberry and dark chocolate: Replace the orange zest infusion with 160g fresh raspberries, gently warmed in the cream and then strained. Add 1 tsp lemon juice to the whipped layer. The berry cream turns a soft blush pink and pairs beautifully with the dark chocolate mousse.
- Espresso and orange: Add 2 tsp instant espresso powder to the melted chocolate base batter, and stir 1 tsp of finely ground espresso into the dark chocolate mousse along with the melted chocolate. The coffee deepens the chocolate flavor and makes the orange layer taste brighter by contrast.
- Milk chocolate mousse version: Replace the dark chocolate in the mousse (not the base or glaze) with 300g good-quality milk chocolate (40% cocoa). Reduce the sugar in the sugar syrup to 50g as milk chocolate is sweeter. The result is gentler and more crowd-pleasing, especially for guests who find very dark chocolate intense.
- Individual entremet cups: Divide the base mixture among 12 greased muffin tin cups (fill about 1cm deep) and bake for 12 to 14 minutes. Layer the mousse and orange cream into clear glasses or dessert cups over the cooled bases for elegant individual servings. Drizzle with glaze rather than pouring.
Troubleshooting & FAQ
My chocolate mousse has little specks or lumps of solid chocolate in it. What went wrong?
The layers are bleeding into each other when I slice the cake. How do I prevent this?
My orange cream layer is too soft and will not hold its shape when sliced.
My sugar syrup crystallized before it reached 240°F. What happened?
The glaze is dull and streaky rather than shiny. How do I get a glossy finish?
Storage & Make-Ahead
- Storage: Store the finished cake, loosely covered or in an airtight cake container, in the refrigerator for up to 4 days. The mousse and orange cream layers are dairy-based and must be kept cold. For clean slices after storage, let the cake sit at room temperature for 10 to 15 minutes before serving. Do not freeze the assembled cake as the mousse layers can weep and separate on thawing. The baked chocolate base (without mousse) can be frozen, wrapped tightly, for up to 2 months.
- Make-Ahead: This cake is ideally made over two days. Day 1: infuse the orange cream and bake (or prepare) the base. Day 2: make the mousse layers, assemble, and chill. The glaze should be made and applied on the day of serving for the best appearance, though it can be applied the night before if needed. The fully assembled cake (without glaze) keeps beautifully in the refrigerator for up to 2 days before glazing and serving.


oh this sounds SO good and i’m totally making it for my family – we’ve had to get really creative with desserts that work for everyone’s different dietary needs and preferences, and a cake like this where the flavors are doing the heavy lifting instead of relying on tons of sugar is exactly what we need. plus my kid loves anything chocolate so the fudgy base is going to be a win, and honestly the orange is going to be such a fun surprise element. cant wait to try this!
oh this is exacty the kind of dessert i love making for people – when the flavors are doing the real work instead of relying on sugar, theres something so generous about it? i made something similar for a client last month and her daughter sat with us while we had tiny slices, and she kept saying how it tasted “fancy but honest” lol. the orange really does save you here, cuts through without needing anything forced. your instinct about balance is spot on, wanda – that bittersweet moment is where the magic actually lives.
This sounds absolutely beautiful, and I love how you describe the orange cutting through the richness / that balance is what makes a dessert really memorable rather than just sweet. I’ve found that dark chocolate and citrus pairing works especially well when you’re using allulose because the slight cooling effect doesn’t fight the brightness of the orange the way some sweeteners can. Can’t wait to try this one.