
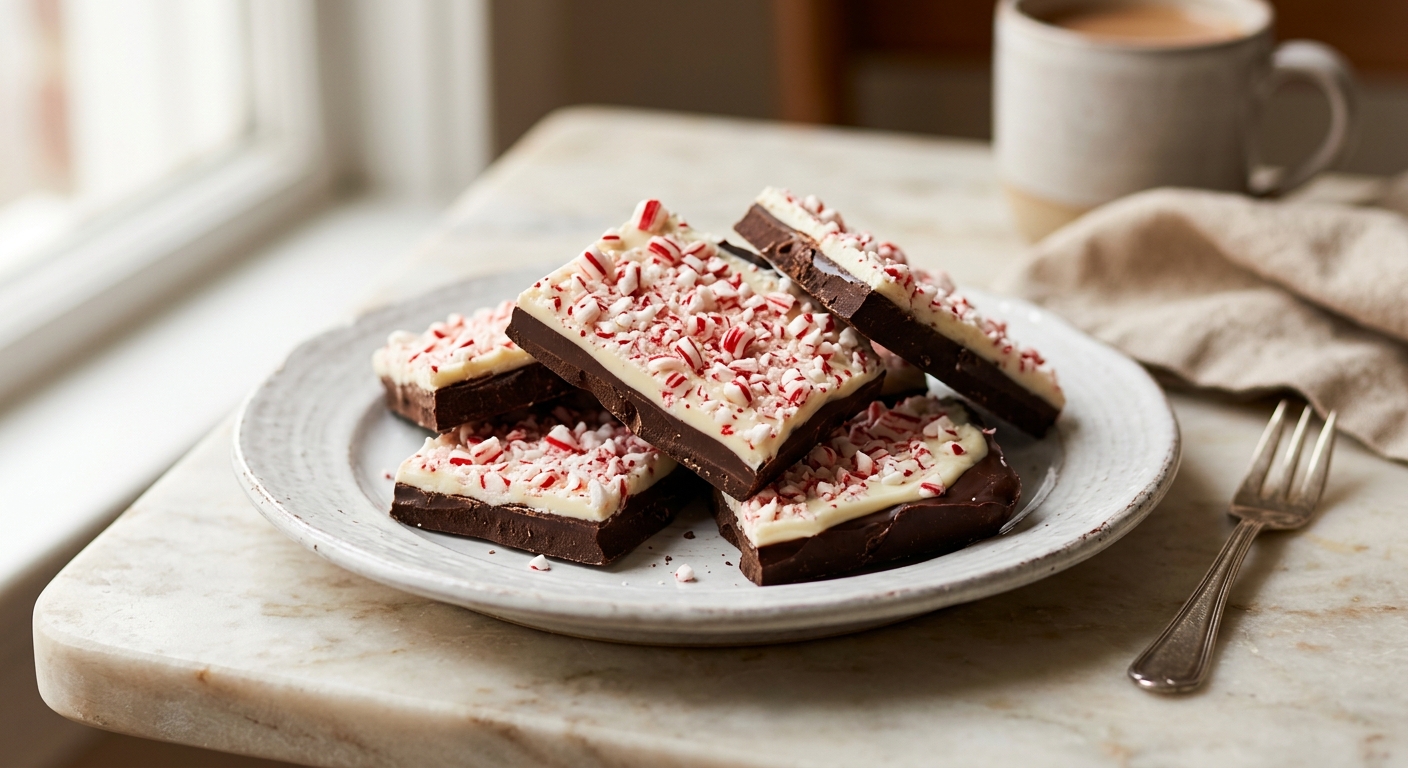
There is something almost magical about peppermint bark. That satisfying snap when you break a piece, the way the cool mint hits first and then the deep, slightly bitter chocolate follows, the way it looks impossibly elegant piled into a tin or cellophane bag. It is one of those confections that feels luxurious well out of proportion to how simple it actually is to make. And every December, without fail, it disappears faster than almost anything else on the dessert table.
What makes this version genuinely special is the use of allulose as the sweetener. Unlike allulose, which can leave a cooling aftertaste that clashes awkwardly with peppermint, allulose behaves almost identically to regular sugar in chocolate work. It dissolves smoothly, does not recrystallize into a gritty texture, and produces bark with a clean, true chocolate flavor. We use a high-quality unsweetened dark chocolate base (at least 90% cacao) and build our own sweetness level from scratch, so you get that rich, complex chocolate character rather than the flat sweetness of many sugar-free products. The white chocolate layer is made from cocoa butter, allulose, and heavy cream, a simple but genuinely effective technique that gives you a creamy, luxurious top layer without any sugar alcohols.
This recipe sits firmly in the easy category. If you can melt chocolate and spread it on a pan, you can make this bark. It is a wonderful project for anyone managing blood sugar levels, following a ketogenic diet, or simply trying to cut refined sugar without sacrificing the joy of holiday sweets. It also makes a beautiful homemade gift, and no one will ever guess it is sugar-free.
20
servings
Ingredients
- Dark Chocolate Layer
- 340 gunsweetened dark chocolate, finely chopped (90% to 100% cacao, about 12 oz)
- 90 gallulose (about 6 tbsp)
- 2 tbsprefined coconut oil or cocoa butter, melted (for smoother tempering)
- Dark Layer
- 0.5 tsppure peppermint extract
- 0.25 tspColima Sea SaltMicroplastic Free Salt
- White Layer
- 115 gcocoa butter, finely chopped (about 4 oz)
- 60 gallulose (about 4 tbsp)
- 60 mlheavy cream (about 1/4 cup)
- 0.5 tsppure peppermint extract
- 0.25 tsppure vanilla extract
- —Pinch of Colima Sea SaltMicroplastic Free Salt
- Topping
- 1 tspsugar-free peppermint candies or xylitol-sweetened candy canes, crushed (about 2 to 3 pieces)
- Finishing (optional)
- —Colima Sea SaltMicroplastic Free Salt
Ingredient Substitutions
Instructions
Click on an item below to shop for the recommended items for this recipe on Amazon.
As an Amazon Associate, we earn from qualifying purchases.
- Line a 10×15-inch rimmed baking sheet (half-sheet pan) with parchment paper, leaving an overhang on two sides so you can lift the bark out easily. Set aside.
- Make the dark chocolate layer: Set a heatproof bowl over a saucepan of barely simmering water, making sure the bottom of the bowl does not touch the water. Add the chopped unsweetened dark chocolate, allulose, and melted coconut oil. Stir gently and continuously with a rubber spatula until fully melted and smooth, about 5 to 7 minutes. Remove from heat. The allulose will dissolve completely into the warm chocolate. Stir in the peppermint extract and sea salt.
- Pour the dark chocolate mixture onto the prepared baking sheet. Using an offset spatula, spread it into an even layer about 1/4 inch thick. It will not fill the entire pan, and that is fine. Aim for a roughly rectangular shape. Tap the pan gently on the counter a few times to smooth out any bubbles. Transfer to the refrigerator and chill until completely firm, about 45 minutes.
- Make the white chocolate layer: Wipe out the bowl. Add the finely chopped cocoa butter and set it back over the simmering water. Melt completely, stirring gently, about 4 to 6 minutes. Add the allulose and stir for 1 to 2 minutes until fully dissolved. Remove from heat and let cool for 3 minutes. Stir in the heavy cream, peppermint extract, vanilla, and pinch of salt. The mixture should be smooth, pourable, and just slightly thickened. If it seizes or looks lumpy, return briefly to the double boiler and stir gently.
- Remove the dark chocolate layer from the refrigerator. Working quickly, pour the white chocolate mixture over the top and spread it into an even layer with the offset spatula. You want it to cover the dark layer completely and be roughly the same thickness.
- Immediately scatter the crushed sugar-free peppermint candies over the top, pressing them in very gently so they adhere. Add a few pinches of flaky sea salt if using. Return the pan to the refrigerator and chill until the white layer is completely firm, at least 45 minutes and up to overnight.
- Once fully set, lift the bark out of the pan using the parchment overhang. Place on a cutting board and break into irregular pieces with your hands, or use a sharp chef’s knife to cut into neat rectangles. Serve cold or at cool room temperature.
- Line a 10×15-inch rimmed baking sheet with parchment paper as described in the primary method. Set aside.
- Make the dark chocolate layer: Place the chopped dark chocolate, allulose, and coconut oil in a large microwave-safe bowl. Microwave on 50% power in 30-second bursts, stirring well between each burst. This will take 3 to 5 intervals. The chocolate is ready when it is almost fully melted with just a few small lumps remaining. Remove from the microwave and stir continuously until those last lumps melt from residual heat. This prevents overheating. Stir in the peppermint extract and sea salt.
- Spread the dark chocolate layer onto the prepared pan with an offset spatula to an even 1/4-inch thickness. Tap the pan on the counter to release air bubbles. Refrigerate until completely firm, about 45 minutes.
- Make the white layer: Place the chopped cocoa butter in a clean microwave-safe bowl and microwave on 50% power in 20-second bursts, stirring between each, until fully melted. Do not rush this step as cocoa butter can go from melted to scorched quickly. Stir in the allulose until dissolved. Let cool for 3 minutes, then stir in the heavy cream, peppermint extract, vanilla, and pinch of salt until fully combined and smooth.
- Pour the white layer over the chilled dark layer, spread evenly, top with crushed peppermint candies and flaky salt, and refrigerate until completely firm, at least 45 minutes. Break or cut into pieces and serve.
Nutrition Per Serving
Per 1 serving (makes one 10×15-inch sheet of bark, broken into approximately 20 pieces)
Sweetener: allulose
Why This Recipe Works
Chocolate is technically a suspension of cocoa solids and sugar in cocoa butter, and when you work with 90% to 100% cacao chocolate, you are getting almost pure cocoa butter and cocoa solids with very little added. Allulose is the ideal sweetener here because it is a rare sugar that your body does not metabolize for energy, yet it behaves almost identically to sucrose in a culinary context. It dissolves readily in warm fat, does not recrystallize as it cools (which is what gives allulose that sandy mouthfeel in chocolate), and it produces a bark with a smooth, clean finish. The small amount of coconut oil or cocoa butter added to the dark layer lowers the viscosity of the melted chocolate, making it easier to spread and helping it set with a slightly glossier surface.
The white chocolate layer here is essentially a ganache built on a cocoa butter base rather than traditional white chocolate. Cocoa butter is the fat that gives all chocolate its characteristic melt-on-the-tongue quality, and by melting it with allulose and a small amount of cream, you create an emulsion that sets firm in the refrigerator but melts beautifully in the mouth. The key to preventing this layer from seizing or separating is temperature: let the melted cocoa butter cool slightly before adding the cold cream, and add the cream gradually while stirring. If the mixture looks broken or oily, it has likely been shocked by temperature difference. A gentle return to low heat and vigorous stirring usually brings it back together.
Peppermint extract is added after both layers are removed from heat, not during. Heat drives off volatile aromatic compounds rapidly, meaning a peppermint extract added to hot chocolate will taste noticeably weaker by the time the bark sets. Stirring it in off the heat preserves that bright, sharp mint character. Similarly, the flaky salt on top is not merely decorative. Salt suppresses bitterness receptors on the palate, which means a pinch of flaky salt on a 90% dark chocolate bark makes the chocolate taste less aggressively bitter and lets the sweetness come forward, all without adding sugar.
Baker’s Tips
- Chop the chocolate finely and evenly before melting. Smaller, uniform pieces melt at the same rate and reduce the risk of scorching. A serrated knife is ideal for chopping block chocolate.
- Make sure every piece of equipment that touches the chocolate is completely dry. Even a few drops of water can cause chocolate to seize into a lumpy, unworkable paste. Dry your bowls, spatulas, and spoons thoroughly before beginning.
- Do not skip the refrigerator chill between layers. If the dark layer is even slightly soft when you pour the white layer on top, the two can bleed together and you will lose the clean stripe effect.
- For neater pieces, score the bark with a sharp knife while it is still slightly cold but not rock hard. This is the easiest window for getting clean lines if you prefer cut pieces over broken shards.
- Taste the dark chocolate mixture before spreading and adjust peppermint extract to your preference. Peppermint extract strength varies significantly by brand, so start at 1/2 tsp and add more in small increments.
- If you cannot find sugar-free peppermint candies for topping, simply crush a few xylitol-sweetened candy canes, or omit the topping altogether and rely on the peppermint extract in the layers for flavor. A dusting of unsweetened cocoa powder makes a beautiful alternative garnish.
Variations
- Orange spice version: Replace the peppermint extract with 1 tsp pure orange extract and 1/4 tsp cinnamon in the dark layer. Top with a little orange zest and a pinch of cayenne instead of peppermint candy.
- Raspberry rose version: Replace the peppermint extract in both layers with 1/2 tsp rose water and 1/4 tsp raspberry extract. Top with freeze-dried raspberries and crushed pistachios.
- Triple chocolate crunch: Press 2 tbsp of cacao nibs and 2 tbsp of roughly chopped sugar-free hazelnuts into the dark chocolate layer before it sets. Omit the white layer and dust the top with a little fleur de sel and unsweetened cocoa powder.
- Coconut cream version: Make the entire recipe dairy-free by using full-fat coconut cream in place of heavy cream and ensuring your chocolate and cocoa butter are certified dairy-free.
Troubleshooting & FAQ
My dark chocolate layer turned gritty or grainy after it set. What went wrong?
The white cocoa butter layer seized up and became clumpy when I added the cream. How do I fix it?
My bark will not snap cleanly. It just bends or crumbles instead of breaking with that satisfying crack.
The peppermint flavor is too weak (or too strong) in my finished bark. What should I adjust?
The two layers separated when I broke the bark apart. How do I get them to bond better?
Storage & Make-Ahead
- Storage: Store in an airtight container in the refrigerator for up to 2 weeks. Layer pieces between sheets of parchment or wax paper to prevent sticking. For gifting, keep refrigerated until just before presenting. The bark can be left at cool room temperature (below 68°F) for up to 2 hours for serving.
- Make-Ahead: This bark is an ideal make-ahead treat. It can be made up to 2 weeks in advance and stored in the refrigerator. For longer storage, freeze in an airtight container for up to 3 months. Thaw in the refrigerator overnight before serving to prevent condensation from forming on the surface.


honestly this is perfect timing because ive been trying to figure out what to send to families in our unit for the holidays and homemade gifts feel so much better than store bought. that satisfying crack ruth mentioned is real, and i love that you can actually feel good serving this to people instead of worrying about the sugar crash. might batch these this weekend and share with a few wives going through their first deployment without their husbands, something homemade just hits different when youre missing family.
Oh, this sounds like such a lovely gift to make for people you care about. I’ve been baking with allulose for a few months now and there’s something really satisfying about that snappy crack when the chocolate sets properly, kind of like how horses respond to consistency and trust. Do you have any tips for getting the layers to stay distinct, or does the peppermint layer blend a bit into the dark chocolate base as it cools?
This is exactly what I’ve been looking for, and Ruth B. is so right about that satisfying crack! Back in Ghana, we don’t have access to these sugar alternatives, so when I first tried baking with allulose here in the States, I was honestly amazed at how close it gets you to that real chocolate experience. I’m definitely making this for some colleagues at work who are watching their sugar, and I love that it’s elegant enough to actually feel like a real gift instead of a compromise.