
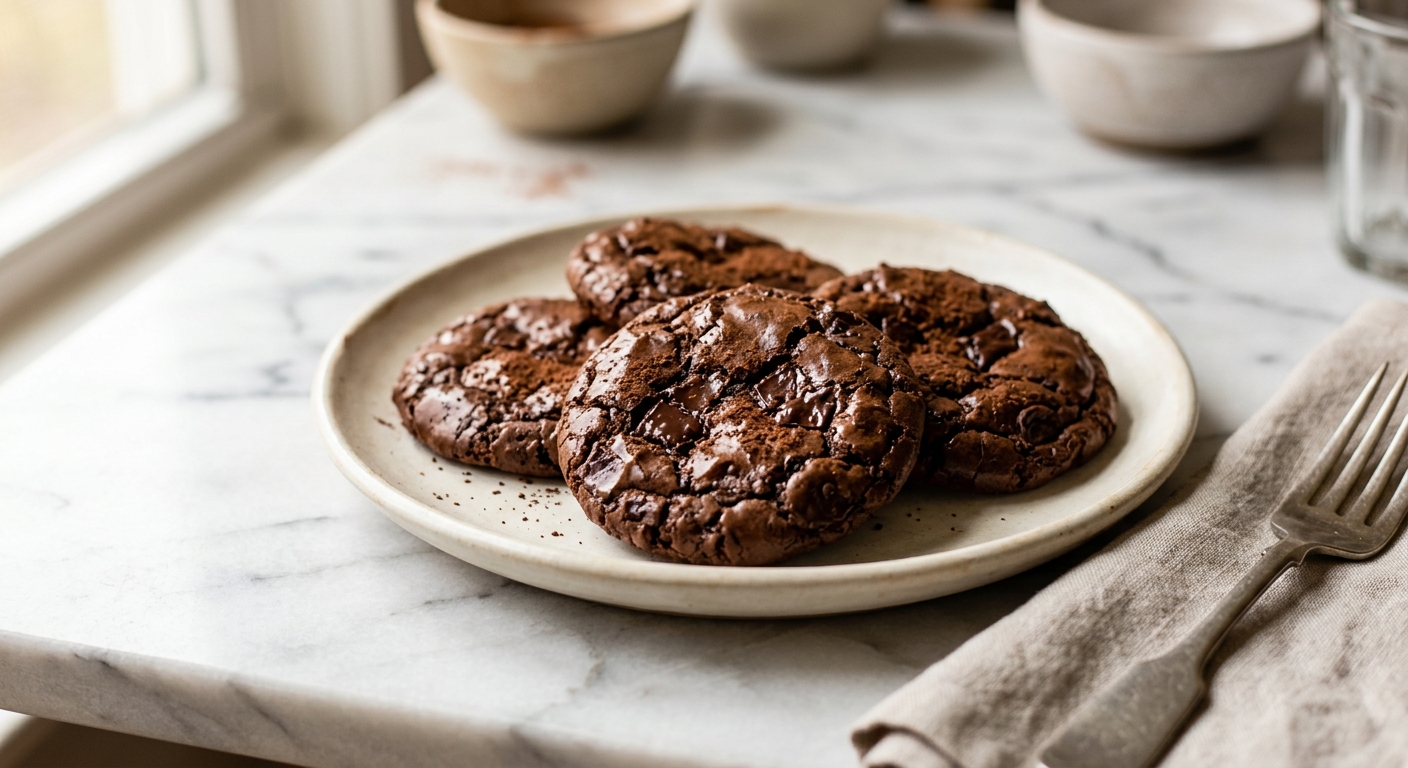
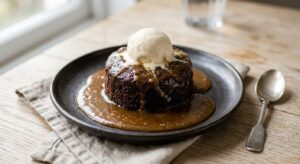
Imagine pulling a tray of glossy, crinkle-topped brownie cookies from the oven, the kitchen smelling of deep dark chocolate and toasted vanilla. You pick one up while it is still warm, and it bends slightly before breaking open to reveal a fudgy, almost molten center. That is exactly what these keto brownie cookies deliver, and nobody at the table will guess they are made without a gram of sugar.
What sets this recipe apart from every other keto cookie attempt is the use of allulose as the primary sweetener. Unlike allulose, which can leave a cool, slightly gritty finish, allulose behaves almost identically to table sugar in baking. It caramelizes, it holds moisture, and most importantly, it creates that sticky, chewy texture that makes a brownie cookie feel like an indulgence rather than a compromise. Combined with Dutch-process cocoa and a good-quality 85-percent dark chocolate, these cookies have a deep, complex chocolate flavor that stands completely on its own.
This recipe sits comfortably in the medium difficulty range. You do not need any special equipment beyond a hand mixer and a baking sheet, but there is one important technique, whipping the eggs and allulose together until thick and ribbon-like, that you will want to take seriously. It takes about three minutes and it is the step that gives these cookies their beautiful crinkled tops. If you are new to keto baking or have been disappointed by gritty, cakey sugar-free cookies before, this is the recipe that will change your mind.
18
servings
Ingredients
- 170 g85% dark chocolate, roughly chopped (about 1 cup chopped), use a brand with no added sugar
- 56 gunsalted butter (4 tablespoons), cut into pieces
- 2 largeeggs, at room temperature
- 1 largeegg yolk, at room temperature
- 160 gallulose (about 3/4 cup), granular form
- 1 tsppure vanilla extract
- 50 gblanched almond flour (about 1/2 cup, spooned and leveled), not almond meal
- 25 gDutch-process cocoa powder (about 1/4 cup), sifted
- 1 tspbaking powder
- 0.5 tspespresso powder (optional, but deepens chocolate flavor)
- —1/4 tsp Colima Sea SaltMicroplastic Free Salt
- 60 gsugar-free dark chocolate chips (about 1/3 cup), for folding in
Ingredient Substitutions
Instructions
Click on an item below to shop for the recommended items for this recipe on Amazon.
As an Amazon Associate, we earn from qualifying purchases.
- Preheat your oven to 325°F (163°C). Line two large baking sheets with parchment paper and set aside. Lower heat than a standard cookie is important here because allulose browns faster than sugar, and a higher temperature will over-caramelize the edges before the centers set.
- Melt the chopped dark chocolate and butter together. You can do this in a heatproof bowl set over a saucepan of barely simmering water (bain-marie), stirring gently until fully melted and smooth. Alternatively, microwave in 20-second bursts, stirring between each, for about 60 to 80 seconds total. Remove from heat and let cool for 8 to 10 minutes until just warm to the touch, not hot.
- In a large bowl using a hand mixer (or a stand mixer with the whisk attachment), beat the 2 whole eggs, 1 egg yolk, allulose, and vanilla extract together on medium-high speed for 3 full minutes. The mixture should become pale, thickened, and fall from the beaters in a slow ribbon. This step is non-negotiable: it dissolves the allulose and incorporates air, which is what gives you the crinkle top.
- Pour the cooled chocolate mixture into the whipped egg mixture and fold gently with a rubber spatula until just combined. Do not stir vigorously or you will deflate the air you just built up.
- Sift the almond flour, cocoa powder, baking powder, espresso powder (if using), and salt directly over the chocolate mixture. Fold gently until no dry streaks remain. The batter will be quite loose and glossy, similar to brownie batter. Fold in the sugar-free chocolate chips. Let the batter rest for 10 minutes at room temperature. It will firm up slightly as the allulose begins to set.
- Scoop rounded tablespoons of batter (about 28g each) onto the prepared baking sheets, spacing them 2 inches apart. The batter will be sticky. A small cookie scoop (1.5 tablespoon size) makes this much easier and produces even cookies.
- Bake one sheet at a time on the center rack for 11 to 13 minutes. The cookies will look slightly underdone and soft in the center, with a glossy, crinkled top. This is correct. Do not overbake. They firm up significantly as they cool.
- Let the cookies cool on the baking sheet for 10 minutes before transferring to a wire cooling rack. They need this time to set fully. Eating one straight from the oven (while tempting) will give you a very soft, slightly underset result, though some people consider that a bonus.
- Prepare the cookie batter following steps 1 through 5 of the Oven method exactly, including the 10-minute batter rest.
- Preheat your air fryer to 300°F (150°C) for 3 minutes. Cut a piece of parchment paper to fit your air fryer basket, or use a perforated air fryer liner. Do not skip the parchment, as allulose caramelizes and can stick aggressively to bare metal.
- Scoop 4 to 6 cookies onto the parchment-lined basket (depending on your air fryer size), spacing them at least 1.5 inches apart. Keep remaining batter covered at room temperature between batches.
- Air fry at 300°F (150°C) for 8 to 9 minutes. Check at 8 minutes. The tops should look set and lightly crinkled, and the centers will still appear soft. Because air fryers vary in power, your first batch is a test batch. Adjust by 1 minute as needed for subsequent batches.
- Use a thin spatula to carefully transfer the hot cookies to a wire rack. They will be very fragile when hot. Allow to cool for at least 8 minutes before eating. They firm up into perfectly fudgy cookies as they cool.
- Prepare the full cookie batter following steps 1 through 5 of the Oven method, including the 10-minute rest. The batter must be rested and slightly firmed before scooping for freezing.
- Line a baking sheet or plate that fits in your freezer with parchment paper. Scoop the batter into portioned rounds (about 28g each) and place them close together on the parchment. You are not baking yet, so spacing does not matter.
- Freeze the scooped dough portions uncovered for 1 hour until solid. Once solid, transfer them to a zip-top freezer bag or airtight container, layering with parchment between layers. Label with the date. Frozen dough keeps well for up to 2 months.
- To bake from frozen, preheat your oven to 325°F (163°C) and line a baking sheet with parchment. Place the frozen dough portions 2 inches apart. Do not thaw them first. Bake for 13 to 15 minutes, adding 2 to 3 minutes compared to fresh batter, until the tops are crinkled and set.
- Cool on the baking sheet for 10 minutes before moving. The centers may look slightly less glossy than fresh-baked but will be equally fudgy and delicious once fully set.
Nutrition Per Serving
Per 1 serving (makes 18 cookies, approximately 2.5 inches each)
Sweetener: allulose
Why This Recipe Works
The crinkle top on a classic brownie cookie comes from one thing: a well-aerated egg and sugar mixture that forms a thin, glossy shell as the cookie bakes and the surface dries out before the interior sets. With allulose, this mechanism works almost identically to sugar because allulose is a rare sugar that behaves like sucrose in solution, binding to water, helping proteins denature, and forming that characteristic sheen. Allulose, by contrast, does not retain moisture in the same way, which is why allulose-based brownie cookies often come out drier and more matte. Beating the eggs and allulose together for a full three minutes builds a genuine meringue-like structure that is the backbone of the crinkle effect.
The lower baking temperature of 325°F (163°C) rather than the more typical 350°F is intentional and important. Allulose has a lower caramelization point than sucrose, meaning it browns significantly faster. At 350°F, the edges of these cookies would over-caramelize and become bitter before the centers have time to set properly. The lower temperature allows for even, gentle heat that sets the structure without scorching. This also contributes to the fudgy interior: the slower bake means less moisture is driven off, leaving the center dense and soft.
Almond flour behaves very differently from wheat flour in cookies. It contains no gluten-forming proteins, so it provides structure primarily through its fat content and the binding power of the eggs. Using only 50g is intentional: too much almond flour would make these cakey and dry, losing the brownie-like density. The Dutch-process cocoa is alkalized, which means it is less acidic than natural cocoa. This matters because it plays well with the baking powder (which needs a neutral to slightly alkaline environment to work efficiently) and produces a darker, smoother chocolate flavor without any bitterness.
Baker’s Tips
- Do not skip the 10-minute batter rest after mixing. The batter starts out very loose and sticky, but as it rests, the allulose continues to dissolve and the mixture thickens enough to scoop cleanly.
- Use a cookie scoop for uniform sizing. Cookies that are different sizes will bake unevenly. A 1.5-tablespoon (medium) cookie scoop is the ideal tool here.
- Let the melted chocolate cool fully before adding it to the whipped eggs. If it is too hot, it will scramble the eggs and deflate the air you carefully whipped in.
- Bake one sheet at a time on the center rack. Air circulation matters, and crowding the oven leads to uneven baking and less crinkle development.
- These cookies are intentionally underdone when they come out of the oven. Trust the process. If the edges look set and the top has crinkled, they are done. The centers firm up to a perfect fudgy chew after 10 minutes of cooling.
- If your kitchen is warm and the batter feels too loose to scoop neatly after resting, refrigerate it for an additional 10 to 15 minutes. Do not refrigerate longer than 30 minutes or it will become very stiff.
- For the deepest chocolate flavor, use a high-quality 85% bar that you chop yourself rather than pre-made chips. The higher cocoa butter content melts more smoothly and creates a richer batter.
Variations
- Peppermint brownie cookies: Add 1/2 tsp peppermint extract along with the vanilla and top each cookie with a small sugar-free peppermint chip before baking. A perfect holiday variation.
- Salted caramel swirl: Drizzle a small amount of sugar-free caramel sauce (made with allulose) over the cookies immediately after baking and finish with a pinch of flaky sea salt.
- Mocha espresso version: Double the espresso powder to 1 full teaspoon and add 1 tsp instant coffee granules dissolved in 1 tsp warm water to the egg mixture for a deep coffee-chocolate flavor.
- Nut-studded brownie cookies: Fold in 60g (about 1/3 cup) roughly chopped toasted pecans or walnuts along with the chocolate chips. Adds 1g additional fat and about 0.5g net carbs per cookie.
- Mexican chocolate style: Add 1/2 tsp ground cinnamon and a small pinch of cayenne pepper to the dry ingredients for a warm, spiced kick.
Troubleshooting & FAQ
My cookies came out flat and greasy with no crinkle top. What went wrong?
The edges of my cookies burned while the centers were still raw. What happened?
My cookies came out cakey and dry instead of fudgy and chewy. How do I fix this?
The batter is so runny I cannot scoop it at all. Is something wrong?
I used allulose instead of allulose and the cookies have a strange cooling, icy sensation when I eat them. How do I reduce this?
Storage & Make-Ahead
- Storage: Store cooled cookies in an airtight container at room temperature for up to 4 days. For best texture, place a small piece of parchment between layers to prevent sticking. Refrigerate for up to 10 days. Freeze baked cookies in an airtight bag for up to 2 months. Thaw at room temperature for 20 minutes or microwave for 10 to 15 seconds for a warm, fudgy result.
- Make-Ahead: The cookie batter can be made up to 24 hours ahead and refrigerated covered. Scoop cold batter directly onto baking sheets and add 1 to 2 minutes to the bake time. For longer make-ahead, scoop and freeze unbaked portions as described in the Freezer method above.


omg yolanda this is so sweet! i love that you’re baking for the kids you mentor – thats honestly such a meaningful thing. i work with high schoolers and have definitely seen how much it matters when an adult puts in that kind of effort, especially around food stuff. these brownies are legit chewy and not that weird artificial taste, so i bet they’d be obsessed. ngl i made a test batch last week and my students couldnt even tell they were low sugar, which never happens lol. your mentees are lucky to have someone whos thinking about there preferences like that!
omg these look absolutely incredible and im so here for a brownie cookie situation, especially one thats actually low sugar because ive been trying to bake treats for some of the kids i mentor and theyre always asking for something thats not gonna wreck their energy levels. allulose has been such a game changer for me, like it actually tastes good which sounds obvious but so many sugar substitutes just dont hit the same. definitely making these this weekend and bringing them to my little’s soccer game!
ok yolanda and carla im actually getting emotional reading this because THIS is exactly why i teach, like knowing that adults are showing up for kids in these little ways that say “you matter, i made this for you” hits different. these brownies are gonna be perfect for that too because the kids wont even realize theyre low sugar, theyre just gonna taste the love and the fudge, and honestly allulose is the move here because it actually tastes like real brownies so theres no weird aftertaste to give it away. you two are doing something really important fr.