
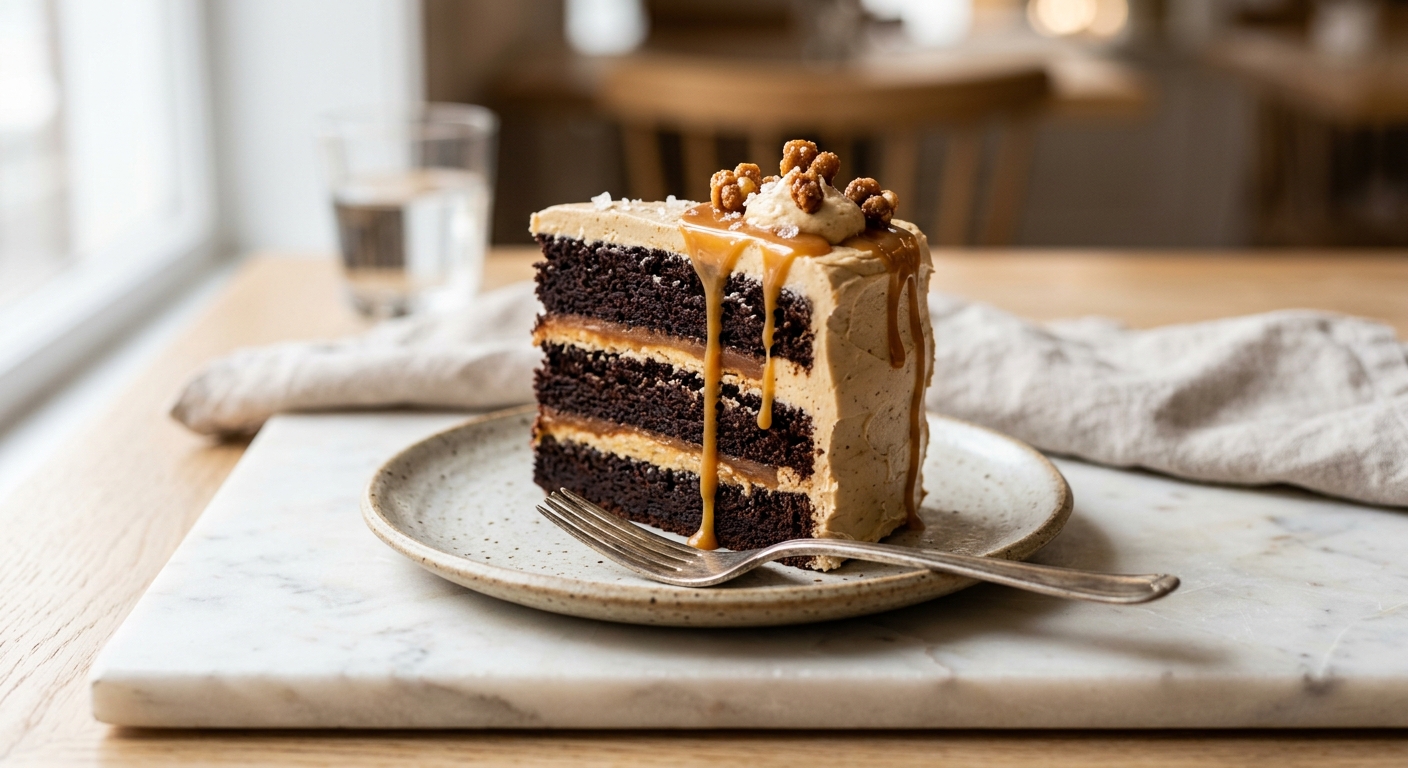
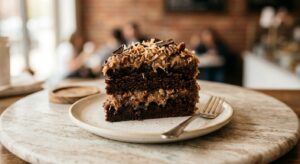
There is a moment, right after you pull a pan of dark chocolate cake from the oven and the kitchen fills with that warm, cocoa-scented air, when baking feels like pure magic. This cake leans right into that feeling. The layers are dark and moist, almost brownie-like in their depth, thanks to a generous pour of hot coffee that blooms the cocoa and adds a subtle roasted note you cannot quite name but absolutely cannot do without. Sandwiched between those layers is a golden, glossy salted caramel that stays soft and just barely gooey, threading through each slice like a ribbon of pure indulgence.
What makes this version stand apart is a detail borrowed from French pastry kitchens: the frosting is built on browned butter. Instead of creaming softened butter straight into the cocoa and powdered sugar, you first cook the butter until the milk solids turn golden and nutty, then chill it until firm again before whipping. The result is a chocolate frosting with a toasty, almost toffee-like undertone that echoes the caramel filling and transforms what could be a simple chocolate buttercream into something genuinely complex. A final shower of flaky sea salt over the top ties every element together.
This recipe is rated medium difficulty, which is honest. The individual components, chocolate cake, stovetop caramel, and buttercream, are each straightforward on their own, but there is some timing and organisation involved in bringing them all together beautifully. If you have made caramel before, you will feel right at home. If this is your first time, the detailed caramel notes in the Tips section will walk you through it confidently. This cake is perfect for birthdays, anniversaries, or any occasion that deserves a genuine centrepiece on the table.
12
servings
Ingredients
- 300 gall-purpose flour (about 2 1/2 cups, spooned and leveled)
- 80 gDutch-process cocoa powder (about 3/4 cup)
- 400 ggranulated sugar (2 cups)
- 2 tspbaking soda
- 1 tspbaking powder
- 1 tspColima Sea SaltMicroplastic Free Salt
- 3 largeeggs, at room temperature
- 240 mlwhole buttermilk (1 cup), at room temperature
- 240 mlAvocado Oil100% Pure Avocado Oil such as canola or sunflower (1 cup)
- 2 tsppure vanilla extract
- 240 mlhot strongly brewed coffee or hot water (1 cup)
- 200 ggranulated sugar for caramel (1 cup)
- 60 mlwater for caramel (1/4 cup)
- 180 mlheavy cream for caramel, warmed (3/4 cup)
- 60 gunsalted butter for caramel, cut into cubes (4 tbsp)
- 1.25 tspColima Sea SaltMicroplastic Free Salt for caramel, plus more for finishing (such as Maldon)
- 340 gunsalted butter for frosting (1 1/2 cups or 3 sticks), browned and re-chilled until firm
- 80 gDutch-process cocoa powder for frosting (3/4 cup), sifted
- 480 gpowdered sugar (4 cups), sifted
- 60 mlheavy cream for frosting (1/4 cup)
- 2 tsppure vanilla extract for frosting
- —Pinch of Colima Sea SaltMicroplastic Free Salt for frosting
Ingredient Substitutions
Instructions
Click on an item below to shop for the recommended items for this recipe on Amazon.
As an Amazon Associate, we earn from qualifying purchases.
- Make the salted caramel first so it has time to cool and thicken. In a medium heavy-bottomed saucepan, combine 200g sugar and 60ml water. Stir once gently to combine, then cook over medium-high heat without stirring until the mixture turns a deep amber colour, 8 to 11 minutes. Swirl the pan gently if the colour looks uneven, but do not stir with a spoon. Remove from heat and carefully pour in the warmed 180ml heavy cream – it will bubble aggressively. Stir with a heatproof spatula until smooth, then add the 60g cubed butter and stir until fully melted. Stir in the flaky sea salt. Pour into a heatproof bowl and let cool to room temperature, about 1 hour, then refrigerate until thick but still spreadable, at least 30 minutes.
- Brown the butter for the frosting while the caramel cools. Melt 340g unsalted butter in a light-coloured saucepan over medium heat, swirling frequently. Cook until the foam subsides, the milk solids turn golden-brown, and the butter smells nutty and toasty, about 6 to 8 minutes. Pour immediately into a heatproof bowl, scraping in all the browned bits from the pan. Refrigerate until firm and opaque, at least 1 hour (or speed it up in the freezer for 25 to 30 minutes).
- Preheat your oven to 350°F (175°C). Grease three 8-inch round cake pans thoroughly with softened butter or non-stick spray, then line the bottoms with parchment paper rounds and flour the sides, tapping out excess.
- In a large bowl, whisk together the 300g flour, 80g cocoa powder, 400g sugar, 2 tsp baking soda, 1 tsp baking powder, and 1 tsp fine sea salt until fully combined. In a separate medium bowl or large jug, whisk together the 3 eggs, 240ml buttermilk, 240ml oil, and 2 tsp vanilla extract until smooth. Pour the wet ingredients into the dry ingredients and whisk until just combined. Carefully pour in the 240ml hot coffee and whisk gently until the batter is smooth and uniform – it will be quite thin, which is correct.
- Divide the batter evenly between the three prepared pans, about 520g per pan if you are weighing. Bake for 28 to 32 minutes, rotating the pans halfway through, until a toothpick inserted in the centre comes out with just a few moist crumbs. Do not overbake. Let the cakes cool in the pans on a wire rack for 15 minutes, then run a thin knife around the edges and invert onto the rack to cool completely, at least 1 hour.
- Make the brown butter chocolate frosting once the butter is firm. Beat the browned, re-firmed butter in a stand mixer fitted with the paddle attachment on medium speed for 2 to 3 minutes until pale and fluffy. Add the sifted 80g cocoa powder and mix on low until incorporated. Add the sifted 480g powdered sugar in two additions, mixing on low after each. Add 60ml heavy cream, 2 tsp vanilla, and a pinch of salt. Increase speed to medium-high and beat for 3 full minutes until the frosting is light, fluffy, and completely smooth. If it seems too thick, add cream 1 teaspoon at a time. If too soft, refrigerate for 10 minutes before using.
- Assemble the cake on a turntable or flat plate. Place the first cake layer flat-side up and spread a thin crumb coat of frosting around the edges only. Spoon about half of the cooled salted caramel onto the centre of the layer and spread to within 1/2 inch of the edge – the frosting border will prevent blowout. Add the second layer and repeat with the remaining caramel. Place the third layer on top, flat-side up. Apply a thin crumb coat of frosting all over the cake and refrigerate for 20 minutes to set.
- Apply the final coat of frosting, working from the top down the sides with an offset spatula or bench scraper for a smooth finish. Just before serving, drizzle any leftover caramel over the top and let it drip naturally down the sides. Finish with a generous pinch of flaky sea salt over the top. Refrigerate for at least 30 minutes before slicing for clean, neat layers.
- Make the salted caramel following Steps 1 of the oven method and set aside. Brown the butter for frosting following Step 2 and refrigerate to firm up.
- Line the base of a 6-quart slow cooker insert with a large sheet of parchment paper, pressing it up the sides. Spray lightly with non-stick cooking spray. Lay two layers of paper towels under the lid before placing it on the slow cooker – this absorbs steam and prevents the cake from becoming soggy on top.
- Prepare one-third of the full cake batter by scaling all cake ingredients down to one-third of the listed amounts: 100g flour, 27g cocoa powder, 133g sugar, 2/3 tsp baking soda, 1/3 tsp baking powder, 1/3 tsp salt, 1 egg, 80ml buttermilk, 80ml oil, 2/3 tsp vanilla, and 80ml hot coffee. Mix following the same method in Step 4 of the oven instructions.
- Pour the batter into the lined slow cooker insert and spread evenly. Place the paper-towel-lined lid on top and cook on High for 2 to 2.5 hours. The cake is done when the edges are set and pulling away from the sides, the top looks matte rather than glossy, and a toothpick inserted in the centre comes out with moist crumbs. Avoid lifting the lid in the first 90 minutes.
- Turn off the slow cooker and let the cake rest uncovered for 15 minutes. Lift it out using the parchment paper and transfer to a wire rack. Serve warm or at room temperature, cut into wedges, topped with warm salted caramel sauce and a generous dollop of brown butter chocolate frosting.
Nutrition Per Serving
Per 1 serving (makes one 8-inch three-layer cake)
Why This Recipe Works
The secret to this cake’s extraordinary moisture lies in two places: the oil and the coffee. Unlike butter, neutral oil stays liquid at room temperature, which means the cake crumb remains soft and tender even after a night in the refrigerator – butter-based cakes can feel dense and slightly waxy when cold. The hot coffee does something equally important: it blooms the cocoa powder, releasing and intensifying the fat-soluble flavour compounds in the cocoa in the same way that blooming spices in oil unlocks their full aromatic potential. You genuinely cannot taste the coffee in the finished cake, but it makes the chocolate taste more chocolate.
The salted caramel is made using a wet caramel method, where water is added to the sugar before heating. Wet caramel takes longer to reach colour than dry caramel, but it gives you more control and dramatically reduces the risk of crystallisation. The key rule is: no stirring once the mixture comes to a boil. Stirring introduces agitation that can cause sugar crystals to chain together and turn the whole batch grainy and solid. Warming the cream before adding it to the hot caramel is not optional – cold cream hitting 340°F sugar will seize violently and can cause a crust of hardened sugar to form on the bottom of the pan. Warm cream incorporates smoothly and gives you a glossy, fluid caramel every time.
Browning the butter for the frosting is a step that home bakers often skip, and it is genuinely transformational here. When butter is cooked beyond the point of melting, the water evaporates and the milk solids undergo the Maillard reaction, the same browning process that makes toasted bread, seared steak, and roasted nuts so deeply flavourful. The result is a butter with 30 to 40 percent more flavour complexity. Re-chilling the browned butter before whipping is essential: the emulsified structure needed for a fluffy buttercream only forms when the fat is semi-solid. If you try to whip warm brown butter, you will end up with a greasy, separated mess rather than a light, airy frosting.
Baker’s Tips
- Bring all refrigerated ingredients, including eggs, buttermilk, and butter, to room temperature before starting. Cold eggs can cause the batter to curdle slightly, and cold buttermilk can cool the batter unevenly.
- Weigh your batter into the pans rather than eyeballing it. Even layers mean even baking and a more professional-looking finished cake. Aim for about 520g per pan.
- For the caramel, watch the colour not the clock. Caramel can go from perfect amber to burnt in under 30 seconds, so stay close to the stove once the mixture starts to colour. Pull it off the heat when it looks like a deep amber penny – it will continue to cook briefly from residual heat.
- If your caramel seizes or turns grainy after adding the cream, do not panic. Put the pan back on low heat and stir gently – the crystals will usually melt back into a smooth sauce within a minute or two.
- To get a clean drip on the finished cake, your caramel should be room temperature and the cake should be cold from the refrigerator. Warm caramel on a cold cake creates a slow, controlled drip that sets in place rather than running all the way down to the board.
- Level your cake layers before assembling if they have domed during baking. A long serrated knife and a steady hand, or a proper cake leveller, makes assembly much tidier and prevents the cake from leaning.
- Use a cake turntable if you have one. It makes applying the final frosting coat dramatically easier and is worth the modest investment if you bake layer cakes more than a few times a year.
Variations
- Espresso caramel version: Add 1 teaspoon of instant espresso powder to the caramel along with the salt for a mocha-caramel filling that intensifies the coffee notes in the cake.
- Dark chocolate ganache drip: Instead of a caramel drip on the finished cake, pour a simple ganache (80ml hot cream poured over 100g finely chopped dark chocolate, stirred until smooth and cooled to thick but pourable) around the top edge for a dramatic finish.
- Salted caramel pretzel crunch: Press roughly crushed salted pretzels into the caramel filling layers before stacking for a salty, crunchy textural contrast.
- Vegan adaptation: Use 3 flax eggs, full-fat oat milk or almond milk plus vinegar in place of buttermilk, refined coconut oil instead of vegetable oil, full-fat coconut cream in the caramel and frosting, and vegan butter for the frosting. The cake will be slightly less tender but still deeply chocolatey.
- Sheet cake version: Pour the full batter into a greased and lined 9×13-inch baking pan and bake at 350°F (175°C) for 35 to 40 minutes. Drizzle cooled caramel over the top before frosting for an easier weeknight version.
Troubleshooting & FAQ
My caramel seized up and turned into a lumpy, grainy mass. What happened?
My cake layers came out dense and gummy rather than light and fudgy. What went wrong?
My brown butter frosting looks greasy and curdled instead of fluffy. How do I fix it?
The caramel is leaking out the sides of my cake when I stack the layers. How do I prevent this?
Why did my cake stick to the pan even though I greased it?
Storage & Make-Ahead
- Storage: Store assembled cake covered in the refrigerator for up to 5 days. Bring slices to room temperature for 30 to 45 minutes before serving for the best texture and flavour. The unfrosted cake layers can be stored at room temperature wrapped tightly in plastic wrap for up to 2 days. Freeze frosted or unfrosted layers for up to 3 months, wrapped in two layers of plastic wrap followed by a layer of foil.
- Make-Ahead: All three components can be made ahead independently. The cake layers can be baked up to 2 days ahead and stored wrapped at room temperature, or frozen for up to 3 months. The salted caramel keeps refrigerated in a sealed jar for up to 2 weeks – gently rewarm and stir before using if it becomes too firm. The browned butter frosting can be made up to 4 days ahead, refrigerated, and then re-whipped with a hand mixer for 2 minutes before using. The fully assembled cake can be refrigerated overnight before serving.
omg yes tommy this is exactly it!! once you nail the technique with allulose the homemade cakes start tasting BETTER than bakery ones because you actually control the quality of every ingredient, plus theres something special about serving something you made yourself. the brown butter frosting in this recipe is gonna change your game if youve never done it before, that nutty flavor is so hard to mess up and your kids are gonna lose their minds. definitely worth the extra 10 minutes of browning the butter, trust me!
this looks incredible, seriously. my kids have always been the type to want the fancy bakery cake for birthdays and i used to think id have to go that route, but ive been experimenting with allulose bakes for a while now and theyre actually getting better than store bought. that brown butter frosting is gonna be key – ive found the nuttier flavors cover any sweetener taste way better than straight vanilla. gonna try this one this weekend and see if my son stops asking for the bakery version lol
oh this is the one, isnt it. i love what youre both saying about how homemade becomes better than bakery once you get the allulose technique down, because thats exactly what happened in my kitchen when i started experimenting with it for the choir bake sales. theres something about knowing every ingredient went in with care, and honestly the brown butter frosting alone would make anyone feel like they showed up for the celebration, you know. my neighbor borrowed this recipe last month for her daughters birthday and came back the next day just to tell me her family couldnt stop talking about it, and i think thats the real magic right here.