
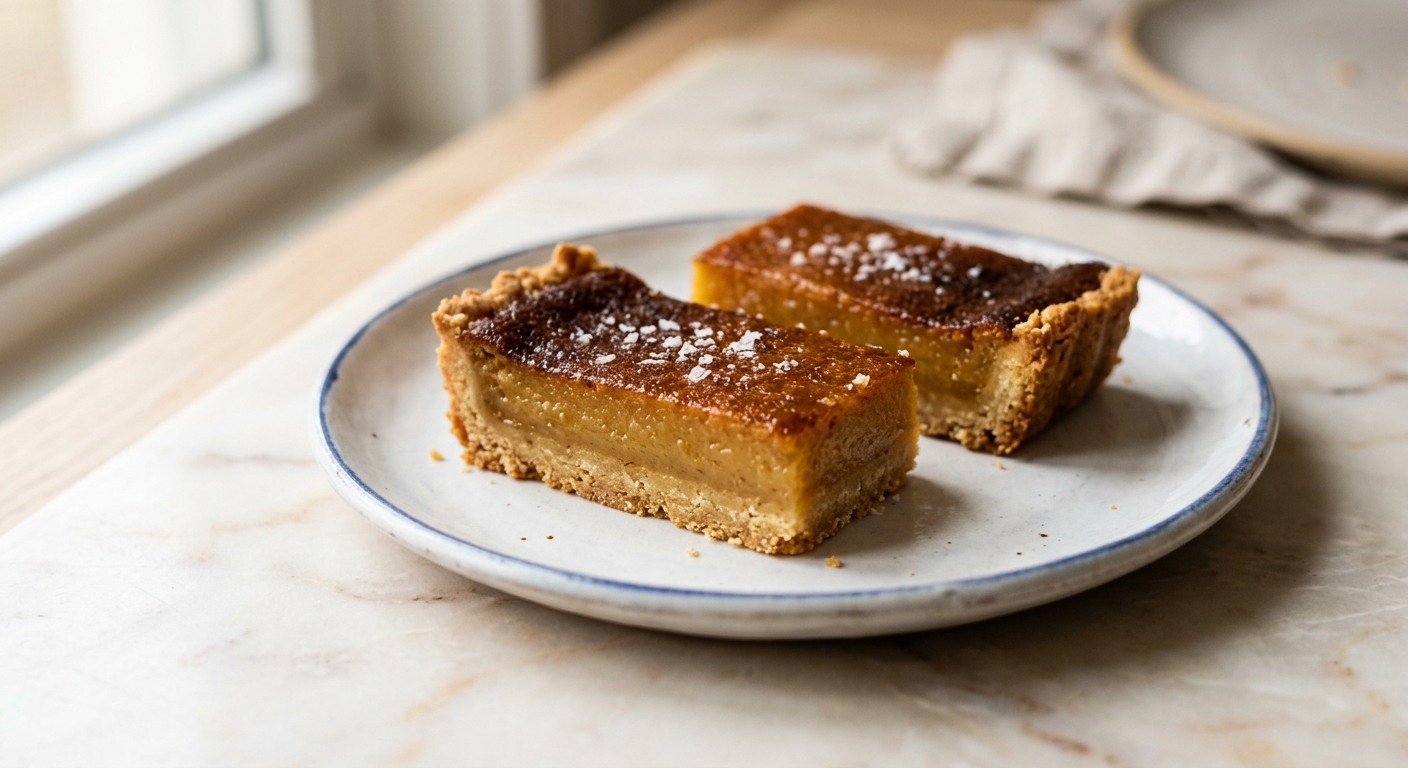
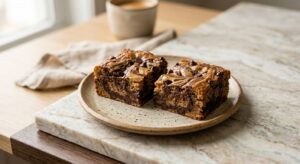
There is a moment, usually sometime in late summer when the farmers market honey is at its most fragrant and golden, when you want a dessert that does very little but does it exquisitely. These Salted Honey Pie Bars are exactly that. The filling is soft and trembling, somewhere between a chess pie and a custard tart, with a glossy burnished top that crinkles as it cools. Cut into neat squares and finished with a shower of flaky sea salt, they look quietly elegant and taste like something you would drive a long way for.
What separates these bars from a standard honey slice is the base: a shortbread crust made with brown butter. Taking the extra five minutes to brown the butter before mixing the dough introduces a deep, toasty, almost caramel-like nuttiness that plays beautifully against the floral honey filling. The crust is pressed in rather than rolled, baked until just golden, and firm enough to hold a clean slice without crumbling. The filling itself relies on a full half cup of good-quality honey – use something you love the flavour of, because it is absolutely the star here – along with heavy cream, eggs, a splash of apple cider vinegar for brightness, and a whisper of vanilla.
These bars sit at a comfortable medium difficulty. The brown butter step is simple once you have done it once, and the filling comes together in a bowl with a whisk. The trickier part is reading the bake correctly: you want a set edge with a slight wobble in the centre, and a bit of patience while they cool fully before cutting. They are ideal for bakers who want something a step above the ordinary without tackling a full pie, and they travel and store beautifully, making them a perfect choice for potlucks, holiday cookie tins, or a quiet weekend afternoon treat.
16
servings
Ingredients
- Browning
- 225 gunsalted butter (1 cup)
- Crust
- 240 gall-purpose flour (about 2 cups, spooned and leveled)
- 60 gpowdered sugar (about 1/2 cup), sifted
- 30 gcornstarch (about 3 tbsp)
- 0.5 tspColima Sea SaltMicroplastic Free Salt
- Filling
- 170 ggood-quality honey (about 1/2 cup), such as wildflower or clover
- 200 ggranulated sugar (about 1 cup)
- 240 mlheavy cream (1 cup), at room temperature
- 4 largeeggs, at room temperature
- 2 tbspunsalted butter, melted and cooled
- 1 tbspapple cider vinegar
- 1 tsppure vanilla extract
- 0.25 tspColima Sea SaltMicroplastic Free Salt
- Finishing
- —Colima Sea SaltMicroplastic Free Salt (such as Maldon)
Ingredient Substitutions
Instructions
Click on an item below to shop for the recommended items for this recipe on Amazon.
As an Amazon Associate, we earn from qualifying purchases.
- Preheat your oven to 325°F (163°C). Grease a 9×13-inch baking pan and line it with parchment paper, leaving a 2-inch overhang on the two long sides. This sling will make lifting the bars out effortless.
- Make the brown butter: place 225g of butter in a light-coloured saucepan over medium heat. Cook, stirring occasionally, until the butter melts, foams, and then turns a deep amber colour with a nutty aroma, about 6 to 8 minutes. Watch carefully in the final 2 minutes as it can burn quickly. Pour immediately into a large mixing bowl and let cool for 15 minutes until just warm, not hot.
- Make the shortbread crust: whisk the flour, powdered sugar, cornstarch, and 1/2 tsp fine sea salt directly into the bowl of cooled brown butter. Stir with a fork until a soft, clumping dough forms. It should hold together when pressed. Transfer the dough to the prepared pan and use your fingertips and the bottom of a flat measuring cup to press it into an even layer covering the entire base. Chill the pan in the freezer for 10 minutes.
- Bake the crust for 14 to 16 minutes until lightly golden at the edges and just set in the centre. It will firm up further as it cools. Remove from the oven and let the crust cool for 10 minutes while you make the filling. Do not turn off the oven.
- Make the honey filling: in a medium bowl, whisk together the honey, granulated sugar, heavy cream, eggs, 2 tbsp melted butter, apple cider vinegar, vanilla, and 1/4 tsp fine sea salt until very smooth and combined, about 1 minute. Do not over-whisk or you will incorporate too much air, which can cause the top to crack.
- Pour the filling gently and evenly over the warm crust. Carefully slide the pan back into the oven. Bake for 28 to 33 minutes, until the edges are set and puffed and the centre has just a gentle wobble when you nudge the pan, similar to a loosely set gelatin. The top should be a deep golden amber colour.
- Remove the pan from the oven and immediately sprinkle a generous, even pinch of flaky sea salt over the entire surface. Allow the bars to cool completely in the pan at room temperature for at least 1 hour, then refrigerate for a minimum of 1 hour (or up to overnight) before cutting. The filling needs to be fully chilled and set to cut cleanly.
- To cut, lift the bars out using the parchment sling and place on a cutting board. Use a sharp knife, wiping it clean between each cut, to slice into 16 bars (4 cuts by 4 cuts). Serve at room temperature for the best texture and flavour.
- Line an 8×8-inch square pan (one that fits inside your air fryer basket) with parchment paper, leaving an overhang on two sides. Prepare a half batch of the brown butter shortbread crust as described in the oven method, browning the butter carefully on the stovetop. Press the dough evenly into the base and freeze for 10 minutes.
- Preheat your air fryer to 300°F (150°C) for 3 minutes. Place the pan with the chilled crust in the basket. Bake for 11 to 13 minutes, checking at 10 minutes, until the edges are lightly golden. The lower temperature versus a conventional oven prevents the thin crust from over-browning in the circulated heat. Remove and let cool for 10 minutes.
- Prepare a half batch of the honey filling: whisk the honey, sugar, cream, eggs, melted butter, apple cider vinegar, vanilla, and salt together until smooth. Pour gently and evenly over the cooled crust.
- Return the pan to the air fryer basket at 300°F (150°C). Bake for 22 to 27 minutes, checking at 20 minutes. The filling is done when the edges are puffed and set and the centre has a slight wobble. Tent loosely with a small piece of aluminium foil if the top begins to get too dark before the centre is set.
- Sprinkle with flaky salt, then cool completely at room temperature for 1 hour. Refrigerate for at least 1 hour before lifting from the pan and cutting into 16 small bars.
- Make the no-bake crust: in a food processor, pulse 200g of shortbread biscuits or graham crackers into fine crumbs. Add 80g of melted unsalted butter and 1/4 tsp fine sea salt and pulse until the mixture resembles wet sand. Press firmly and evenly into the base of a parchment-lined 9×13-inch pan using the bottom of a measuring cup. Freeze for 20 minutes to set.
- Make the no-bake honey filling: beat 450g of full-fat cream cheese (at room temperature) with an electric hand mixer on medium speed until completely smooth and no lumps remain, about 2 minutes. Add 170g of good-quality honey, 240ml of heavy cream, 1 tsp vanilla extract, 1 tbsp lemon juice (in place of the vinegar), and 1/4 tsp fine sea salt.
- Continue beating on medium-high speed for 3 to 4 minutes until the mixture is thick, light, and holds soft peaks. It should be noticeably thicker than when you started, as the cream aerates and helps the filling hold its shape once chilled.
- Pour and spread the filling evenly over the chilled crust using an offset spatula. Smooth the top as flat as possible. Sprinkle generously with flaky sea salt.
- Cover the pan loosely with plastic wrap (try not to let it touch the surface of the filling) and refrigerate for a minimum of 4 hours, or overnight, until completely firm. For extra clean slices, freeze for 30 minutes just before cutting. Lift out using the parchment sling, slice with a clean sharp knife, and serve chilled.
Nutrition Per Serving
Per 1 serving (makes 16 bars from one 9×13-inch pan)
Why This Recipe Works
The magic of a honey pie filling is in its custard structure. The four eggs provide the protein network that sets the filling as it bakes, but the ratio of cream to eggs is deliberately generous, which keeps the texture silky and soft rather than rubbery or tight. The granulated sugar alongside the honey is not redundant: sugar helps control the sweetness intensity (pure honey can be overwhelming in large quantities) and also contributes to the filling’s glossy, slightly crackled surface as the sugars caramelize gently in the oven’s heat. The tablespoon of apple cider vinegar is a classic trick borrowed from chess pie tradition. It does not make the filling taste sour at all; instead, it cuts through the richness and lifts the floral honey flavour so it stays bright rather than cloying.
The brown butter in the shortbread crust is about more than flavour, though the flavour is extraordinary. When you brown butter, you are cooking off the water content and encouraging the milk solids to undergo Maillard browning, producing hundreds of new flavour compounds including diacetyl (butterscotch) and nutty pyrazines. Crucially, removing that water also means the shortbread dough has less moisture to develop gluten, resulting in a more tender, crumbly-in-a-good-way texture. The cornstarch in the crust reinforces this: starch molecules interrupt gluten development and give the base that melt-away quality that distinguishes a great shortbread from a merely good one.
The two biggest areas where this recipe can go wrong are overbaking the filling and cutting it before it is fully set. The filling should come out of the oven looking slightly underdone in the very centre, with a wobble like a just-set panna cotta. Residual heat and the subsequent chilling will finish the job. If you bake until the centre is completely still and firm-looking, the bars will be dense and may weep liquid as they cool. Similarly, cutting warm bars will give you a messy, flowing filling. Patience here is the single most important technique: full refrigerator chilling, ideally overnight, is what gives you those clean, bakery-worthy slices.
Baker’s Tips
- Use a good honey you genuinely enjoy eating by the spoonful. Mild clover honey gives a gentle sweetness, while wildflower, buckwheat, or orange blossom each bring their own distinct character. Avoid processed honey blends, as their flavour is flat once baked.
- Brown butter can go from perfect to burnt in under a minute. Use a light-coloured or stainless steel saucepan so you can see the colour of the milk solids clearly. Remove from the heat the moment you see a deep amber colour and smell a nutty aroma.
- Do not skip chilling the pressed crust before baking. That 10 minutes in the freezer firms the butter and helps the crust hold its shape and edges cleanly, preventing it from slumping or bubbling up.
- When whisking the filling, mix only until everything is smooth and combined. Over-whisking introduces air bubbles that can cause the surface to crack as the filling bakes and expands.
- The parchment sling is non-negotiable for clean results. Press the paper into the corners as neatly as possible and clip the overhanging edges to the sides of the pan if needed to keep them from flopping inward.
- For the cleanest cuts, run your knife under hot water and wipe it completely dry between every single slice. A cold, wet blade dragged through the filling is the fastest way to a ragged edge.
- Bring the eggs and heavy cream to room temperature before making the filling. Cold dairy added to a mixing bowl can cause the mixture to look slightly curdled or uneven, though it will still bake correctly. Room temperature ingredients combine more smoothly.
Variations
- Lavender Honey Bars: Warm the honey gently with 1 tsp of dried culinary lavender for 10 minutes, then strain before using. The floral note is subtle and stunning.
- Brown Sugar Variation: Replace up to half the granulated sugar with packed light brown sugar for a deeper, more molasses-forward filling with a slightly softer set.
- Spiced Version: Add 1/2 tsp ground cinnamon, 1/4 tsp ground cardamom, and a pinch of black pepper to the filling for a warmly spiced autumn bar.
- Citrus Honey Bars: Add 2 tsp of fresh orange or lemon zest to the filling along with the vanilla. Citrus and honey are a natural pair and brighten the whole bar considerably.
- Mini Bars: Use a standard 12-cup muffin tin lined with paper cups. Divide the crust dough and filling evenly. Bake the crust for 10 minutes and the filling for 18 to 22 minutes. Makes 12 individual rounds.
Troubleshooting & FAQ
My filling cracked across the top. What went wrong?
The bars are slicing messily and the filling seems too soft even after chilling overnight.
My shortbread crust is crumbling and falling apart when I try to lift the bars.
There is a pool of liquid under my filling after I cut the bars. Did something go wrong?
My brown butter went dark very fast and smells slightly bitter. Can I still use it?
Storage & Make-Ahead
- Storage: Store cut bars in an airtight container in the refrigerator for up to 5 days. Layer between sheets of parchment paper to prevent sticking. For the best texture and flavour, bring to room temperature for 20 minutes before serving. Freeze individual bars wrapped tightly in plastic wrap and placed in a zip-top freezer bag for up to 2 months. Thaw overnight in the refrigerator.
- Make-Ahead: The shortbread crust can be pressed into the pan, covered, and refrigerated up to 2 days ahead before baking. The fully baked and cooled bars (before cutting) can be made 2 days ahead, kept wrapped in the pan in the refrigerator. The filling mixture can be whisked together and refrigerated in a sealed container for up to 24 hours before pouring and baking.
My grandmother used to say the best desserts are the ones that taste like someone actually cared while making them, and these sound exactly like that. Brown butter shortbread is such a smart move for the crust, gives it that toasted depth that honey needs to really shine. I’ve been experimenting with allulose in her old pie recipes and it’s been kind of incredible how well it works with anything involving caramel or honey, so I’m definitely bookmarking this one to try soon.
oh my goodness, your grandmother sounds like she was such a wise woman and how lovely that youre carrying on her tradition with these recipes, that just touches my heart. i completely agree about brown butter and honey being such a perfect pair, theres something about that nutty toasted flavor that just lets the honey shine instead of overwhelming it, and im so glad youve had such good success with allulose in her old pie recipes because honestly those sugar alternatives have been a game changer for me too when im baking for my grandkids. i cant wait to hear how these turn out for you, im sure theyll taste just as full of love and care as your grandmother’s originals did.
oh man these sound incredible, ngl. we made your brown butter base recipe last month for something totally different and my oldest (who is usually the picky one about sweets) kept asking for more. theres something about brown butter that just hits different, you know? and the salted honey combo sounds like its gonna be one of those things where people cant stop eating just one bar lol. definitely saving this one.