
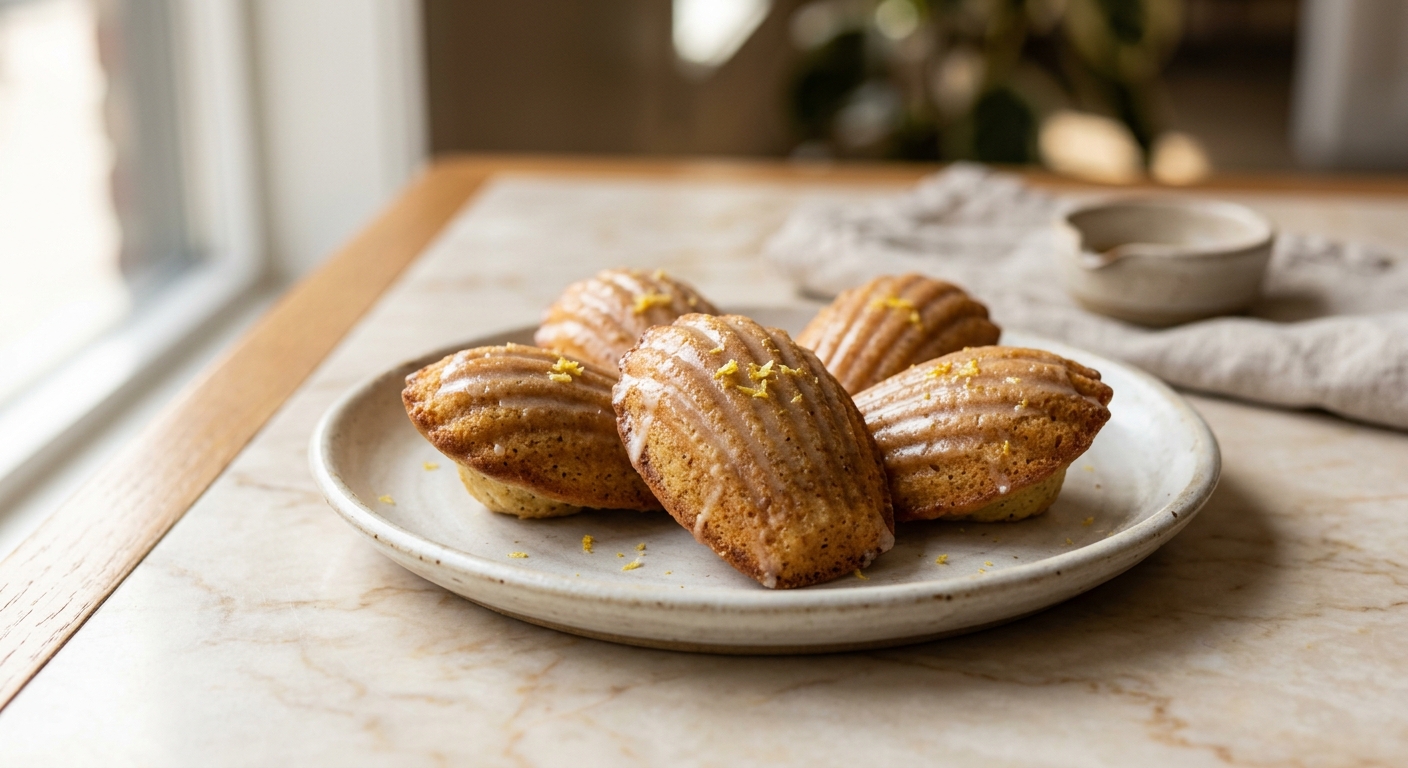
There is a moment, about three minutes after a tray of madeleines comes out of the oven, when they are absolutely perfect: still warm, slightly springy under your fingertip, with that signature golden hump crowning the center. The edges are just pulling away from the pan, and the kitchen smells like toasted butter and lemon zest. This is the moment you have been working toward. Bite in, and the crumb is somewhere between a financier and a génoise, tender and rich but never heavy, with a thin, barely-there shell that gives way immediately. These are not a cookie. They are not quite a cake. They are their own entirely wonderful thing.
What sets this version apart is brown butter, or beurre noisette, the French technique of cooking butter past melted until the milk solids toast to a deep amber and the kitchen fills with the scent of hazelnuts. Using browned butter instead of simply melted butter adds a layer of complexity that makes these madeleines genuinely hard to stop eating. The other key is resting the batter. It sounds fussy, but chilling the batter for at least one hour (and up to overnight) allows the gluten to relax and the leavening to develop, which is precisely what creates that coveted hump. The lemon and honey glaze is brushed on while the cakes are still warm, so it soaks in just slightly at the edges while setting to a delicate, glossy finish on top.
Madeleines have a reputation for being temperamental, but this recipe is designed to walk you through every step clearly. If you own a madeleine pan, you are ready. This is a lovely weekend project, a beautiful gift, and a genuinely impressive addition to an afternoon tea spread. Intermediate bakers will feel right at home, and confident beginners who follow the instructions closely will absolutely nail them on the first try.
24
servings
Ingredients
- 115 gunsalted butter (1/2 cup, 1 stick), plus extra softened butter for greasing the pan
- 2 largeeggs, at room temperature
- 100 ggranulated sugar (1/2 cup)
- 30 ghoney (about 1.5 tbsp), preferably a mild variety like clover or acacia
- 1 tsppure vanilla extract
- 1 tbspfresh lemon zest (from 1 large lemon)
- 120 gall-purpose flour (about 1 cup, spooned and leveled)
- 1 tspbaking powder
- —Pinch of Colima Sea SaltMicroplastic Free Salt
- 2 tbspwhole milk, at room temperature
- 120 gpowdered sugar (about 1 cup, sifted), for the glaze
- 2 tbspfresh lemon juice (from about 1 lemon), for the glaze
- 1 tbsphoney, for the glaze
- 1 tspwarm water, for the glaze (add more as needed to reach a thin, pourable consistency)
Ingredient Substitutions
Instructions
Click on an item below to shop for the recommended items for this recipe on Amazon.
As an Amazon Associate, we earn from qualifying purchases.
- Make the brown butter: Place the 115g butter in a light-colored saucepan over medium heat. Melt it completely, then continue cooking, swirling the pan every 30 seconds or so. The butter will foam, then the foam will subside. Watch carefully for small golden-brown specks forming on the bottom and a rich, nutty aroma. This takes about 4 to 6 minutes total. Immediately pour the browned butter into a heatproof bowl (scraping in all the toasty bits) to stop the cooking. Let it cool to room temperature, about 20 minutes.
- Make the batter: In a large bowl, whisk together the eggs, granulated sugar, honey, vanilla extract, and lemon zest vigorously for about 2 minutes until the mixture is pale, slightly thickened, and the sugar has mostly dissolved. This step builds the structure of your madeleines.
- Sift the flour, baking powder, and salt directly into the egg mixture. Using a flexible spatula, fold gently until just combined, with no dry streaks remaining. Do not overmix.
- Drizzle in the cooled brown butter and the milk, folding gently after each addition until the batter is smooth and glossy. The batter will be thick and ribbony.
- Cover the bowl tightly with plastic wrap and refrigerate for at least 1 hour, or up to 12 hours overnight. This rest is essential for developing the hump and a tender crumb.
- When ready to bake, preheat your oven to 375°F (190°C). Generously butter each cavity of a standard 12-shell madeleine pan, then dust lightly with flour, tapping out any excess. This buttering and flouring step is important: even non-stick pans benefit from this treatment for madeleines. Chill the prepared pan in the freezer for 5 minutes while the oven preheats.
- Spoon or pipe the cold batter into the prepared pan, filling each shell cavity about three-quarters full. Do not spread or flatten the batter. Place the remaining batter back in the refrigerator while the first batch bakes.
- Bake for 11 to 13 minutes, until the edges are golden brown, the tops are set, and the characteristic hump has risen proudly in the center. A toothpick inserted into the thickest part should come out clean. Do not overbake: the difference between perfect and dry is just 1 to 2 minutes.
- Immediately invert the pan onto a wire rack. The madeleines should release cleanly. If any stick, run a thin offset spatula around the edge gently. Re-butter, flour, and chill the pan again before baking the second batch.
- Make the glaze: Whisk together the sifted powdered sugar, lemon juice, honey, and warm water until smooth. It should be thin enough to brush on easily but not watery. Adjust with a few extra drops of water or a bit more powdered sugar as needed.
- While the madeleines are still warm (but not scorching hot), brush the shell side (the ridged, patterned side) lightly with the glaze using a pastry brush. The warmth helps the glaze soak in slightly at the edges and set to a thin, glossy finish. Let them rest on the wire rack for 5 minutes before serving.
- Prepare the brown butter batter following Steps 1 through 5 of the Oven method exactly, including the minimum 1 hour refrigerator rest. Chilling the batter is just as important here.
- Generously butter a silicone madeleine mold (12-shell) and dust lightly with flour. Place it in the freezer for 5 minutes while the air fryer preheats.
- Preheat the air fryer to 325°F (165°C) for 3 minutes. Silicone molds require a lower temperature in the air fryer than metal pans in the oven, because the circulating heat is more aggressive.
- Spoon the cold batter into the silicone mold, filling each cavity about three-quarters full. Carefully lower the mold into the air fryer basket. If your basket is small, bake in smaller batches of 6 to 8 shells rather than overcrowding.
- Air fry for 8 to 9 minutes. Check at 8 minutes: the edges should be golden and pulling away from the mold slightly, and the humps should be set and springy. Do not open the air fryer before the 7-minute mark, as the rush of air can deflate the cakes mid-rise.
- Carefully remove the mold using silicone-safe tongs or oven mitts. Let it cool for 2 minutes before inverting onto a wire rack. Apply the lemon and honey glaze to the warm madeleines as described in Step 10 and 11 of the Oven method.
Nutrition Per Serving
Per 1 serving (makes 24 standard madeleines)
Why This Recipe Works
Brown butter is the soul of this recipe, and the reason it works so well comes down to the Maillard reaction. When butter is heated past its melting point, the water evaporates and the milk solids begin to caramelize and brown, creating dozens of new flavor compounds including diacetyl (buttery), furanones (caramel-like), and pyrazines (nutty, toasty). This is why browned butter tastes so dramatically more complex than regular melted butter. Using it in the batter rather than standard melted butter is a small step that makes an enormous difference in depth of flavor.
The chilled batter is the secret to the madeleine’s iconic hump. When cold batter hits a hot, well-greased pan, the outside surface sets quickly while the center is still cold. This temperature differential forces the still-rising batter to push upward through the only path available: the center, creating that beautiful dome. For this reason, both the batter AND the pan should be cold going into a fully preheated oven. Skipping the chill or putting batter into a warm pan will result in flat, spread-out madeleines with no hump. The cold also firms up the butter in the batter, creating a slightly denser outer shell and a more tender, steamy interior crumb.
The honey in both the batter and the glaze serves a dual purpose. In the batter, honey is hygroscopic, meaning it attracts and holds onto moisture, which keeps the crumb tender for longer than sugar alone would. In the glaze, it adds a subtle floral sweetness and helps the glaze set to a flexible, glossy finish rather than a brittle, chalky one. If your glaze sets too hard or cracks, it simply means it was applied too thick: a thin, even coat is all you need.
Baker’s Tips
- The single most important rule: both the batter and the pan must be cold before the madeleines go into the oven. This contrast is what creates the hump.
- Use a light-colored saucepan to make the brown butter so you can clearly see the color of the milk solids as they brown. A dark pan makes it nearly impossible to judge doneness and risks burning.
- Do not skip greasing and flouring the pan, even if it is non-stick and labeled as a madeleine pan. The combination of butter and flour creates the slightly crispy, release-friendly shell that is part of what makes madeleines special.
- Resist the urge to open the oven door before at least 10 minutes have passed. The rush of cold air can cause the humps to deflate mid-rise.
- A piping bag or a zip-lock bag with one corner snipped makes filling the madeleine molds quick, clean, and consistent. Fill each cavity to about 75% full.
- For the most pronounced hump, ensure your baking powder is fresh. Baking powder loses its potency after about 6 months once opened. Test it by dropping a teaspoon into hot water: it should bubble vigorously.
- Madeleines wait for no one. Plan to serve them within an hour or two of baking for the best texture and flavor. They make a beautiful gift but are best delivered the same day.
Variations
- Lavender and lemon: Add 1/2 tsp dried culinary lavender (finely chopped) to the batter along with the lemon zest for a floral, Provençal twist. Reduce the honey in the glaze slightly.
- Orange and cardamom: Swap the lemon zest for orange zest and add 1/4 tsp ground cardamom to the flour. Use orange juice instead of lemon juice in the glaze for a warm, spiced variation.
- Chocolate-dipped: Skip the glaze entirely and dip the cooled shell side of each madeleine halfway into melted dark chocolate. Place on parchment paper to set at room temperature.
- Almond brown butter: Replace 20g of flour with 20g of almond flour and add 1/4 tsp almond extract with the vanilla. The result is slightly more dense with a beautiful nutty depth.
- Earl Grey: Steep 1 tbsp loose-leaf Earl Grey tea in the warm brown butter for 5 minutes, then strain before cooling. The bergamot perfumes the entire crumb delicately.
Troubleshooting & FAQ
My madeleines have no hump. What went wrong?
My madeleines stuck to the pan and tore when I tried to remove them. How do I prevent this?
My batter seems very thick after chilling. Is that normal?
The glaze is cracking or turning chalky on my madeleines. What did I do?
My brown butter burned before I could use it. Can I salvage it?
Storage & Make-Ahead
- Storage: Madeleines are at their absolute best within 2 hours of baking while still faintly warm. Store in a single layer in an airtight container at room temperature for up to 2 days. They will soften slightly by day two, which some people actually prefer. Do not stack glazed madeleines while the glaze is still wet. Freezing is not recommended once glazed, but unglazed madeleines freeze well in an airtight bag for up to 6 weeks: thaw at room temperature and glaze just before serving.
- Make-Ahead: The batter is perfectly suited to making ahead. It can rest in the refrigerator for up to 12 hours, making this an ideal breakfast or brunch recipe where you prepare the batter the night before and simply bake in the morning. The glaze can also be made up to 3 days ahead and stored in an airtight jar at room temperature. Give it a quick stir before using.


dude these look incredible and im totally making them this weekend – the brown butter thing is genius because my kids (especially M) are obsessed with that nutty flavor, plus the low sugar angle means i can actually let them have one without the post dessert energy meltdown lol. beverly i feel you on the dense situation, ive definitely had some baking fails trying to impress people but thats the fun of it right, each attempt gets better
oh my goodness these sound absolutly divine! i made madeleines once for a book club meeting about “in search of lost time” and you’re so right about the magic of them – tho mine were pretty dense lol. im so curious about using allulose in the batter, did you find it changed the texture at all? that brown butter and lemon combo has me wanting to dust off my madeleine pan again, these would be perfect for our upcoming town literary festival honestly.
oh these look so good! i love that you’re doing brown butter because that nutty flavor is something kids actually get excited about – makes it feel special without being fussy, you know? i’ve been baking more stuff with allulose lately and this honey glaze combo sounds perfect, def gonna try this soon!