
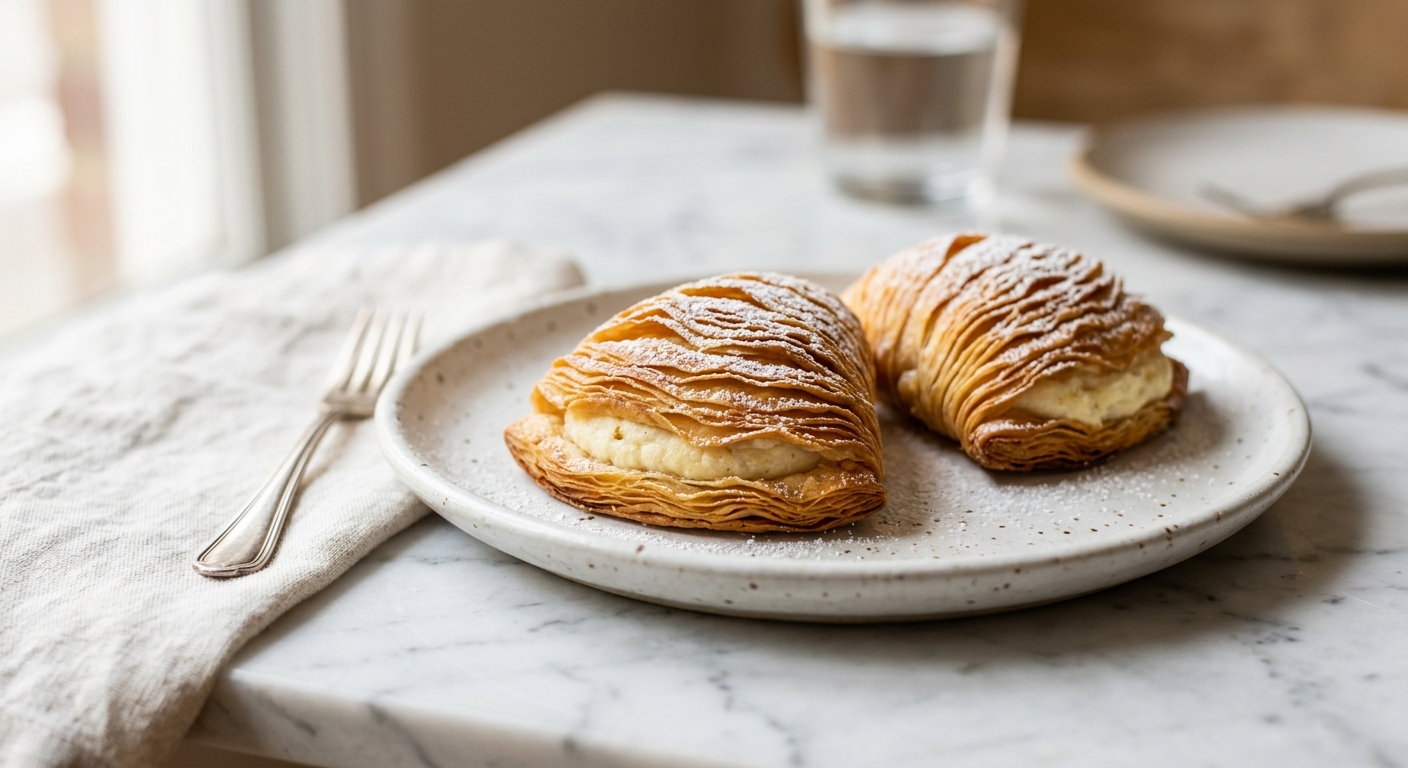
There is a moment in every great Neapolitan bakery when a fresh tray of sfogliatelle emerges from the oven, still crackling and hissing, their ridged clamshell shapes glistening with rendered lard and golden from the heat. The sound alone stops you in your tracks. You reach for one before it has properly cooled, because you cannot help yourself, and when you bite through those impossibly thin, shattering layers into the creamy, citrus-perfumed ricotta filling inside, you understand immediately why Neapolitan pastry chefs have been guarding this recipe since the 17th century. These are not a casual Tuesday treat. They are an event.
What sets this recipe apart is the dual lamination technique: the dough is first stretched ultra-thin using a pasta machine, then rolled and coiled into a tight log before being sliced and shaped by hand. This process creates dozens of distinct, independent layers that separate dramatically during baking rather than puffing into a single mass. The filling, too, is treated with the same respect, cooked low and slow until the semolina thickens the ricotta into a pipeable, stable cream that holds its shape without becoming stodgy. A generous amount of whole-milk ricotta drained overnight is non-negotiable here, as the extra moisture would steam the shells from the inside and compromise those precious layers.
Sfogliatelle sit firmly in the medium-to-hard difficulty range, and that is worth being honest about. The lamination takes patience, a pasta machine is strongly recommended, and shaping the cones requires a bit of practice to get right. But this recipe breaks the process into manageable stages spread over two days, so it never feels overwhelming. If you have made croissants or rough puff pastry before, you will feel right at home. If this is your first time laminating dough, take it slowly and trust the process. The reward is extraordinary and genuinely unlike anything you can buy outside of a great Italian pasticceria.
16
servings
Ingredients
- 400 gall-purpose flour (about 3 1/4 cups, spooned and leveled), plus extra for dusting
- 150 mlwarm water (about 2/3 cup), around 100°F (38°C)
- 30 mlhoney (about 1 1/2 tbsp)
- 5 gColima Sea SaltMicroplastic Free Salt (about 1 tsp)
- 180 glard, very soft but not melted (about 3/4 cup) – substitute with a high-quality leaf lard or shortening
- 500 gwhole-milk ricotta (about 2 cups), drained in a cheesecloth-lined sieve overnight in the refrigerator
- 150 gfine semolina (about 3/4 cup)
- 350 mlwhole milk (about 1 1/2 cups)
- 150 ggranulated sugar (about 3/4 cup)
- 2 largeeggs, at room temperature
- 1 tsppure vanilla extract
- 1.5 tspground cinnamon
- 1 largeorange, zested (about 1 1/2 tsp zest)
- 60 gcandied citron or candied orange peel, finely chopped (about 1/3 cup) – optional but traditional
- —Powdered sugar, for dusting when serving
Ingredient Substitutions
Instructions
Click on an item below to shop for the recommended items for this recipe on Amazon.
As an Amazon Associate, we earn from qualifying purchases.
- Day 1 – Drain the ricotta: Line a fine-mesh sieve with cheesecloth or two layers of paper towels and set it over a bowl. Spoon in the ricotta, cover loosely with plastic wrap, and refrigerate overnight (at least 8 hours). You should lose about 60 to 80g of liquid. Well-drained ricotta is essential for a firm, non-soggy filling.
- Day 1 – Make the dough: Combine the flour, salt, and honey in a large bowl or stand mixer fitted with the dough hook. Add the warm water gradually and mix on medium speed for 6 to 8 minutes, or knead by hand for 10 minutes, until the dough is smooth, firm, and only slightly tacky – it should feel denser than a bread dough. Wrap tightly in plastic wrap and rest at room temperature for 30 minutes.
- Day 1 – Laminate the dough: Divide the rested dough into 4 equal pieces. Working with one piece at a time and keeping the others covered, feed the dough through a pasta machine starting at the widest setting. Fold the strip in thirds, rotate 90 degrees, and pass through again. Repeat this rolling and folding process 3 to 4 times on the widest setting until the dough is very smooth, then gradually reduce the setting down to the second-thinnest setting (typically setting 7 or 8 on a 9-setting machine). The strip should be nearly translucent. Brush the entire surface generously with softened lard, then immediately lay the next laminated strip overlapping the first by about 1 inch (2.5cm). Continue until all 4 strips are connected and lard-covered.
- Day 1 – Form the log: Beginning from one short end, roll the entire lard-coated dough sheet into a very tight, compact cylinder. Roll back and forth on the counter with your palms to compress and elongate the log slightly, aiming for a diameter of about 2.5 inches (6cm). Wrap tightly in plastic wrap and refrigerate for at least 4 hours, or overnight.
- Day 1 – Make the filling: Combine the milk, semolina, and sugar in a medium saucepan over medium heat. Whisk constantly until the mixture thickens and the semolina is fully cooked, about 6 to 8 minutes. It should be very thick, like a stiff polenta. Remove from heat and let cool for 10 minutes. In a large bowl, beat the drained ricotta, eggs, vanilla, cinnamon, and orange zest together until smooth. Fold in the warm semolina mixture and the candied citron if using. Press plastic wrap directly onto the surface of the filling and refrigerate until fully cold, at least 3 hours.
- Day 2 – Slice and shape: Preheat the oven to 400°F (200°C) and line two large baking sheets with parchment paper. Remove the dough log from the refrigerator. Using a very sharp knife, slice the log into rounds about 3/4 inch (2cm) thick. Working with one round at a time and keeping the rest refrigerated, place it on a lightly floured surface and use your thumbs to press and rotate the center outward from the middle, gradually working the layers open from the cut face to create a cone shape. Think of it like opening a pinecone: your thumbs push inward from the center while your fingers support the outside. The cone should be about 3 to 3.5 inches (8 to 9cm) deep.
- Day 2 – Fill and seal: Transfer the cold filling to a piping bag fitted with a plain round tip (or use a zip-lock bag with the corner snipped). Pipe the filling into each cone until it is about three-quarters full – do not overfill or the filling will burst through the sides during baking. Pinch the open end of the cone together firmly and gently press the edges to seal. Place sealed side down on the prepared baking sheet. Repeat with all remaining cones.
- Day 2 – Bake and finish: Bake for 22 to 26 minutes, rotating the pans halfway through, until the shells are deeply golden brown and the layers are visibly fanned and separated. The shells should sound hollow when tapped on the bottom. Let cool on the baking sheet for 10 minutes before transferring to a wire rack. Sfogliatelle are traditionally served warm and dusted generously with powdered sugar. They are at their absolute best within 2 hours of baking, when the layers are still crisp.
- Prepare the dough, filling, and shape the sfogliatelle exactly as described in steps 1 through 7 of the oven method. Refrigerate the shaped, filled shells for 15 minutes before air frying to help them hold their structure under the intense heat.
- Preheat your air fryer to 375°F (190°C) for 5 minutes. Lightly brush the air fryer basket with a small amount of softened lard or cooking spray to prevent sticking.
- Place 2 to 4 sfogliatelle in the air fryer basket, sealed side down, making sure they are not touching. Do not crowd the basket. The air circulation needs room to work around each shell to create the characteristic fanned layers.
- Air fry for 10 minutes, then carefully open the basket and check the color. If the tips are browning faster than the body, loosely tent them with a small piece of foil. Continue cooking for another 8 to 10 minutes until deeply golden and the layers are visibly separated and crisp. The total time will vary slightly depending on your air fryer model.
- Remove carefully using tongs and transfer to a wire rack. Allow to cool for 5 minutes before dusting with powdered sugar and serving. Repeat with remaining sfogliatelle in batches, returning the remaining shaped shells to the refrigerator between batches to keep them cold and firm.
Nutrition Per Serving
Per 1 serving (makes 16 individual sfogliatelle shells)
Why This Recipe Works
The magic of sfogliatelle is entirely architectural. When you roll the lard-coated dough into a tight cylinder and refrigerate it, the lard sets firm between every individual layer. In the oven, that lard melts rapidly and the water in the dough turns to steam, forcing each layer apart from the next one rather than allowing them to bond. This is the same principle behind puff pastry and croissants, but with a key difference: because there is no yeast and no folding to create a lattice structure, each layer remains completely independent and thin, shattering rather than pulling apart in soft, airy ribbons. Using lard rather than butter amplifies this effect because lard has a higher melting point and no water content, so it lubricates the layers cleanly without creating the steam that would prematurely puff the dough before the layers are properly set.
The filling is cooked before it goes into the shell for a very specific reason. Raw ricotta and eggs would release liquid during baking, which would steam the inside of the shell and create soft, soggy layers from within. By pre-cooking the semolina in milk and folding it into the drained ricotta, you create a filling that is already structurally stable before it ever enters the oven. The semolina acts as a starch thickener that gelatinizes early in the bake and locks moisture in place, while the pre-drained ricotta starts the process with minimal free liquid. The eggs in the filling add additional protein structure that firms up as it bakes, ensuring the filling is sliceable and clean rather than runny.
If your layers are not separating dramatically, the two most common culprits are lard that was too soft (nearly melted) when applied, which means it soaked into the dough rather than sitting between layers, and a dough log that was not cold enough when sliced and shaped. Always chill the log until it is very firm, almost hard, so it slices cleanly and the layers stay defined. If your filling is leaking out during baking, the cones were likely overfilled or the edges were not sealed firmly enough. A dab of egg wash on the edges before sealing helps them bond more securely.
Baker’s Tips
- Drain the ricotta overnight without fail. Place it in a cheesecloth-lined sieve over a bowl in the refrigerator. Even ricotta labeled ‘dry’ or ‘firm’ benefits from draining. A wet filling is the number one reason sfogliatelle collapse.
- Use a pasta machine if you have one. Rolling the dough by hand thin enough is possible but extremely difficult. The dough needs to be nearly translucent and a pasta machine gives you consistent, even thickness on every pass.
- Keep everything cold. The laminated dough log must be cold and firm before slicing, the shaped cones should go back into the refrigerator while you work through the batch, and the filling should be cold when piped. Warm dough becomes sticky and the layers fuse together.
- The lard should be soft like room-temperature butter, not greasy or liquid. If your kitchen is warm and it is starting to melt, refrigerate it briefly before using. Proper consistency is critical for clean layer separation.
- When shaping the cones, press from the inside out using your thumbs in a slow, spiraling motion. Do not rush or try to force the cone open all at once or you will tear through the layers. A practiced, gradual pressure is what creates that perfect ridged cone.
- Bake at a true 400°F (200°C). Use an oven thermometer to verify your oven temperature. Too cool and the lard will absorb into the dough before the layers can set apart. Too hot and the outside will burn before the inside is cooked through.
- Serve warm. Sfogliatelle are exponentially better fresh from the oven. If you are making them for guests, time the bake so they come out 20 to 30 minutes before serving.
Variations
- Sfogliatelle Frolle (shortcrust variation): Replace the laminated dough with a simple shortcrust pastry (300g flour, 150g butter, 80g sugar, 2 egg yolks, pinch of salt). Roll to 3mm thickness, cut into rounds, press into a muffin tin, fill, and bake at 375°F (190°C) for 20 minutes. The result is a softer, cookie-like shell that is much easier to make and still captures the beautiful filling.
- Chocolate and hazelnut filling: Replace 50g of the ricotta with Nutella and fold in 40g of finely chopped toasted hazelnuts. Reduce the sugar by 30g to compensate for the sweetness of the spread.
- Lemon and pistachio: Replace the orange zest with the zest of 2 lemons, omit the cinnamon, and fold 60g of finely ground toasted pistachios into the finished filling for a bright, Sicilian-style variation.
- Mini sfogliatelle: Slice the dough log into thinner 1/2-inch (1.2cm) rounds and shape into smaller cones. Makes approximately 24 to 28 bite-sized shells. Reduce the bake time to 18 to 20 minutes.
Troubleshooting & FAQ
My layers are not separating – the shell looks solid instead of fanned and layered. What went wrong?
My filling is leaking out all over the baking sheet. How do I stop this?
The dough kept tearing when I was trying to stretch it thin enough. What am I doing wrong?
My sfogliatelle turned out soft and chewy the next day instead of crisp. Can I fix them?
My ricotta filling is grainy and lumpy rather than smooth and creamy. How do I fix it?
Storage & Make-Ahead
- Storage: Sfogliatelle are best eaten within 2 hours of baking when the shells are at their crispest. Store leftovers uncovered (not in an airtight container, which traps steam and softens the layers) at room temperature for up to 1 day. Reheat in a 350°F (175°C) oven for 8 to 10 minutes or in an air fryer at 350°F for 5 minutes to restore crunch. The uncooked dough log and shaped unfilled cones can be refrigerated for up to 3 days. Shaped unfilled cones can also be frozen for up to 1 month and baked from frozen with an additional 5 minutes of bake time.
- Make-Ahead: This recipe is ideal for breaking into stages. Day 1: drain the ricotta, make and laminate the dough, form the log, and prepare the filling. Everything can then sit refrigerated overnight. Day 2: slice, shape, fill, and bake. The laminated dough log can be refrigerated for up to 3 days or frozen for up to 1 month. The ricotta filling can be made up to 2 days ahead and kept refrigerated.


oh wow, these sound absolutely heavenly and honestly kind of intimidating in the best way? ive always been nervous about laminated dough but the way you describe it makes me want to try, especially since i could use these for the school holiday potluck and feel like i actually know what im doing for once. that ricotta and semolina filling with the orange sounds like something that would make even the pickiest kid actually sit down and eat something real instead of just grabbing whatever’s convenient, which trust me is half the battle. definitely bookmarking this one.
I love your enthusiasm, Sandra! Honestly, laminated dough is just patience and cold butter, and it’s so worth it once you see those layers puff up. I’ve had the same nerves with fancy pastry work, but I started keeping my workspace cool and my hands quick, which made a huge difference. These would be stunning for a special occasion, and the allulose version means you can enjoy them without the sugar crash.
My grandmother used to make these for special occasions, and I remember watching her fold the dough with this meditative focus, like she was telling the butter a story. I’ve been experimenting with allulose versions since getting into baking more seriously, and honestly, the laminated technique becomes almost meditative once you stop worrying about perfection – cold butter and patience are really all you need, just like Sage said. Would love to hear how these turn out for you, Sandra, because there’s something meaningful about making something that requires you to slow down.