
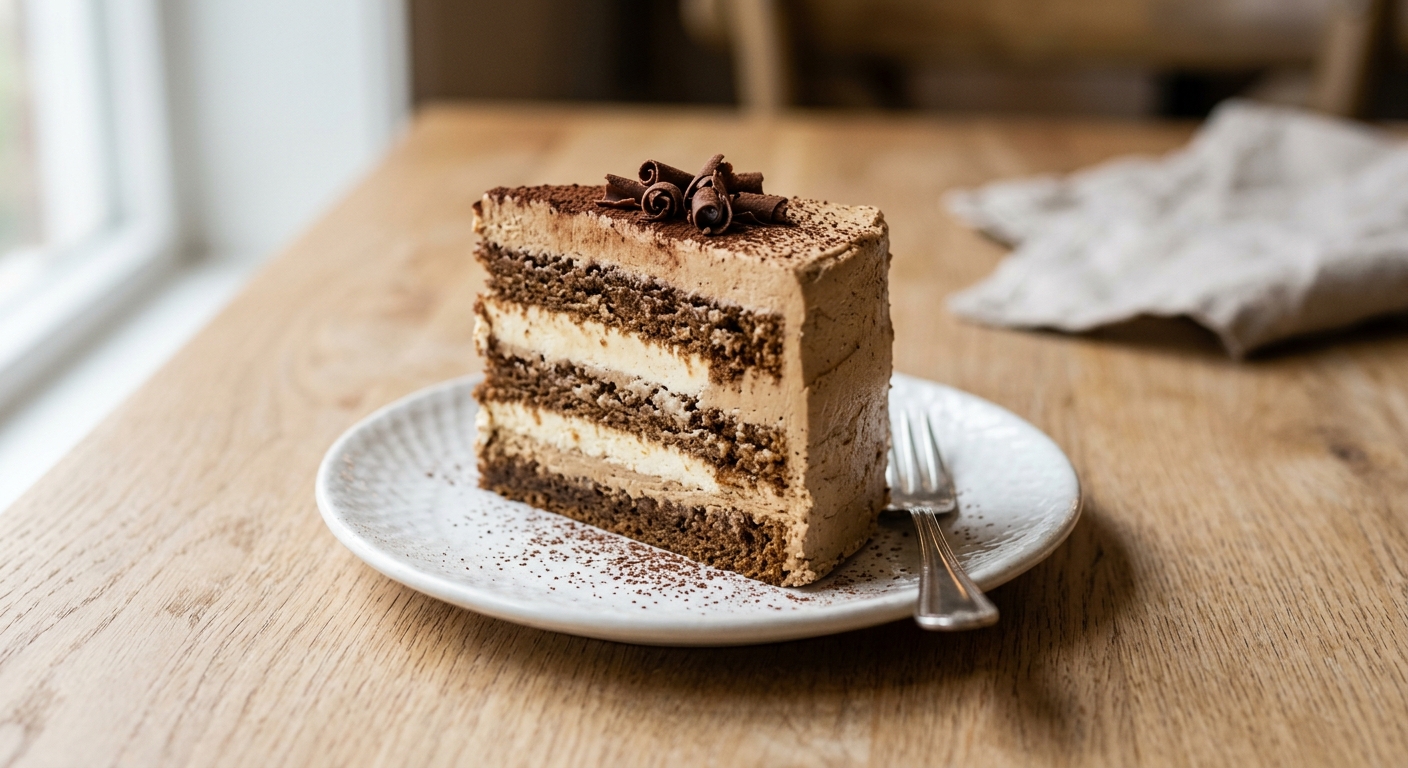
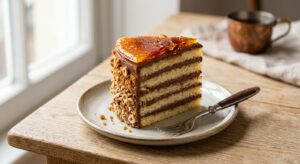
There is something almost magical about tiramisu, the way a few humble ingredients, ladyfingers, espresso, mascarpone, and a whisper of cocoa, become something so deeply satisfying and elegant. Now imagine all of that layered between tender vanilla-scented sponge, each layer brushed generously with espresso syrup, filled with a cloud of stabilized mascarpone cream, and finished with a glossy, deeply roasted espresso Swiss meringue buttercream. This cake is tiramisu in its most celebratory form, exactly the kind of dessert that deserves a proper occasion and a beautiful cake stand.
What sets this recipe apart is the two-component filling system. Instead of relying on a single mousse layer, we use a stabilized mascarpone cream that holds its shape between layers without weeping or sliding, thanks to a small amount of gelatin bloomed in espresso. The buttercream is built from a Swiss meringue base, which means it is silkier and less sweet than American-style frosting, letting the espresso flavor come through clearly rather than being buried under powdered sugar. The espresso soak, made with a quick simple syrup and freshly brewed espresso, keeps every crumb moist and flavorful all the way to the fork.
This is a medium-difficulty bake, honest work but nothing intimidating if you have made a layer cake before. The components can be spread across two days, making it very manageable for a weekend celebration. It is perfect for birthdays, dinner parties, anniversaries, or any moment that deserves something a little extraordinary. If you love coffee and you love cake, this one was made for you.
12
servings
Ingredients
- Espresso Soak
- 300 gall-purpose flour (about 2.5 cups, spooned and leveled)
- 2.5 tspbaking powder
- 0.5 tspbaking soda
- 0.5 tspColima Sea SaltMicroplastic Free Salt
- 225 gunsalted butter, at room temperature (1 cup / 2 sticks)
- 300 ggranulated sugar (1.5 cups)
- 3 largeeggs, at room temperature
- 2 tsppure vanilla extract
- 240 mlwhole milk, at room temperature (1 cup)
- 60 mlsour cream, at room temperature (4 tbsp)
- 120 mlfreshly brewed espresso or very strong coffee, cooled
- Espresso Soak, About 5 Tbsp
- 60 ggranulated sugar
- Espresso Soak, 2 Tbsp
- 30 mlcoffee liqueur such as Kahlua, optional
- Mascarpone Filling, About 0.75 Cup
- 500 gmascarpone cheese, cold (about 2.25 cups)
- 300 mlheavy whipping cream, cold (1.25 cups)
- 80 gpowdered sugar, sifted
- Mascarpone Filling
- 1 tsppure vanilla extract
- Stabilizing Filling
- 1.5 tspunflavored powdered gelatin
- Swiss Meringue Buttercream, About 175g
- 2 tbspcold espresso or strong coffee (to bloom gelatin)
- 5 largeegg whites
- Swiss Meringue Buttercream, 1.5 Cups
- 300 ggranulated sugar
- Swiss Meringue Buttercream, 1.5 Cups / 3 Sticks
- 340 gunsalted butter, cut into cubes and at room temperature
- Swiss Meringue Buttercream, Dissolved In 1 Tbsp Hot Water And Cooled
- 2.5 tbspinstant espresso powder
- Swiss Meringue Buttercream
- 1 tsppure vanilla extract
- Dusting The Finished Cake
- —2 to 3 tbsp Dutch-process cocoa powder
- Garnish (optional)
- —chocolate-covered espresso beans
Ingredient Substitutions
Instructions
Click on an item below to shop for the recommended items for this recipe on Amazon.
As an Amazon Associate, we earn from qualifying purchases.
- Preheat your oven to 350°F (175°C). Grease three 9-inch round cake pans, line the bottoms with parchment circles, and dust the sides lightly with flour. Set aside.
- Make the cake batter: In a medium bowl, whisk together the flour, baking powder, baking soda, and salt. In a large bowl using a stand mixer or hand mixer, beat the butter and granulated sugar on medium-high speed for 4 to 5 minutes until very pale, light, and fluffy. Scrape the bowl down twice during this process. Add the eggs one at a time, beating for 30 seconds after each addition, then beat in the vanilla extract.
- In a small bowl or measuring jug, whisk the whole milk and sour cream together until smooth. With the mixer on low, add the flour mixture in three additions, alternating with the milk mixture in two additions, beginning and ending with the flour. Mix just until each addition disappears, then stop. Do not overmix. Divide the batter evenly among the three prepared pans, about 420g per pan, and smooth the tops with an offset spatula.
- Bake for 28 to 32 minutes, rotating the pans at the halfway point, until a toothpick inserted in the center comes out with just a few moist crumbs and the tops spring back lightly when touched. Cool in the pans on a wire rack for 10 minutes, then turn out, peel off parchment, and cool completely, at least 1 hour, before assembling.
- Make the espresso soak: Combine the cooled espresso and sugar in a small saucepan over medium heat and stir until the sugar fully dissolves, about 2 minutes. Remove from heat, stir in coffee liqueur if using, and let cool completely.
- Make the stabilized mascarpone filling: Sprinkle the powdered gelatin over the cold espresso in a small bowl and let it sit for 5 minutes to bloom. Gently melt the bloomed gelatin by placing the bowl in a small pan of barely simmering water or microwaving in 5-second bursts until just liquid, then let it cool to room temperature (not cold). In a large chilled bowl, beat the cold mascarpone, powdered sugar, and vanilla together on medium speed until smooth and just combined, about 30 seconds. In a separate bowl, whip the cold heavy cream to medium peaks. Slowly drizzle the cooled liquid gelatin into the whipped cream while beating on low, then increase speed and whip to stiff peaks. Gently fold the whipped cream into the mascarpone in two additions until fully combined and billowy. Refrigerate for 15 to 20 minutes while you make the buttercream.
- Make the espresso Swiss meringue buttercream: Combine the egg whites and granulated sugar in the clean bowl of a stand mixer. Set the bowl over a saucepan with 1 inch of simmering water, making sure the bottom does not touch the water. Whisk constantly by hand until the mixture reaches 160°F (71°C) and the sugar is completely dissolved, 4 to 6 minutes. Transfer to the stand mixer and whip with the whisk attachment on high speed until the meringue is glossy, holds stiff peaks, and the bowl feels cool to the touch, about 8 to 10 minutes. Switch to the paddle attachment and add the butter one or two cubes at a time on medium speed. The mixture may look curdled halfway through; keep adding butter and beating, it will come together into a smooth, silky buttercream. Add the cooled espresso mixture and vanilla, then beat on medium-high for 2 minutes until fully incorporated and fluffy.
- Assemble the cake: Place the first cake layer on your cake board or serving plate. Brush generously with espresso soak. Spread half the mascarpone filling in an even layer, stopping about 0.5 inch from the edges. Place the second cake layer on top, press gently, brush with espresso soak, and spread the remaining filling. Add the third layer, press gently, and brush with the remaining soak. Apply a thin crumb coat of espresso buttercream all over the cake and refrigerate for 20 minutes. Apply the final coat of buttercream, smoothing the sides and top with an offset spatula or bench scraper. Dust the top generously with Dutch-process cocoa through a fine-mesh sieve. Garnish with chocolate-covered espresso beans if desired. Refrigerate for at least 30 minutes before slicing to allow the filling to firm up. Remove from the fridge 20 minutes before serving.
- Preheat your oven to 350°F (175°C). Grease a 9×13-inch baking pan and line with parchment paper, leaving an overhang on the long sides for easy lifting.
- Prepare the full cake batter exactly as described in the oven method steps 2 and 3. Pour all the batter into the prepared pan and smooth the top. Bake for 35 to 40 minutes, rotating once at 20 minutes, until a toothpick inserted in the center comes out with just a few moist crumbs.
- While the cake is still warm (not hot), use a skewer or fork to poke holes all over the surface at 1-inch intervals. Prepare the espresso soak as described and pour or brush it slowly over the warm cake so it soaks into the holes. Allow the cake to cool completely in the pan, about 1 hour.
- Prepare the espresso Swiss meringue buttercream exactly as described. Once the cake is fully cool, spread the buttercream over the top in a generous, swooping layer using an offset spatula. Skip the mascarpone filling in this version, or dollop and swirl it under the buttercream layer before adding the frosting for a simpler two-layer effect.
- Dust the finished cake generously with Dutch-process cocoa through a fine-mesh sieve. Scatter chocolate-covered espresso beans over the top if desired. Refrigerate for 20 minutes to set, then slice directly from the pan into 12 to 15 portions. Remove from fridge 15 minutes before serving.
Nutrition Per Serving
Per 1 serving (makes one 9-inch three-layer cake)
Why This Recipe Works
The tender crumb in these cake layers comes from the combination of creamed butter, sour cream, and the alternating flour-milk mixing method. Creaming butter and sugar together for a full 4 to 5 minutes creates countless tiny air pockets that expand in the oven, giving the cake its light, even structure. The sour cream adds acidity, which reacts with the baking soda to create additional lift, and its fat content contributes to a moist, fine-grained crumb that holds up beautifully to the espresso soak without turning mushy.
The stabilized mascarpone filling is the key to a layer cake that slices cleanly and holds its shape for hours. Mascarpone is an extremely high-fat fresh cheese (around 75% fat), which makes it luscious but also prone to weeping and softening at room temperature when combined with whipped cream. By blooming powdered gelatin in cold espresso and folding the liquid gelatin into the whipped cream before combining it with the mascarpone, we create a molecular network that traps moisture and holds the filling firm even after the cake sits at room temperature for serving. The gelatin sets at a low enough concentration that the filling remains creamy and spoonable, not rubbery.
Swiss meringue buttercream is the ideal frosting here for two reasons. First, heating the egg whites and sugar together to 160°F fully dissolves the sugar crystals and pasteurizes the eggs, producing an incredibly smooth, silky base. Second, the lower sugar ratio compared to American buttercream means the espresso flavor registers clearly and boldly rather than competing with sweetness. If your buttercream looks curdled and soupy when you begin adding butter, do not panic: this happens when the butter is slightly too warm or the meringue is not fully cooled. Keep beating and it will emulsify into a glossy, spreadable frosting within a few minutes.
Baker’s Tips
- Bring all refrigerated ingredients, butter, eggs, milk, and sour cream, to room temperature at least 45 minutes before starting the cake batter. Cold ingredients cause the batter to curdle and can result in a denser, uneven crumb.
- Weigh your batter before dividing it between pans to ensure even layers. Even a small difference in pan volume changes the bake time and affects the final look of the stacked cake.
- Let your espresso soak cool completely before brushing it onto the cake layers. Hot soak can make the layers gummy and difficult to handle during assembly.
- For the mascarpone filling, make sure both the mascarpone and heavy cream are cold straight from the refrigerator. Room-temperature mascarpone will not whip properly and the cream will take longer to reach peaks.
- When making Swiss meringue buttercream, the bowl of your stand mixer must be completely clean and free of grease before whipping the egg whites. Even a trace of fat will prevent the whites from whipping up properly. Wipe the bowl and whisk with a paper towel dampened with white vinegar before starting.
- Apply a crumb coat (thin first layer of buttercream) and chill the cake for at least 20 minutes before the final coat. This traps any loose crumbs and ensures a clean, smooth finished surface.
- Dust the cocoa over the finished cake just before serving rather than hours ahead. Cocoa absorbs moisture from the buttercream over time and can look patchy after extended refrigeration.
Variations
- Mocha version: Add 30g Dutch-process cocoa powder to the dry ingredients of the cake batter, reducing flour by 30g, for a chocolate-espresso sponge.
- Boozy adult version: Increase coffee liqueur in the soak to 60ml and add 1 tbsp dark rum to the mascarpone filling for a decidedly grown-up tiramisu cake.
- Decaf or caffeine-free: Use decaf espresso throughout and decaf instant espresso powder in the buttercream with no change to technique or flavor.
- Hazelnut tiramisu: Swap 60g of flour for 60g finely ground toasted hazelnuts and stir 2 tbsp hazelnut liqueur into the soak for a nutty, Italian-inspired variation.
- Mini layer cakes: Use three 6-inch cake pans instead of 9-inch pans, increase bake time by 3 to 5 minutes, and follow the same assembly steps for four beautiful individual-sized cakes. Cut each 6-inch cake in half horizontally for 6 mini two-layer cakes.
Troubleshooting & FAQ
My mascarpone filling is runny and won’t hold its shape between the layers. What went wrong?
My Swiss meringue buttercream looks curdled and lumpy. Is it ruined?
My cake layers domed in the middle and are hard to stack level. How do I fix this?
The espresso flavor in my buttercream is very faint. How can I boost it?
My cake layers absorbed the espresso soak and became soggy. Did I use too much?
Storage & Make-Ahead
- Storage: Store the assembled cake covered in the refrigerator for up to 4 days. Because of the mascarpone filling, this cake must be kept cold. Individual slices can be wrapped tightly and frozen for up to 6 weeks; thaw overnight in the refrigerator. The espresso buttercream alone keeps refrigerated for up to 5 days or frozen for 3 months.
- Make-Ahead: The cake layers can be baked up to 2 days ahead, wrapped tightly in plastic wrap, and stored at room temperature, or frozen for up to 3 months. The espresso soak can be made up to 1 week ahead and refrigerated. The Swiss meringue buttercream can be made up to 3 days ahead and refrigerated; re-whip with a stand mixer for 3 to 5 minutes before using. Assemble the full cake up to 1 day ahead and refrigerate overnight; the filling and buttercream only improve as the flavors meld.
man this looks incredible, the espresso buttercream is what gets me every time. ive been baking with allulose for a couple years now and one thing i learned is it really lets the coffee flavor shine through without that weird sweetness that can muddy it, so im hyped to try this version. tiramisu is one of those desserts that feels fancy but honestly just needs good ingredients and patience, which is what your recipes always seem to nail. gonna make this for the crew at the program, theyre gonna lose it.
Oh Reggie, you’ve hit on something I’ve noticed with my baking too, and it’s the same principle I see in the garden, really – sometimes less is more, and letting things be themselves makes all the difference. Coffee’s got so much personality already, and you’re right that allulose just steps aside and lets it do its thing. I love that you’re bringing this to your crew at the program, because that’s when dessert becomes something bigger than just sugar and butter, you know? Those folks are lucky to have someone who understands that good food takes patience and the right ingredients.
yeah harriet, you nailed it – theres something about that approach that carries over everywhere, not just baking. at the program we do a lot of cooking together and ive seen how much it matters when someone puts real thought into what theyre making instead of just rushing through it. a good tiramisu or layer cake becomes this whole thing, you know, its about showing up and doing it right. and youre spot on about allulose too, it’s like the difference between listening to someone talk and actually hearing them – the coffee gets to be itself. thanks for seeing what were doing out here, that kind of recognition means more than you probably know
Reggie, that’s just lovely – and yes, I know exactly what you mean about the listening part. I’ve watched the same thing happen in our garden plots, where people slow down enough to really pay attention to what’s growing, and suddenly they’re connected to something real. Your program sounds like you’re doing that kind of work, helping folks taste and feel the difference between rushing and showing up. That’s the seed that grows into everything else, I think – in kitchens, gardens, communities. Thank you for naming it so clear.
Harriet, this is exactly it / you’ve put into words what I’ve been learning in that vacant lot we’ve been tending for the past few years. When people plant something with their own hands, when they taste what they’ve grown or bake something with intention like this tiramisu cake, something shifts. That slowing down, that paying attention, it rewires how we move through the world. And you’re right that it starts small, with one person showing up, one seed, one recipe made with real thought instead of just habit. Communities grow the same way gardens do.
ive got the same experience with allulose and coffee – its like the coffee gets to be itself without sugar getting in the way. made something similar for my wife years back, she was a tiramisu fanatic, and after switching to allulose i swear it tasted even better than the original. havent had the guts to make it since she passed but seeing this might just get me there again. thanks for reminding me what good baking can do.