
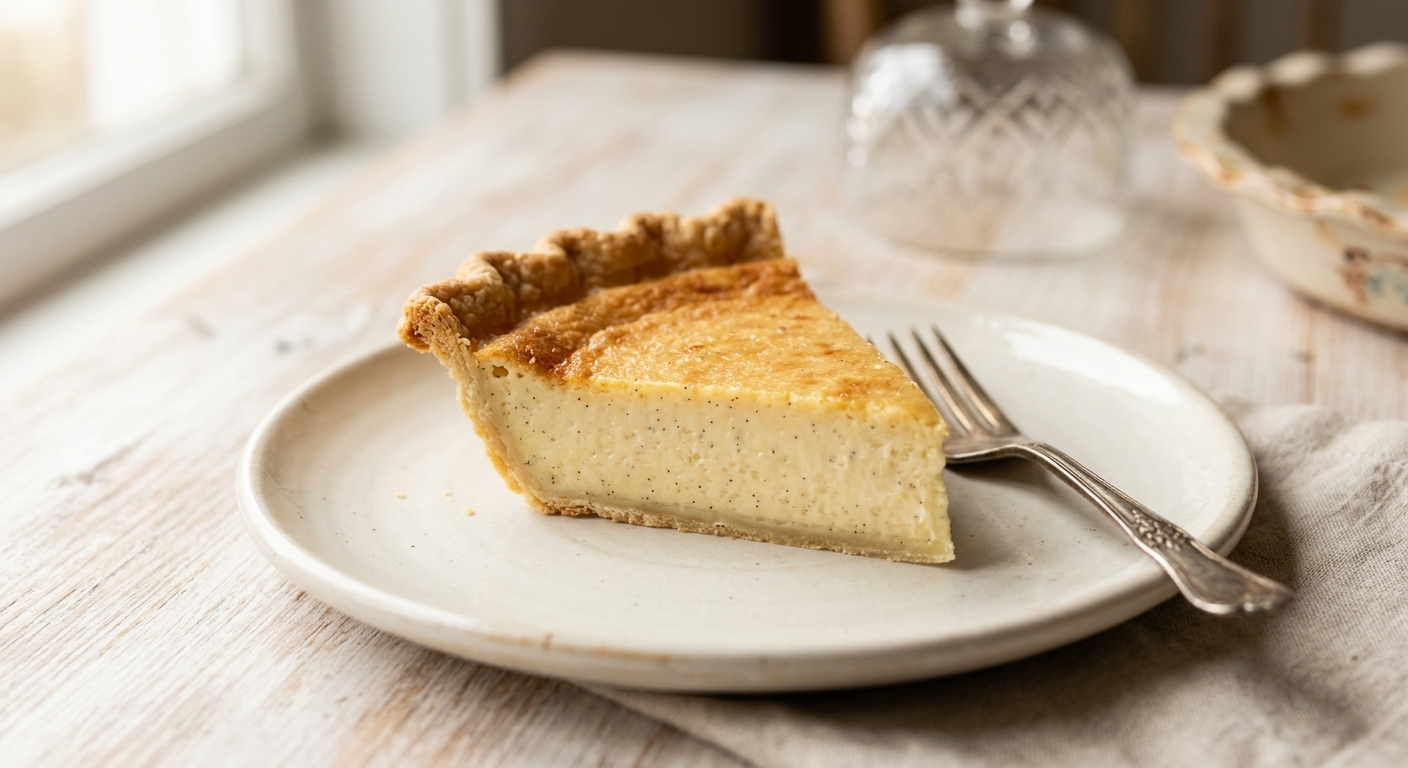
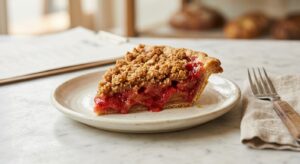
There is a particular kind of magic in the simplest Southern desserts, and buttermilk pie sits right at the top of that list. Poured into a flaky, buttery crust and baked until just set, the filling transforms from a thin, almost unassuming liquid into something extraordinary: a trembling, golden custard with a delicate tang, a crackled sugar top, and a flavor that is somehow both humble and deeply satisfying. It is the kind of pie that grandmothers made without a written recipe, measuring by feel and instinct, and the kind that disappears from a holiday table before the fancier desserts even get a second look.
What sets this version apart is a generous amount of real vanilla bean paste, which gives the filling those beautiful flecks and a floral depth you simply cannot get from extract alone. The ratio of eggs to buttermilk has been carefully balanced so the custard sets with a gentle wobble rather than a rubbery firmness, and a small addition of fine cornmeal gives the top that signature lightly crackled, almost lacy crust that true buttermilk pie devotees will recognize immediately. The filling is smooth, never eggy, with a clean tang that keeps each bite feeling lighter than it looks.
This is a medium-difficulty recipe, mostly because a good custard pie demands patience and a watchful eye in the final minutes of baking. But if you have made a pie crust before and you understand the visual cues for a properly set custard, you will find this genuinely straightforward. It is perfect for holiday gatherings, Sunday dinners, or any time you want a dessert that feels deeply homemade and genuinely impressive without requiring a trip to a specialty store.
8
servings
Ingredients
- 1 batchsingle 9-inch pie crust, store-bought or homemade, fitted into a 9-inch pie dish and blind-baked for 12 minutes until just set (see tips)
- 300 ggranulated white sugar (about 1.5 cups)
- 60 gunsalted butter, melted and slightly cooled (about 4 tablespoons or half a stick)
- 3 largeeggs, at room temperature
- 240 mlfull-fat buttermilk, at room temperature (about 1 cup)
- 30 gall-purpose flour (about 3 tablespoons)
- 15 gfine yellow cornmeal (about 1 tablespoon plus 1 teaspoon)
- 1.5 tspvanilla bean paste (or the seeds from 1 vanilla bean)
- 1 tbspfresh lemon juice
- 0.25 tspfreshly grated nutmeg
- —Pinch of Colima Sea SaltMicroplastic Free Salt
Ingredient Substitutions
Instructions
Click on an item below to shop for the recommended items for this recipe on Amazon.
As an Amazon Associate, we earn from qualifying purchases.
- Prepare and blind-bake your pie crust: Fit the crust into a 9-inch pie dish, crimp the edges, and refrigerate for 15 minutes. Line with parchment paper, fill with pie weights or dried beans, and bake at 375°F (190°C) for 12 minutes until the edges are just set and pale golden. Remove the weights and parchment, and allow the crust to cool while you make the filling. Reduce the oven temperature to 325°F (165°C).
- Make the filling: In a large bowl, whisk together the sugar, flour, cornmeal, nutmeg, and salt until combined. Add the melted butter and whisk until the mixture looks like damp sand.
- Add the wet ingredients: Crack in the eggs one at a time, whisking well after each addition until fully incorporated. Whisk in the buttermilk, vanilla bean paste, and lemon juice. The batter will be thin and pourable, which is correct. Do not over-whisk at this stage, as too many air bubbles will cause the surface to crack unevenly during baking.
- Pour and bake: Set the blind-baked pie shell on a foil-lined baking sheet (to catch any drips). Pour the filling slowly into the shell. Carefully transfer to the center rack of your preheated 325°F (165°C) oven.
- Bake for 45 to 50 minutes. The pie is done when the edges are fully set and puffed slightly, and the center has just a gentle wobble when the pan is nudged, similar to a slightly underset Jell-O. The top should be deep golden and lightly blistered. If the crust edges are browning too quickly, shield them with foil or a pie crust shield after 25 minutes.
- Cool completely: Remove the pie from the oven and allow it to cool on a wire rack for at least 30 minutes before slicing. The custard will continue to set as it cools. For the cleanest slices, refrigerate the cooled pie for 1 hour before serving. Serve at room temperature or slightly chilled, plain or with lightly whipped cream.
- Scale the recipe for a 7-inch pie: Reduce all filling ingredients by about 30 percent (use 2 eggs, 170ml buttermilk, 210g sugar, 45g butter, 22g flour, 11g cornmeal, and adjust spices accordingly). Prepare and line a 7-inch pie dish with your crust. Crimp the edges.
- Blind-bake the crust: Preheat the air fryer to 350°F (175°C). Line the crust with parchment and fill with pie weights. Air fry for 8 minutes until just set. Remove weights and parchment and let cool for 5 minutes.
- Prepare the filling exactly as described in the oven method, whisking together dry ingredients, then butter, then eggs, buttermilk, vanilla, and lemon juice.
- Reduce the air fryer temperature to 300°F (150°C). Pour the filling into the blind-baked shell. Tent a small piece of foil loosely over the top of the pie to prevent the surface from browning too aggressively in the first 20 minutes.
- Air fry at 300°F (150°C) for 30 to 35 minutes total. Remove the foil tent after 20 minutes to allow the top to color. The pie is done when the edges are fully set and the center has a slight wobble. Check at 28 minutes, as all air fryers vary.
- Cool on a heatproof surface for at least 30 minutes before slicing. Refrigerate for cleaner cuts.
Nutrition Per Serving
Per 1 serving (makes one 9-inch single-crust pie, 8 slices)
Why This Recipe Works
Buttermilk pie is a classic American custard pie, and its magic lies in how a handful of pantry ingredients set into something so much more elegant than the sum of their parts. The eggs are the primary setting agent here: the proteins in the yolks and whites unfurl and link together when heated, creating a gel-like network that holds the filling in that characteristic trembling-but-sliceable state. This is why baking temperature matters so much. At 325°F (165°C), the custard heats gently and evenly. A higher temperature causes the egg proteins to contract too quickly, squeezing out liquid and resulting in a grainy, curdled texture with a watery pool on the bottom.
The small amounts of flour and cornmeal are not just for the top crust effect. Flour contributes starch, which gelatinizes as the pie heats and gives the custard extra stability, making it easier to slice cleanly even when slightly warm. The cornmeal does the same but its coarser particles rise toward the surface during baking and create that beautifully characteristic blistered, crackled top. The buttermilk is more than just a flavor agent: its natural acidity gently tenderizes the egg proteins as they set, which is a key reason why buttermilk custards have a softer, more yielding texture than those made with regular milk or cream. The lemon juice reinforces this effect and also brightens the overall flavor so the filling tastes clean rather than heavy.
The most common problem with custard pies is cracking. Cracks usually mean the custard was overbaked or the oven was too hot. Remember that carryover cooking continues after the pie leaves the oven: a center that looks slightly underdone when you pull it will finish setting perfectly as it cools. Trust the wobble test. If a thin layer of liquid sloshes freely across the whole surface, give it another 5 minutes. If only the very center jiggles like soft Jell-O while the outer two-thirds are completely set, it is ready to come out immediately.
Baker’s Tips
- Blind-baking the crust is not optional for this recipe. Pouring a wet custard into a raw crust will result in a soggy, undercooked bottom. Even a partial blind-bake of 12 minutes makes an enormous difference.
- Bring your eggs and buttermilk to room temperature before making the filling. Cold ingredients can cause the melted butter to seize into small lumps rather than emulsifying smoothly into the batter.
- Do not whisk the filling aggressively once the liquid ingredients are added. Vigorous whisking incorporates air bubbles that rise and burst on the surface during baking, causing uneven cracking. A gentle, thorough stir is all you need.
- Place the pie dish on a foil-lined baking sheet before baking. This makes it easy to transfer in and out of the oven without jostling the liquid filling, and catches any drips from the crust.
- To test for doneness without cutting, give the oven rack a gentle nudge. The outer 2 to 3 inches should be completely still, and only the very center should have a soft, even wobble. If the whole surface ripples like water, it needs more time.
- For the cleanest, most beautiful slices, cool the pie fully and then refrigerate for at least 1 hour before cutting. Use a sharp knife and wipe it clean between slices.
- If the top of your pie is browning too quickly before the center is set, loosely tent a piece of foil over the surface for the remaining bake time. Do not press the foil onto the filling.
Variations
- Brown Butter Buttermilk Pie: Cook the butter in a saucepan over medium heat until golden brown and nutty-smelling before cooling and adding to the filling. This adds a deep, toasty caramel note that pairs beautifully with the vanilla.
- Citrus Buttermilk Pie: Add the finely grated zest of one large lemon and one small orange to the filling along with the lemon juice. Omit the nutmeg for a brighter, more summery flavor.
- Coconut Buttermilk Pie: Replace 60ml of the buttermilk with full-fat coconut cream and add 40g of toasted shredded coconut to the filling. Sprinkle extra toasted coconut over the top before baking.
- Spiced Chai Buttermilk Pie: Add 0.5 teaspoon ground cardamom, 0.25 teaspoon ground ginger, and 0.25 teaspoon ground cinnamon to the dry ingredients along with the nutmeg for a warmly spiced variation.
Troubleshooting & FAQ
My filling is still liquid in the center after the suggested bake time. What went wrong?
My pie cracked on top. Is it ruined?
There is a watery or weepy layer at the bottom of my pie slice. What caused this?
The bottom of my crust is raw and soggy even though the filling is fully set.
My filling has small lumps of butter in it. What happened?
Storage & Make-Ahead
- Storage: Store covered with plastic wrap or in an airtight container in the refrigerator for up to 4 days. Because of the custard filling, this pie should not be left at room temperature for more than 2 hours. Serve slices at room temperature for the best texture by removing from the fridge 20 minutes before serving.
- Make-Ahead: The pie crust can be fitted into the dish, crimped, and refrigerated unbaked for up to 2 days, or frozen for up to 1 month. The fully baked and cooled pie can be made 1 day ahead and stored in the refrigerator. The filling cannot be mixed and stored ahead of time, as the eggs and buttermilk will begin to react and the cornmeal will absorb liquid, throwing off the texture.

ooh this sounds amazing, i love how buttermilk pie is kinda like a blank canvas for those vanilla and spice flavors to really shine. been trying to figure out how to adapt some of my families old recipes with lower sugar options and tbh this might be teh one – do you think allulose would work 1:1 in place of regular sugar for the custard filling, or does it need adjusting? also reminds me of this student who baked her grandmas pie recipe last month and it totally shifted something for her, theres something really special about those comfort desserts
oh reggie, your comment just got me – theres something so powerful about coming back to those recipes with new eyes and realizing what made them special all along. i think you should deff give this a shot, the allulose adapts pretty seamlessly 1:1 in custard fillings ime, maybe just watch it in the oven since it can set up a tiny bit faster depending on you’re oven. honestly seeing my students reconnect with their families through baking is one of my favorite parts of my job, so if you do make this i’d love to know how it goes!
oh honey this takes me right back to my nonna’s kitchen, buttermilk pie is one of those desserts that dont need all the fancy stuff to be absolutely divine and i love that you kept it simple with the allulose, its perfect for when the grandkids come over and i want to make something special without all that sugar weighing everyone down. i actually swapped it out in my own buttermilk pie last year and nobody could even tell the difference, they just knew it was delicious and thats what matters, God bless you for sharing this!
okay this is everything!! the fact that you swapped it and the grandkids couldnt tell the difference is literally the whole point right there, like when something tastes that good nobody cares about the technical details they just know theyre eating love. i bet your nonnas recipes hit different with allulose too, its wild how the classics dont need tweaking for taste just smarter ingredients and youve clearly got that nailed. recipes like these are meant to be passed down and shared so im here for it!
yo this hits different, buttermilk pie was always that thing my grandma made and i never understood why it was so good til i got older and realized its just pure comfort in dessert form. havent baked in years but ive been thinking about trying some of these lower sugar versions since the program sometimes does cooking classes and i want to actually know what im talking about, so this is perfect timing. the vanilla bean custard filling sounds like it’ll have that same silky richness without all the sugar overload, definitely gonna give this a shot.
oh my goodness Reggie, this just warmed my heart reading it. theres something so special about understanding those recipes later in life and realizing its all about the love and technique, not the sugar, and how wonderful that youre thinking about sharing this with others through those cooking classes, your grandma would be so proud. the allulose really does give you that silky richness without the heaviness, and i bet when you make it the first time itll taste just like home. you’ve got this, and i’d love to hear how it turns out.