
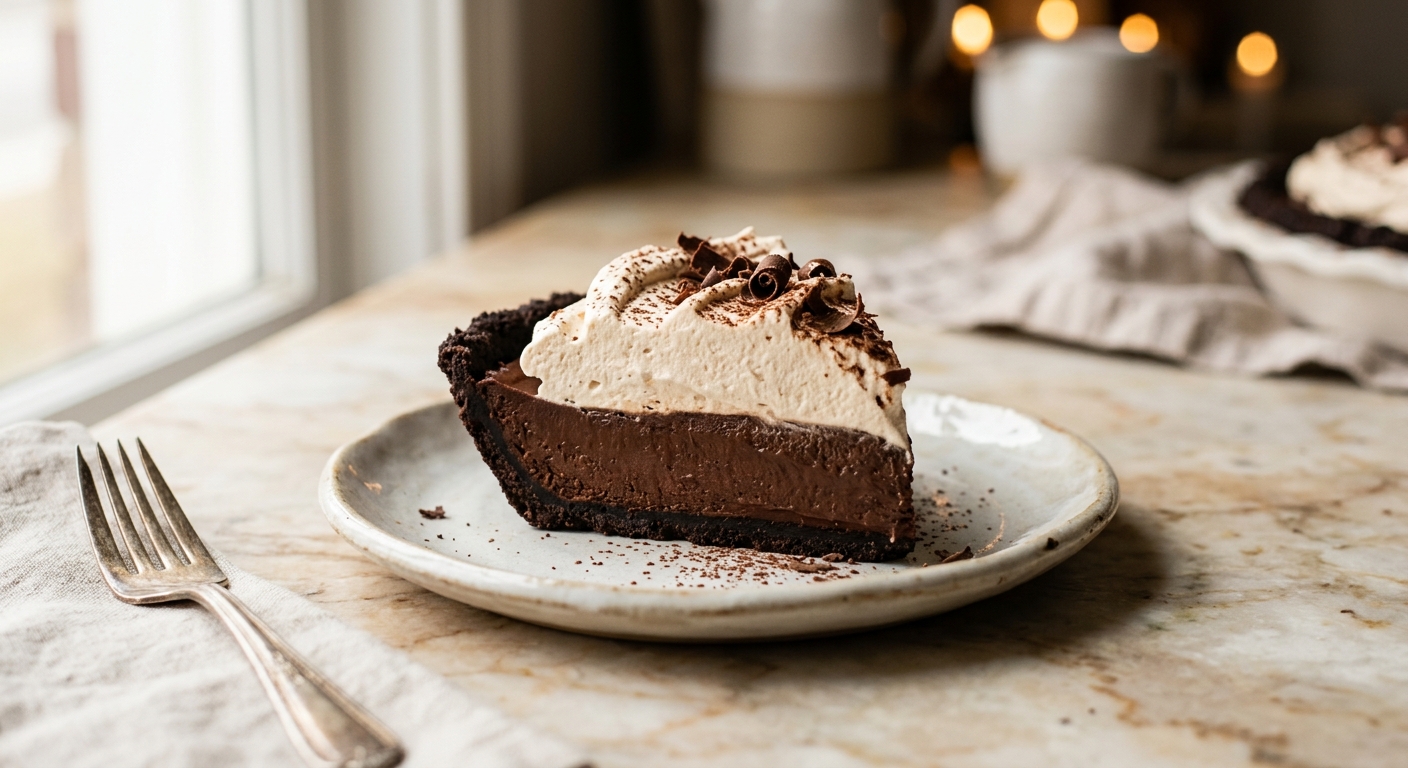
There is a particular kind of joy in slicing into a cream pie – that moment when the knife glides through billowy whipped cream and sinks into a filling so smooth and dark it looks almost like velvet. Dark Chocolate Silk Cream Pie is exactly that kind of dessert. The filling is intensely chocolatey without being cloying, rich without being heavy, and it holds a perfect, clean slice every single time. It is the sort of pie that disappears from the table before you have even found a fork for yourself.
What sets this version apart is the combination of a stovetop-cooked custard base and high-quality dark chocolate – at least 70% cacao – stirred in at the end. Cooking the egg yolks with cornstarch and sugar stabilizes the filling so it slices cleanly, while the dark chocolate brings a complex, slightly bitter depth that balances the sweetness beautifully. The crust is made from crushed chocolate wafer cookies blended with brown butter, which adds a nutty, caramel-like undertone that supports the filling without competing with it. The finishing touch is a brown sugar whipped cream that is just barely sweet and absolutely clouds of soft.
Despite the impressive results, this pie sits firmly in the medium difficulty range. The stovetop custard requires your attention and a little patience, but there are no finicky steps or special equipment beyond a saucepan and a whisk. It is perfect for a dinner party where you want dessert done ahead of time, a holiday table that already has the oven working overtime, or any weekend when you feel like treating yourself to something truly special.
10
servings
Ingredients
- Crust
- 280 gchocolate wafer cookies, finely crushed (about 2 1/4 cups crumbs, from one 9oz/255g package)
- 60 gunsalted butter (about 4 tbsp), browned and cooled slightly
- 20 ggranulated sugar (about 1 1/2 tbsp)
- 0.25 tspColima Sea SaltMicroplastic Free Salt
- 600 mlwhole milk (about 2 1/2 cups)
- 4 largeegg yolks, at room temperature
- Filling
- 150 ggranulated sugar (about 3/4 cup)
- 30 gcornstarch (about 3 1/2 tbsp)
- 25 gDutch-process cocoa powder (about 3 tbsp), sifted
- 0.5 tspColima Sea SaltMicroplastic Free Salt
- 170 gdark chocolate (70% cacao or higher), finely chopped (about 6 oz)
- 30 gunsalted butter (about 2 tbsp), cut into cubes
- 1.5 tsppure vanilla extract
- 360 mlheavy whipping cream (about 1 1/2 cups), cold
- Whipped Cream
- 25 glight brown sugar, packed (about 2 tbsp)
- 0.5 tsppure vanilla extract
- Garnish (optional)
- —Dark chocolate shavings or cocoa powder
Ingredient Substitutions
Instructions
Click on an item below to shop for the recommended items for this recipe on Amazon.
As an Amazon Associate, we earn from qualifying purchases.
- Preheat your oven to 350°F (175°C). In a medium bowl, stir together the chocolate wafer crumbs, granulated sugar, and salt for the crust. Add the browned butter and mix with a fork until the crumbs are evenly moistened and hold together when you press a clump between your fingers.
- Press the crumb mixture firmly and evenly into the bottom and up the sides of a 9-inch deep-dish pie plate. Use the flat bottom of a measuring cup to compact the base. Bake for 12 minutes, until the crust is set and fragrant. Transfer to a wire rack and let it cool completely before adding the filling, at least 30 minutes.
- While the crust cools, make the filling. In a medium saucepan, whisk together the egg yolks, sugar, cornstarch, cocoa powder, and salt until a smooth, thick paste forms. Gradually whisk in the whole milk, starting with just a splash to loosen the paste, then adding the rest in a steady stream. This prevents lumps.
- Place the saucepan over medium heat and cook, whisking constantly and reaching into the corners of the pan, until the mixture thickens and comes to a full, bubbling boil, about 8 to 11 minutes. Once it reaches a boil, continue whisking and cook for exactly 1 minute more. This step is important – it cooks out the starchy taste from the cornstarch and ensures the filling sets firmly.
- Remove the pan from the heat immediately. Add the finely chopped dark chocolate, the butter cubes, and vanilla extract. Whisk vigorously until the chocolate and butter are completely melted and the filling is glossy and smooth, about 1 to 2 minutes.
- Pour the warm filling through a fine-mesh strainer into the cooled crust, smoothing the top with a spatula. Press a sheet of plastic wrap directly onto the surface of the filling to prevent a skin from forming. Refrigerate for at least 4 hours, or overnight, until fully set and cold.
- When ready to serve, remove the plastic wrap. In a chilled bowl, whip the cold heavy cream with the brown sugar and vanilla extract using a hand mixer or stand mixer, starting on medium and increasing to medium-high, until soft-to-medium peaks form, about 2 to 3 minutes. Spread or pipe the whipped cream over the filling. Garnish with chocolate shavings or a dusting of cocoa powder if desired. Slice with a sharp knife wiped clean between cuts.
- In a medium bowl, stir together the chocolate wafer crumbs, granulated sugar, and salt. Add the browned butter and mix well until all the crumbs are evenly coated and hold together when pressed.
- Press the crumb mixture firmly into the bottom and all the way up the sides of a 9-inch deep-dish pie plate. Use the bottom of a flat measuring cup to compact it as tightly as possible, paying extra attention to the edges where the sides meet the base. Place the crust in the freezer for 30 minutes (or the refrigerator for 1 hour) until it is completely firm.
- While the crust chills, make the filling on the stovetop. In a medium saucepan, whisk together the egg yolks, sugar, cornstarch, cocoa powder, and salt into a smooth paste. Gradually whisk in the whole milk in a thin, steady stream to avoid lumps.
- Cook over medium heat, whisking constantly and reaching into the corners of the pan, until the mixture thickens and comes to a full boil, about 8 to 11 minutes. Once boiling, cook for 1 full minute more, whisking continuously. Remove from the heat and whisk in the chopped dark chocolate, butter cubes, and vanilla until smooth and glossy.
- Let the filling cool for 10 minutes, stirring occasionally, so it does not melt or soften the chilled no-bake crust. Then pour it carefully through a fine-mesh strainer into the firm cold crust. Smooth the top, press plastic wrap directly onto the surface, and refrigerate for at least 4 hours until fully set.
- Top with brown sugar whipped cream and garnish before serving. Because the no-bake crust is more delicate, run a thin spatula around the inner edge of the pie plate before slicing to help release clean pieces.
Nutrition Per Serving
Per 1 serving (makes one 9-inch deep-dish cream pie)
Why This Recipe Works
The heart of this pie is a classic pastry cream, adapted for chocolate. Cornstarch is the workhorse here – when heated with the egg yolks and liquid, the starch granules absorb moisture and swell dramatically, creating that thick, sliceable gel. The reason you must bring the mixture to a full boil and cook it for a full extra minute is to fully gelatinize the starch and, crucially, to destroy an enzyme in the egg yolks called alpha-amylase that would otherwise break down the starch and cause your filling to thin back out as it chills. Skipping that final boiling minute is the most common reason chocolate cream pie fillings do not set properly.
Adding the chopped dark chocolate off the heat rather than during cooking preserves its nuanced flavor compounds, which can turn bitter or flat with prolonged high heat. The small amount of butter stirred in at the end is an emulsifier and a texture agent – it adds gloss and a silky mouthfeel while also slightly softening the set, so the filling is firm enough to slice but melts luxuriously on the tongue. Using Dutch-process cocoa (rather than natural cocoa) in addition to the dark chocolate gives you a double layer of chocolate flavor: the cocoa builds a deep, dark base, while the chopped chocolate adds richness and complexity.
For the crust, browning the butter before mixing it with the crumbs is a small step with a big payoff. Brown butter contains hundreds of new flavor compounds created through the Maillard reaction, giving the crust a toasty, almost toffee-like depth that a plain melted butter crust simply cannot match. If your filling ever seems too loose after the full chill time, it almost certainly means the mixture was not brought to a true boil, or the proportions were altered. Trust the process, cook it to that bubbling boil, and it will set perfectly every time.
Baker’s Tips
- Use a heavy-bottomed saucepan for the filling so the heat distributes evenly and the custard does not scorch on the bottom before the center thickens.
- Whisk constantly and reach the corners and edges of the pan with every stroke. Cornstarch custards can form lumps or scorch spots in neglected areas very quickly.
- Chop your dark chocolate finely – pieces no larger than a chocolate chip. Smaller pieces melt more quickly and completely into the hot custard off the heat.
- Press the plastic wrap directly onto the surface of the filling while it chills. Even a thin air gap will result in a rubbery skin forming on top.
- Chill your bowl and whisk attachment in the freezer for 10 minutes before whipping the cream. Cold equipment means the cream reaches stiff peaks faster and holds them longer.
- For clean, bakery-style slices, dip your knife in hot water, wipe it dry, then make each cut. Repeat between every slice.
- Do not rush the chill time. Four hours is the true minimum, and overnight chilling produces a noticeably firmer, cleaner-slicing result.
Variations
- Mocha version: Add 1 tbsp of instant espresso powder to the milk mixture before cooking. The coffee deepens the chocolate flavor without tasting strongly of coffee.
- Mexican chocolate: Add 1 tsp ground cinnamon and a pinch of cayenne pepper to the filling along with the cocoa powder for a warmly spiced, gently heated version.
- Peanut butter swirl: Dollop 3 tbsp of creamy peanut butter over the warm filling as you pour it into the crust, then swirl gently with a skewer for a chocolate-peanut butter silk pie.
- Gluten-free crust: Use gluten-free chocolate sandwich cookies (filling removed) in place of the wafer cookies, same quantity and method.
Troubleshooting & FAQ
My filling did not set – it is still soft and pudding-like after chilling. What went wrong?
There are lumps in my chocolate filling. How do I fix this?
The crust is crumbling apart when I try to slice the pie. What did I do wrong?
My whipped cream deflated or turned watery after sitting on the pie for a few hours. What can I do?
My filling tastes faintly starchy or gluey. How do I prevent this?
Storage & Make-Ahead
- Storage: Cover the finished pie loosely with plastic wrap or a pie dome and refrigerate for up to 4 days. The whipped cream is best added the day of serving but will hold reasonably well for up to 2 days in the fridge. Do not freeze the finished pie as the custard filling and whipped cream do not thaw well.
- Make-Ahead: This pie is an excellent make-ahead dessert. The crust can be baked and cooled up to 2 days in advance and stored loosely covered at room temperature. The chocolate filling can be made and poured into the crust up to 2 days ahead – keep it covered in the refrigerator. Whip the cream and add it the day you plan to serve for the freshest presentation.


made something like this for my late wife years back, not low sugar of course, but man did she love it. the no-bake filling part is key – less fussing means more time to just sit with whoever youre sharing it with. been meaning to try this version with the allulose, figure its time i actually did. that brown sugar whipped cream sounds like it’d be perfect for bringing out the chocolate without all the extra sweetness.
This is the kind of dessert that actually makes sense to me, you know? Back home in Ghana, we don’t have as many options for treating sugar differently, so seeing something this elegant done with allulose feels like the best of both worlds. I made a version of this last month for my sister’s birthday and the brown sugar whipped cream was what really got everyone talking – there’s something about that caramel note that makes the dark chocolate sing even louder. Bob’s right about the no-bake part being key, and Diane, you’ve touched on something I think matters a lot: the time you save in the kitchen is time you actually get to spend with the people you’re feeding.
Oh Kofi, what you said about spending time with the people you’re feeding hits me right in the heart – that’s exactly it. My mom and I have had some of our best moments lately when I’m not stressed over timing or temperatures, just there with her, and a dessert like this feels so right for that. I love that you brought the brown sugar caramel note into conversation with dark chocolate, that’s such a beautiful observation, and I’m so glad your sister’s birthday was special. There’s something about sharing something made with intention and care that matters so much more than the ingredients list, you know?
okay this looks absolutely incredible and i love that theres no baking involved for the filling – that feels like such a win when youre trying to keep things simple but still want that wow factor. ive definitely learned through baking (and running, honestly) that the most impressive things dont always have to be complicated, they just have to be done with real intention. definitely making this for my partner’s birthday, the dark chocolate silk thing is speaking to me on every level.
oh this is so beautiful, diane – you’re totally right about intention being the whole thing. theres something about no-bake desserts that just feels more present, like you’re not stressed in the kitchen the whole time and you can actually enjoy the moment with the person you’re making it for. ive found the same thing with running actually, the ones that matter most arent about being perfect, theyre about showing up and paying attention. your partner is going to feel how much care went into this, that dark chocolate is going to taste like you took the time to get it right.
This comment just made me tear up a little, honestly. There’s something so real about what you’re saying here – that showing up and paying attention is the actual gift, not the perfection. I’ve baked a lot of things while going through treatment that turned out kind of wonky, and you know what? The people I made them for still got it. They felt the care. This pie especially strikes me as that kind of dessert because it’s so unapologetically rich and simple at once, no fussy decorating or stressing, just really good chocolate that says “I wanted you to have something special.” Your partner is lucky.