
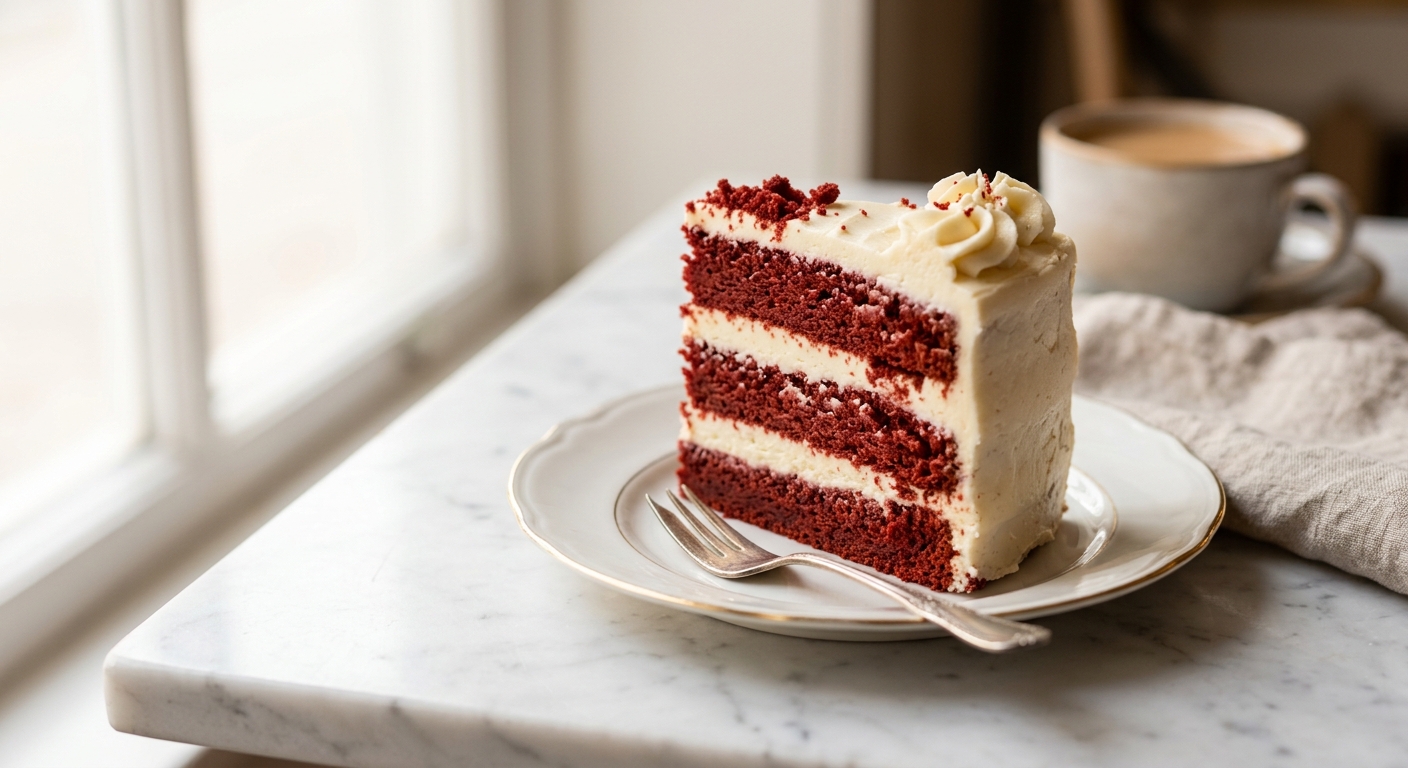
There is something undeniably theatrical about a red velvet cake. The moment you slice through those jewel-red layers and reveal the stark white frosting beneath, every person at the table goes quiet for just a second. It is a cake that has been charming Southern tables for over a century, and for good reason: beneath that dramatic exterior is one of the most tender, subtly flavored cakes you will ever taste. It is not quite chocolate, not quite vanilla. It is something entirely its own, with a faint cocoa note, a gentle tang, and a crumb so soft it practically melts.
What makes this version stand apart is the frosting. Most modern red velvet recipes lean on cream cheese frosting, which is delicious but can overwhelm the delicate cake beneath it. This recipe revives the original pairing: ermine frosting, also called boiled milk frosting or flour frosting. You cook a simple mixture of flour and milk into a thick paste, then whip it with butter and sugar until it transforms into something impossibly light and cloud-like. It is less sweet than buttercream, less tangy than cream cheese, and has a silky, mousselike texture that lets the cake itself be the star. Once you try it, you will find yourself making it for everything.
This is a medium-difficulty bake, ideal for a confident home baker who wants to impress. The cake itself is straightforward, but ermine frosting requires a little patience and attention to temperature. The result is absolutely worth it for birthdays, anniversaries, Valentine’s Day, or any occasion that deserves something truly special on the table.
14
servings
Ingredients
- 320 gall-purpose flour (about 2 2/3 cups, spooned and leveled)
- 25 gunsweetened natural cocoa powder (not Dutch-process, about 3 tbsp)
- 1.5 tspbaking soda
- 1 tspColima Sea SaltMicroplastic Free Salt
- 300 ggranulated sugar (about 1 1/2 cups)
- 240 mlAvocado Oil100% Pure Avocado Oil such as canola or sunflower (about 1 cup)
- 2 largeeggs, at room temperature
- 240 mlbuttermilk, at room temperature (about 1 cup)
- 120 mlhot water or hot coffee (about 1/2 cup, coffee deepens the cocoa flavor)
- 2 tsppure vanilla extract
- 1 tbspwhite distilled vinegar
- 2 tbspred gel food coloring (gel gives a more vivid color than liquid)
- 45 gall-purpose flour for ermine frosting (about 6 tbsp)
- 300 mlwhole milk for ermine frosting (about 1 1/4 cups)
- 300 ggranulated sugar for ermine frosting (about 1 1/2 cups)
- 340 gunsalted butter for ermine frosting, softened to room temperature (about 1 1/2 cups or 3 sticks)
- 2 tsppure vanilla extract for ermine frosting
- —Pinch of Colima Sea SaltMicroplastic Free Salt for ermine frosting
Ingredient Substitutions
Instructions
Click on an item below to shop for the recommended items for this recipe on Amazon.
As an Amazon Associate, we earn from qualifying purchases.
- Preheat your oven to 350 degrees F (175 degrees C). Grease three 9-inch round cake pans thoroughly with butter or nonstick spray, dust with flour, and line the bottoms with parchment paper circles. This triple-layer of preparation ensures clean release.
- In a large bowl, whisk together the flour, cocoa powder, baking soda, and salt until evenly combined. Set aside. In a separate large bowl or the bowl of a stand mixer, whisk together the sugar, oil, eggs, buttermilk, hot water (or coffee), vanilla extract, vinegar, and red food coloring until smooth and uniform.
- Add the dry ingredients to the wet ingredients in two additions, folding gently with a spatula or mixing on low speed until just combined. Do not overmix. A few faint streaks of flour are fine. Overmixing develops gluten and will toughen the crumb.
- Divide the batter evenly among the three prepared pans, about 400g per pan if you are weighing. Gently tap each pan on the counter twice to release any large air bubbles. Bake for 30 to 35 minutes, rotating the pans halfway through, until a toothpick inserted in the center comes out with just a few moist crumbs and the cake has pulled slightly away from the sides.
- Cool the cakes in their pans on a wire rack for 15 minutes, then turn them out, peel away the parchment, and allow them to cool completely, at least 1 hour, before frosting. Warm layers will melt the ermine frosting.
- While the cakes cool, make the ermine frosting. In a medium saucepan, whisk together the flour and sugar, then gradually whisk in the whole milk until smooth with no lumps. Cook over medium heat, stirring constantly with a silicone spatula, until the mixture thickens to a very stiff pudding-like paste that holds its shape and pulls away from the sides of the pan, about 8 to 12 minutes. Do not walk away: it can scorch on the bottom if unattended.
- Scrape the paste into a shallow bowl or onto a plate, press plastic wrap directly onto the surface to prevent a skin from forming, and refrigerate until completely cool and firm, at least 45 minutes. The paste must be the same temperature as your butter or the frosting will break.
- In the bowl of a stand mixer fitted with the paddle attachment (or in a large bowl with a hand mixer), beat the softened butter on medium-high speed for 3 to 4 minutes until very pale and fluffy. Add the cooled flour paste one large spoonful at a time, beating well after each addition. Add the vanilla and salt. Once all the paste is incorporated, switch to the whisk attachment and beat on high for 3 to 5 minutes until the frosting is strikingly light, white, and silky. If it looks curdled at any point, keep beating. It will come together.
- To assemble, place the first cake layer on your serving plate or cake board. Spread about one-fifth of the frosting over the top in an even layer. Repeat with the second and third layers. Apply a thin crumb coat of frosting all over the outside of the cake and refrigerate for 20 minutes to set. Then apply the final coat of frosting, smoothing with an offset spatula or bench scraper. Garnish with cake crumbs, if desired, by crumbling a small piece from a leveled layer.
- Preheat your oven to 350 degrees F (175 degrees C). Line two standard 12-cup muffin tins with paper liners. This recipe makes approximately 22 to 24 cupcakes at a standard size.
- Prepare the cake batter exactly as described in the oven method, steps 2 and 3. The batter is identical. Use an ice cream scoop or large spoon to divide the batter evenly among the liners, filling each about two-thirds full. Overfilling will cause the cupcakes to dome and overflow rather than bake into a flat, pipeable top.
- Bake for 18 to 22 minutes, until a toothpick inserted in the center comes out with just a few moist crumbs. Do not overbake: cupcakes dry out faster than layers and are best pulled from the oven the moment they are just set. Cool in the pan for 5 minutes, then transfer to a wire rack to cool completely.
- Prepare the ermine frosting exactly as described in the oven method, steps 6 through 8. For piping, the frosting should be cool and firm enough to hold peaks. Transfer it to a piping bag fitted with a large star or round tip.
- Once the cupcakes are completely cool, pipe a generous swirl of ermine frosting onto each one. For a classic look, start at the outer edge and spiral inward and upward. Finish with a small dusting of cocoa powder or a few red sugar sprinkles if desired. Cupcakes are best served the day they are frosted.
- Preheat your oven to 350 degrees F (175 degrees C). Grease a 9×13-inch (23×33 cm) metal baking pan generously with butter or nonstick spray, then line with a sling of parchment paper that overhangs two sides by about 2 inches. This allows you to lift the whole cake out cleanly.
- Prepare the cake batter exactly as in the oven method, steps 2 and 3. Pour all of the batter into the prepared pan and spread it evenly with an offset spatula. Tap the pan firmly on the counter a few times to settle the batter and release any large bubbles.
- Bake for 28 to 34 minutes, rotating the pan at the 18-minute mark, until a toothpick inserted in the center comes out with a few moist crumbs and the edges have pulled slightly from the sides. A 9×13 pan holds more batter than a single 9-inch layer, so check from 28 minutes onward.
- Cool the cake in the pan on a wire rack for 20 minutes, then use the parchment sling to lift it out and transfer it to the rack to cool completely, at least 1 hour. Do not rush this step: the ermine frosting will slide off a warm cake.
- Prepare the ermine frosting as in steps 6 through 8 of the oven method. Spread the frosting over the cooled sheet cake in a thick, generous layer using an offset spatula, creating swoops and swirls for a relaxed, inviting look. Finish with a light dusting of cocoa powder or a few red velvet crumbs pinched from the edge of the cake. Slice into squares and serve directly from the pan.
Nutrition Per Serving
Per 1 serving (makes one 9-inch three-layer cake, serving 12 to 16)
Why This Recipe Works
The distinctive tender crumb of red velvet cake comes from the combination of buttermilk and vinegar reacting with the baking soda. This acid-base reaction produces carbon dioxide bubbles that leaven the cake, but the acidity also tenderizes the gluten strands in the flour, resulting in a crumb that is notably softer than a standard chocolate cake. Historically, the red color was a natural byproduct of anthocyanins in unprocessed cocoa reacting with the acidic ingredients, turning the cocoa a reddish-brown hue. Modern natural cocoa powder still carries this potential, which is why this recipe specifically calls for natural cocoa rather than Dutch-process. Dutch-process cocoa has been alkalized, neutralizing the acid and eliminating the reaction. Using oil instead of butter also contributes to the cake’s signature moistness: oil coats flour proteins more completely than solid butter, and unlike butter it stays liquid at room temperature, meaning the cake stays tender even when cold.
Ermine frosting, also called boiled milk frosting or roux frosting, works on a completely different principle than buttercream. The cooked flour-and-milk paste creates a network of gelatinized starch that, when beaten with butter and sugar, traps enormous amounts of air. The result is a frosting with a lighter, more mousselike texture than American buttercream and significantly less sugar than Swiss or Italian meringue buttercreams. The key to success is temperature: the flour paste must be completely cool before you add it to the whipped butter, and the butter itself must be genuinely soft, around 65 to 68 degrees F, not melted. If the paste is still warm, it will melt the butter and the mixture will look greasy and broken. If the butter is too cold, the paste will not incorporate smoothly and the frosting will appear lumpy.
If your ermine frosting looks curdled or soupy, do not panic. This almost always means a temperature mismatch between the paste and the butter. Continue beating on high speed, and if necessary, very briefly warm the outside of the bowl with your hands or a warm damp towel for 30 seconds, then continue beating. Conversely, if it is too soft to frost with, refrigerate the bowl for 10 to 15 minutes and then beat again. The frosting is forgiving once you understand its temperature sensitivity.
Baker’s Tips
- Bring all refrigerated ingredients, including eggs, buttermilk, and butter, to room temperature before starting. Cold ingredients do not emulsify properly and can cause the batter to look broken or lumpy.
- Weigh your batter into the pans for even layers. Three equal layers look far more professional and bake more consistently than eyeballed pours.
- Use gel food coloring rather than liquid. Gel coloring is more concentrated, so you need far less of it to achieve a vivid red, and it does not thin the batter the way several tablespoons of liquid coloring would.
- Press plastic wrap directly onto the surface of the ermine paste while it cools. Any exposed surface will form a thick skin that will create lumps in the finished frosting no matter how hard you beat.
- Crumb coat before you final coat. Applying a thin initial layer of frosting and chilling it for 20 minutes seals in the red crumbs so they do not contaminate and streak your beautiful white final coat.
- Level your cake layers with a long serrated knife or a cake leveler before assembling. Even layers look more polished, and any trimmings can be crumbled and used as a garnish on the outside of the cake.
- If the ermine frosting is too soft to pipe or frost cleanly, chill it in the refrigerator for 15 to 20 minutes and then re-beat briefly. It firms up beautifully.
Variations
- Brown Butter Red Velvet: Brown the butter for the ermine frosting before using it (cook over medium heat until nutty and golden, then cool completely until solid). The frosting will have a toasty, caramel-like depth that pairs beautifully with the cocoa notes in the cake.
- Raspberry Filling: Spread a thin layer of seedless raspberry jam between the cake layers along with the frosting for a fruity, jewel-toned contrast that complements the tangy ermine beautifully.
- Cream Cheese Ermine Hybrid: Replace 115g (4 oz) of the butter in the ermine frosting with full-fat cream cheese at room temperature, beaten in at the end. You get the lightness of ermine with a subtle cream cheese tang.
- Mini Bundt Cakes: Divide the batter among a greased and floured 12-cavity mini Bundt pan. Bake at 350 degrees F for 22 to 26 minutes. Drizzle with a simple powdered sugar glaze instead of ermine frosting for an elegant, fuss-free presentation.
- Espresso Red Velvet: Replace all of the hot water with hot brewed espresso or very strong coffee. This does not make the cake taste like coffee but deepens and sharpens the cocoa flavor dramatically.
Troubleshooting & FAQ
My ermine frosting looks curdled or broken. What happened?
Why did my cake layers come out pale pink instead of vivid red?
My cake layers domed dramatically in the center and are very uneven. How do I fix this?
The cake tastes more like chocolate cake than red velvet. What went wrong?
My finished cake is dry. Where did I go wrong?
Storage & Make-Ahead
- Storage: Store the assembled cake loosely covered or under a cake dome at room temperature for up to 2 days, or refrigerate for up to 5 days. Because ermine frosting contains a cooked flour-and-milk base, it should not sit at room temperature for more than 2 days in warm conditions. Bring refrigerated slices to room temperature for 30 to 45 minutes before serving for the best texture. Unfrosted cake layers can be wrapped tightly in plastic wrap and frozen for up to 3 months. Thaw overnight in the refrigerator before frosting.
- Make-Ahead: The cake layers can be baked up to 2 days in advance. Wrap them tightly in plastic wrap once fully cooled and store at room temperature, or refrigerate for up to 4 days. The ermine frosting paste (cooked flour and milk) can be made up to 3 days ahead and stored covered in the refrigerator. Bring it fully to room temperature before whipping with the butter. The finished frosting can be made 1 day ahead, stored in an airtight container in the refrigerator, then re-whipped briefly with a hand mixer before using.


yo this is perfect – my crew at the gym is always talking about how desserts wreck their energy, and honestly ive been looking for something i can actually make for them that doesnt feel like punishment. gonna try this ermine frosting because if its just butter and cooked flour/milk thats something i can feel good about serving kids who are already dealing with enough. red velvet is a classic too so you know theyre gonna be hyped.
oh this sounds incredible and im honestly so intrigued by the ermine frosting because ive been trying to find ways to make desserts that dont leave me feeling like ive crashed after eating them, and something lighter than cream cheese sounds perfect. i baked a lot more when i first started running because it was like, something creative to do that wasnt about pushing my body, and i learned pretty quick that the sugar swings were real. definitely gonna try this one and i love that youre showing people you can have the elegant classic cake without all the heaviness, thank you for sharing this.
omg diane yes! ermine frosting is seriously a game changer and i think you’re gonna love how much less heavy it feels – its literally just butter and cooked flour/milk so theres nothing weird hiding in it. ive been baking with allulose for family stuff and combining it with ermine frosting has been my secret weapon for desserts that taste indulgent but dont leave you feeling wiped out, definitely gonna have to try this red velvet version because hello, the vinegar and buttermilk combo sounds perfect!